
Updated on Apr. 21, 2023
Position: Resource - Disk Utilities - How to Fix "Device Not Migrated" on Windows 11/10? [8 Fixes]
DiskGenius - A free disk partition manager for Windows PCs and Servers to partition hard disk, extend partition, migrate OS, image disk, wipe data, and more.
The "Device not migrated" error can be spotted in Device Manager: right-click the Start menu and choose Device Manager. Then locate and right-click the device that is malfunctioning and click "Properties". Click the "Events" tab and you can see the error:
"Device not migrated.
Device was not migrated due to a partial or ambiguous match."
or
"Device settings not migrated.
Device settings were not migrated from previous OS installation due to a partial or ambiguous device match."
or
"Device not migrated.
Device was not migrated due to partial or ambiguous match."

The symptoms of a "Device not migrated" error can vary depending on the device and the cause of the error. However, some common symptoms may include:
If you experience any of these symptoms, it may indicate that there is an issue with the device driver or the device itself. You should take steps to troubleshoot the issue, such as updating the device driver or connecting the device to a different computer to isolate the problem.
Why does the "device not migrated" error occur? The "device not migrated" error typically occurs in Windows when a device driver is not migrated during an operating system upgrade or update. This error message can appear when you try to use a device that was previously working fine but is no longer recognized by the computer.
The migration process is responsible for moving device drivers from the previous operating system to the new one. If a driver is not migrated during this process, it can result in the "device not migrated" error. Some common reasons why a device driver may not be migrated include:
To resolve this error, you can try reinstalling the device driver manually or using Windows Update to automatically install any available updates for the device. It's also a good idea to ensure that you have the latest version of the operating system installed, as this can help to prevent driver compatibility issues in the future.
Method #1: Connect the Device to a Different Port
Many devices on your computer are connected via USB ports, thus it is necessary to have a check if there is something wrong with the USB port.
Step 1. Disconnect the device from the USB port.
Step 2. Connect the device to a different USB port on the computer.
Step 3. Connect the device to a different computer if the step 2 does not work well.
Method #2: Scan for Hardware Changes in Device Manager
The Device Manager plays an important role in Windows operating system, and it provides a central and organized view of all installed hardware, such as CPU, hard disk, USB drives, mouse, keywords, printers, etc. In addition, it can also help us scan for hardware changes. Here are steps:
Step 1. Right-click the Start menu and click "Device Manager" option.
Step 2. Once the Device Manager is launched, you can view and select the device that was not migrated correctly.
Step 3. Click the "Action" tab on the menu area and choose "Scan for hardware changes". Then wait for the scanning to finish on its own.
Method #3: Run Hardware and Device Troubleshooter
Windows Troubleshooter is a built-in tool in the Windows operating system that helps to diagnose and resolve common problems related to the system and software applications. It is designed to provide an easy and automated way to identify and fix problems that may be affecting the performance and stability of your computer.
The Windows Troubleshooter can be used to diagnose and fix a wide range of issues, including problems with internet connections, audio and video playback, hardware and devices, printers and scanners, and more. It uses a set of automated tests to identify potential issues and then provides a series of recommended solutions to resolve them.
The Windows Troubleshooter can save time and effort by automating the process of identifying and fixing problems that might otherwise require manual troubleshooting or advanced technical expertise. It can help you keep your system running smoothly and efficiently and ensure that you get the most out of your Windows experience.
Thus, we can Windows Troubleshooter to fix the Device Not Migrated error, there are steps:
Step 1. Click Start > Settings > Update & Security > Troubleshoot > Additional troubleshooters.
Step 2. Click the device you want to repair and click "Run the troubleshooter" button.
Step 3. Follow the on-screen instructions to complete the troubleshooting process.
Method #4: Fix Faulty Drivers
The device not migrated error might be caused by faulty drivers, and you can try fixing drivers to get rid the error. Here are some general steps you can follow:
Step 1. Identify the problematic drive that is causing the issue.
Step 2. Update the driver: Once you have identified the problematic driver, try updating it. You can do this by visiting the manufacturer's website and downloading the latest version of the driver.
Step 3. Roll back the driver: If updating the driver doesn't work, you can try rolling back the driver to a previous version. This can be done by going to the Device Manager, selecting the problematic device, and clicking on the "Driver" tab. From there, you can choose the "Roll Back Driver" option.
Step 4. Reinstall the driver: If neither updating nor rolling back the driver works, you can try uninstalling and then reinstalling the driver. To do this, go to the Device Manager, select the problematic device, and click on the "Uninstall" option. Then, restart your computer and reinstall the driver either from the manufacturer's website or using a driver updater tool.
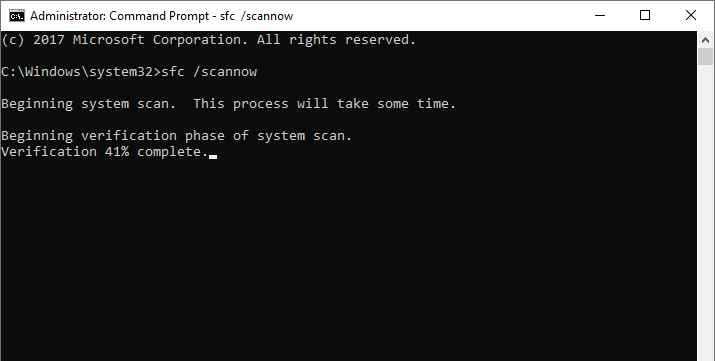
Method #5: Run SFC Scannow
The "SFC Scannow" command is a system tool that is available on Microsoft Windows operating systems. It stands for System File Checker, and its primary function is to scan and repair any corrupted or damaged system files.
When you run the SFC Scannow command, it will scan all protected system files on your computer, and if it finds any corrupted or damaged files, it will attempt to repair or replace them with the correct versions from the Windows operating system.
To run the SFC Scannow command, you can follow these steps:
Step 1. Open the Command Prompt as an administrator. You can do this by searching for "Command Prompt" in the Start menu, right-clicking on it, and selecting "Run as administrator".
Step 2. Once the Command Prompt window opens, type sfc /scannow and press Enter.
The SFC Scannow command will then start scanning your system files. This process can take some time to complete, depending on the size and complexity of your system.
When the scan is complete, the SFC Scannow command will display a message indicating whether any corrupted files were found and repaired.
Method #6: Install Windows Updates
It is generally recommended to install Windows updates to keep your system up-to-date with the latest security patches, bug fixes, and new features. Windows updates can help protect your computer from security vulnerabilities and keep it running smoothly.
While some users may prefer to delay or disable updates due to concerns about compatibility issues or system slowdowns, this can leave your computer at risk of security threats and other issues. It's important to regularly check for and install Windows updates to ensure that your system is secure and functioning properly.
Here are how to install Windows updates:
Step 1. Check for updates: Go to the Windows Start menu and click on "Settings" (gear icon). Click on "Update & Security" and then "Windows Update". Click on "Check for Updates" and wait for Windows to check for available updates.
Step 2. Download and Install updates: Once Windows has finished checking for updates, it will display a list of available updates. Click on the "Download" button to start downloading the updates. Once the download is complete, click on "Install" to install the updates. You may need to restart your computer after the installation is complete.
Step 3. Configure Automatic Updates: You can configure Windows to automatically download and install updates by clicking on "Advanced options" in the Windows Update settings. Under "Choose how updates are installed", select "Automatic (recommended)" to have updates automatically downloaded and installed in the background.
It's important to note that Windows updates can take some time to download and install, especially major updates like feature updates. Be sure to have a stable internet connection and keep your computer plugged in or charged to ensure that the update process is not interrupted. Additionally, if you encounter any errors during the update process, you may need to troubleshoot the issue or seek the assistance of a professional.
Method #7: Roll Back Windows to an Earlier State
Rolling back Windows to an earlier state can solve most system related issues, for example, restoring computer to a previous point when everything works smoothly. It's important to note that System Restore does not affect personal files such as documents, music, or photos, but it may remove installed applications, updates, or system configuration changes made after the restore point was created. Additionally, not all system changes are saved as restore points, so it may not always be possible to roll back to an earlier state. If this method still cannot fix the "Device not migrated" error, you will have to consider replacing it with a new one.
Step 1. Open the System Restore tool: Go to the Windows Start menu and type "System Restore" in the search box. Click on "Create a Restore Point" or "System Restore" to open the System Restore tool.
Step 2. Choose a restore point: In the System Restore window, click on "Next" to see a list of available restore points. Select the restore point that you want to use and click on "Next".
Step 3. Confirm the restore point: Review the details of the restore point and click on "Finish" to confirm the restore point. Windows will warn you that you cannot undo the restore operation after it's complete.
Step 4. Begin the restore process: Click on "Yes" to start the system restore process. Your computer will restart and begin the restore process. This may take several minutes to complete.
Step 5. Wait for the restore to finish: Windows will restart again after the restore process is complete. Wait for Windows to finish loading and check that the system is back to the previous state.
Method #8: Replace the Device
If none of the methods mentioned above can fix the error, you may need to have a check if the device is physically damaged. It is not easy to repair a damaged device on our own, which needs the help of the product's support team or some professional repairing center. If the device is broken beyond repair, consider replacing it with a new one.
When it comes to replacing the old hard drive with a new hard disk or SSD, users usually worry about the OS reinstallation instead of the price of the new drive. The process of reinstalling Windows operating system and applications, transfer personal files, migrate customized settings, etc. takes too much time and effort. Here is a simple solution given by DiskGenius Free Edition, i.e., migrate everything to the new HDD or SSD, including system files, software/device settings, drivers, installed programs, boot files, personal data, and more.
The system migrating process is read-only to original disk and OS, which means either the new disk or the old disk can be used to boot computer. In addition to migrating Windows to HDD/SSD, DiskGenius also can migrate Windows OS to external hard drives or USB flash drives.
The following steps show you how to migrate Windows 10 to a new disk using DiskGenius Free Edition.
Step 1. Run DiskGenius Free Edition and connect the new hard drive to this computer. Then click "OS Migration" button from the toolbar area.
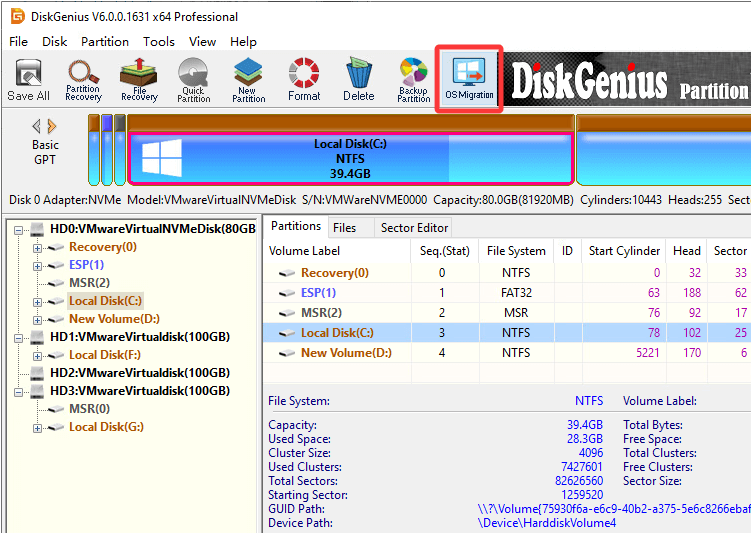
Step 2. Select the destination disk and click "OK" button.
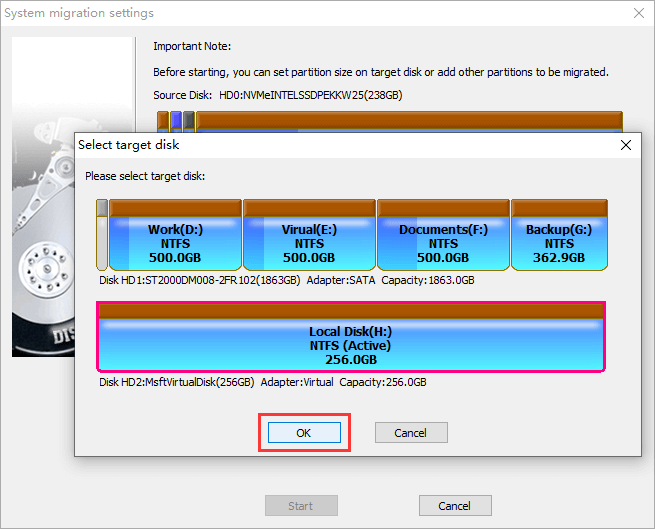
Tip: You can configure settings based on your needs. For example, change the partitions on the destination disk, whether to modify boot sequence, which partition of the original disk can be migrated, etc.
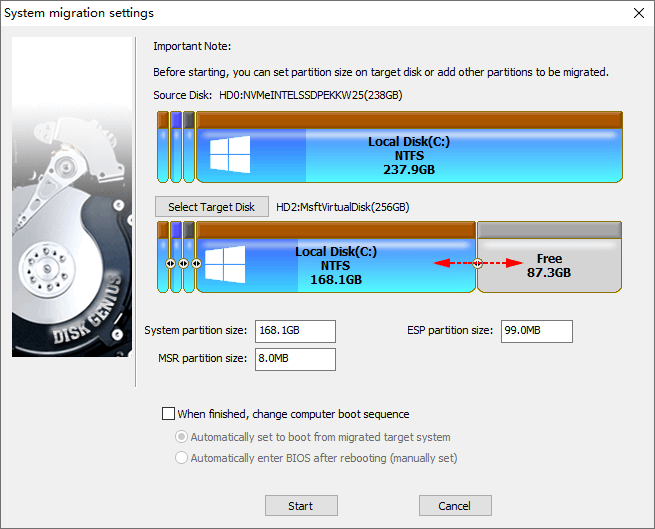
Step 3. Click "Start" button when you are ready to migrate Windows.
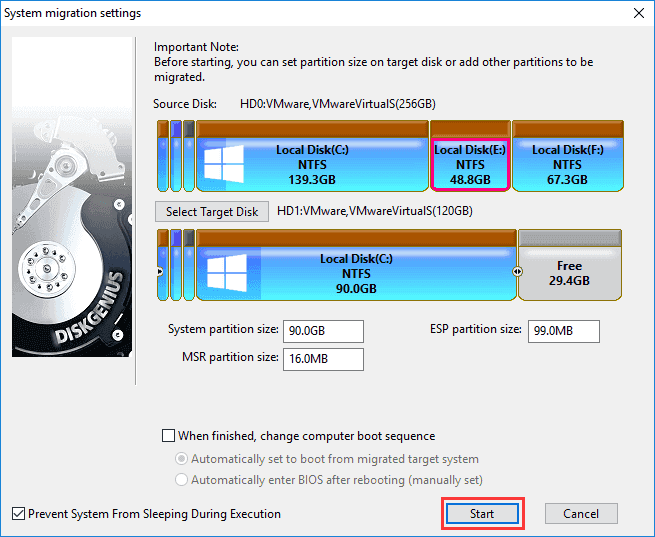
Step 4. Please confirm there are not important files on the destination disk. Click "OK" to continue.

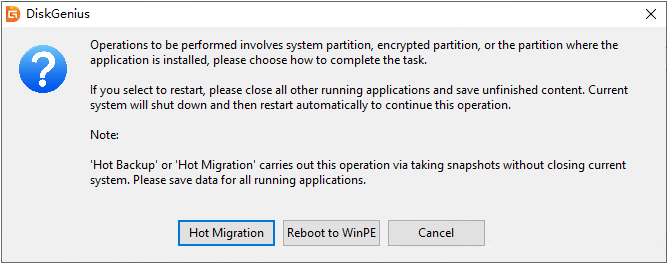
Step 5. Choose how to execute the migration task.
Hot Migration means the task can be done background, and you won't be interrupted; if you choose "Reboot to WinPE", computer will restart and boot to DiskGenius WinPE Edition to finish the system migration. Either way is okay, and you can choose one in line with your situation.
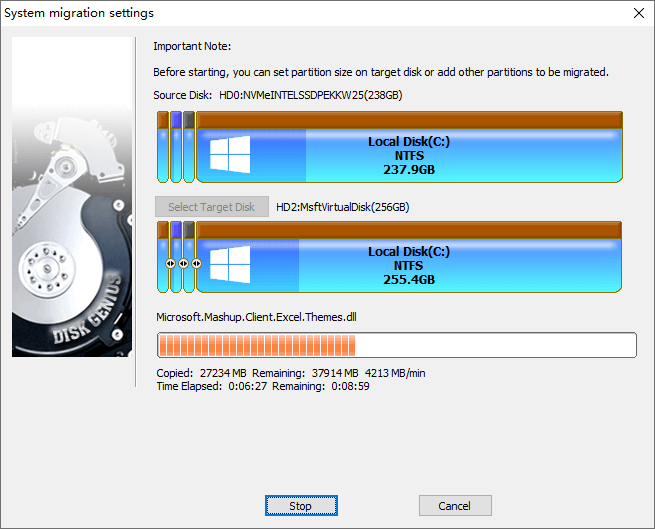
Step 6. Wait for the migration process to complete.
Once the system migration is done, you can replace the old hard drive with the new one and then boot computer from the new disk.
The "Device was not migrated due to partial or ambiguous match" can occur to a variety of devices, and yet it can be easily fixed via solutions discussed in this guide. If you find this article useful, please share it with others. Should you need any help regarding migrating Windows, clone HDD, recover lost data, etc. feel free to contact our support team.
1. What is the status of 0xc0000719?
0xc0000719 is a Windows error code that indicates there is a problem with the security provider on your system. Specifically, this error occurs when a user tries to authenticate with a smart card and the system is unable to load the smart card driver or associated software.
The error code may appear as a blue screen of death (BSOD) or as an error message on your screen. If you encounter this error, you may not be able to log in to your Windows account or access certain files or programs.
2. Why does my Windows 10 update fail migrate data?
There could be several reasons why your Windows 10 update fails to migrate data during the update process. Some of the common reasons are:
3. How do I get to Device Manager in Windows 11?
To get to Device Manager in Windows 11, you can follow these steps:
Step 1. Press the Windows key + X on your keyboard to open the Quick Link menu.
Step 2. Click on "Device Manager" from the list of options.
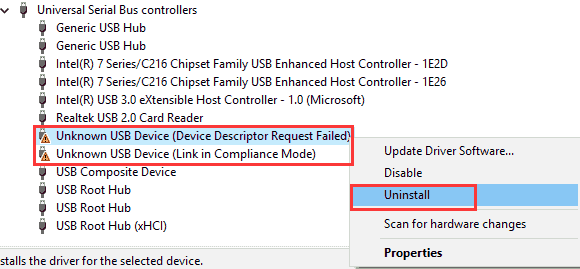
4. How do I update USB drivers on Windows 11?
To update USB drivers on Windows 11, you can follow these steps:
Step 1. In the Device Manager window, locate and expand the "Universal Serial Bus controllers" category.
Step 2. Right-click on the USB device you want to update and select "Update driver". Then select "Search automatically for updated driver software". If a new driver is available, Windows will download and install it automatically.
Step 3. Once the installation is complete, restart your computer to ensure the changes take effect.
Step 4. If Windows does not find any updates, you can also try downloading the latest driver from the manufacturer's website and install it manually.
5. Why is my USB device not recognized?
There can be several reasons why your USB device is not being recognized:
6. Is migrating OS same as cloning?
No, migrating an operating system and cloning an operating system are not the same thing.
Migrating an operating system refers to the process of moving an existing operating system installation from one computer to another or from one storage device to another. This typically involves reinstalling the operating system on the new hardware and transferring all user data, settings, and applications to the new installation.
Cloning an operating system, on the other hand, refers to the process of creating an exact copy of an existing operating system installation on another storage device, typically a hard drive or an SSD. Cloning creates an exact replica of the operating system, including all system files, user data, settings, and applications, which can be used as a backup or for deploying multiple identical systems.
While both processes involve moving an operating system from one location to another, migrating an operating system typically involves reinstalling the OS, while cloning creates an exact copy of the OS without the need for a new installation.
7. What does it mean to migrate settings?
Migrating settings typically refers to the process of transferring or copying settings from one device or application to another.
For example, if you switch to a new computer, you may want to migrate your settings from your old computer to the new one so that you don't have to set everything up from scratch. This could include settings for your email client, web browser, productivity software, and more.
Similarly, if you upgrade to a new version of an application or operating system, you may need to migrate your settings to ensure that everything works smoothly and that you don't lose any important data or customizations.
Overall, migrating settings can be a convenient way to ensure that your devices and applications work the way you want them to without having to spend a lot of time configuring everything manually.
8. Why is it unable to migrate on iPhone?
Migrating data from one iPhone to another should typically be a smooth process. However, there can be various reasons why the migration process might fail or be unable to migrate data:
9. What does USB device not migrated mean?
The error message "USB device not migrated" usually appears when there is an issue with a USB device connected to your computer, and the system is unable to migrate the device driver to a new location or update it. This error can occur due to various reasons, including faulty drivers, conflicting software, bad sectors, corrupted file system, etc.
Related Pages
DiskGenius - The best free disk cloning tool to clone SD card, clone HDD to SSD, transfer Windows OS to HDD/USB, image hard drive, backup any partition into an image file, etc.

DiskGenius is a one-stop solution to recover lost data, manage partitions, and back up data in Windows.
Download Facebook
 YouTube
 X
X