Position: Resource - Partition Management - 4 Best Free Hard Drive Format Tools in Windows
Formatting a hard drive is a crucial step in many scenarios. You might need to format a drive when setting up a new hard drive, reusing an old one, changing the file system type, or securely erasing data before selling or disposing of a device. Here are some common situations where formatting is required:
Basic formatting can be done through simple methods, and dedicated hard drive formatters provide more control and options. Advanced tools allow for tasks like formatting a hard disk to EXT4 in Windows, resizing partitions, securely erasing data beyond recovery, and even recovering lost partitions
Next, we'll explore several hard disk format tools that are popular in Windows, providing a detailed look as each tool's features, advantages, limitations, and step-by-step instructions. Thus, you can easily select the best tool for your own needs.
DiskGenius Free Edition is a third-party and free disk management tool that offers a wide range of features, making it one of the most comprehensive utilities available for Windows users. Unlike the native tools provided by Windows, DiskGenius is designed to offer a more robust set of options for managing partitions and recovering data.
DiskGenius tool not only allows users to format hard drives but also provides advanced features like partition recovery, disk cloning, and even file recovery from damaged or corrupted partitions.
The free edition is a great starting point for users who need more than what Windows' built-in tools can offer but aren't ready to invest in a full suite of professional disk management software. Its balance between user-friendliness and powerful features makes it a popular choice among both novices and experienced users.
Advantages:
- Support to format various storage devices, including hard drives, SSDs, memory cards, USB flash drives, virtual disks, and more.
- Support to format a drive to various file system types, such as NTFS, FAT32, exFAT, Ext4, Ext3, and Ext2 in Windows.
- Support to format partitions larger than 32GB to FAT32.
- Offer rich features regarding data recovery, disk cloning, disk partitioning, and disk utilities.
- Many features are available in the Free edition.
Limitations:
- It does not have a Mac version.
How to Use DiskGenius Free Edition to format hard disk:
Step 1. Free download DiskGenius Free Edition and install it on your computer.
Tip: If you don't want to install any software, you can download the portable version.
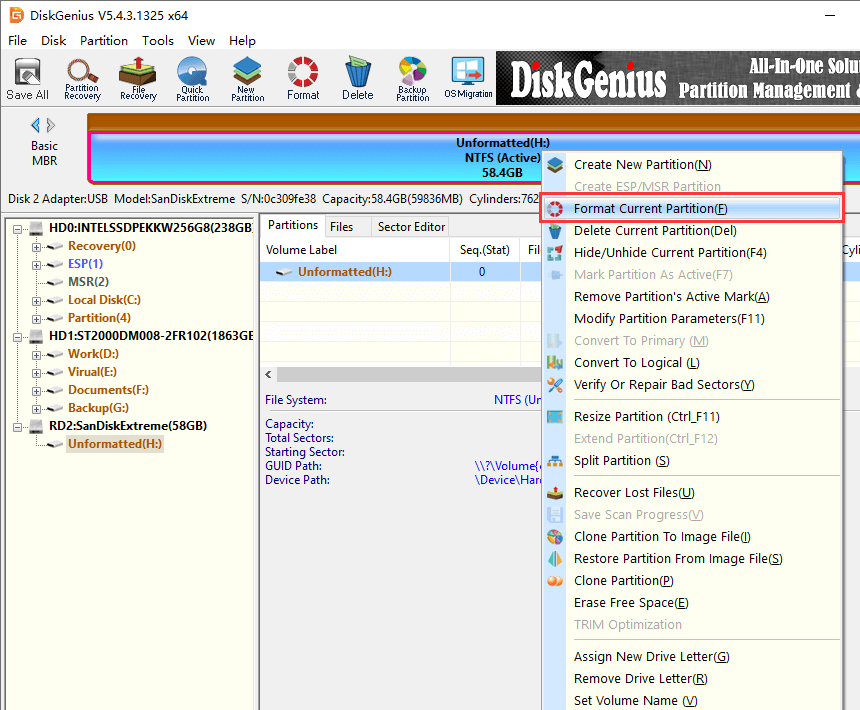
Step 2. Select the partition you want to format, right-click the drive and choose "Format Current Partition" from the context menu.
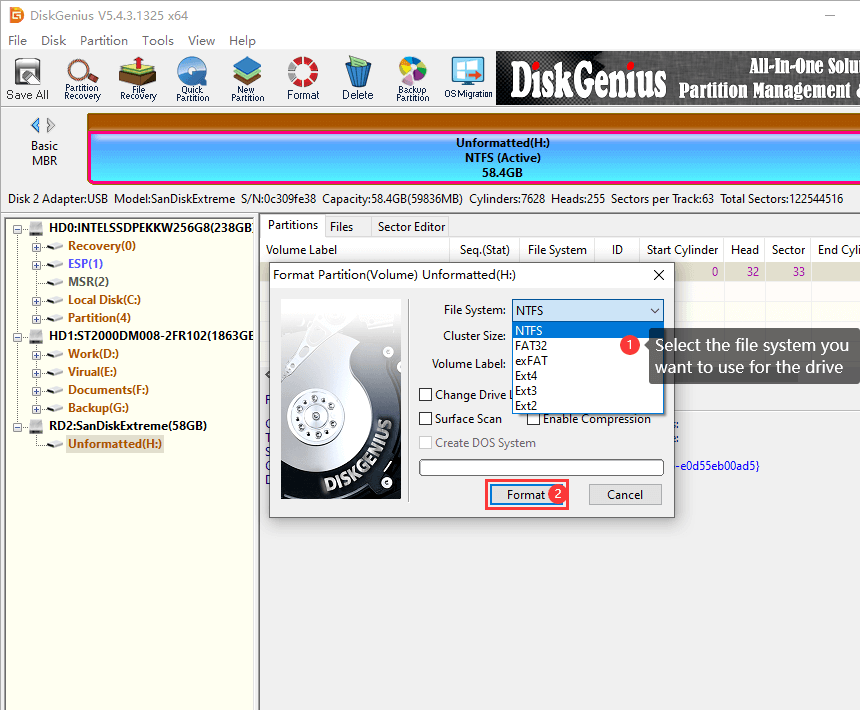
Step 3. Choose the file system from the dropdown list and click "Format" button.
As you can see, NTFS, FAT32, exFAT, Ext4, Ext3, and Ext2 are available for the formatting, thus you can format the hard drive as any of these file systems based on your needs.
Formatting will remove all data on the drive, so make sure you are going to format the correct drive. Click "Yes" to confirm the operation, and the formatting will be executed immediately.

Here is the video guide to format a hard drive partition as EXT4 in Windows 10:
The File explorer is the built-in tool in Windows, and it's often the first choice for many users when accessing files and folders. In addition to managing data, File Explorer also offers a simple way to format volumes. It's particularly well-suited for basic formatting tasks, such as preparing a drive for general use or converting between common file systems like NTFS and FAT32. Its straightforward interface and ease of use make it ideal for those who might not be comfortable with more advanced tools.
Advantages:
- The intuitive interface is user-friendly to all users.
- File Explorer can be quickly and easily accessed from the desktop or taskbar.
- It supports basic formatting options like file system type NTFS, FAT32, and exFAT.
Limitations:
- Advanced options like partition resizing are not available.
- It cannot format the drive that is larger than 32GB to FAT32.
Steps to format hard drive in File Explorer:
Step 1. Click the folder icon from the taskbar or double-click the "This PC" from desktop to open File Explorer.
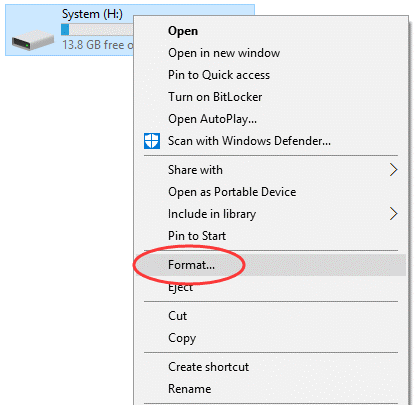
Step 2. Find the drive you want to format, right-click on it and select "Format" from the context menu.
Step 3. Select the file system (NTFS, FAT32, or exFAT) based on your needs and set a volume label if desired. Click the "Start" button to initiate the formatting.
Step 4. Confirm the operation to proceed the formatting.
Disk Management is more advanced disk utility built into Windows that allows you to perform a variety of disk-related tasks. Unlike File Explorer, which focuses on simplicity, Disk Management provides a graphical interface for managing both internal and external disks. This tool is also useful for users who want to create partitions, delete partitions, change drive letters, convert disk types, and resize partitions.
Advantages:
- It allows for more detailed disk management tasks.
- The graphical interface gives a visual representation of all drives and partitions.
- It supports multiple features such as create new partitions, delete existing partitions, format partitions, shrink partitions and extend partitions.
Limitations:
- It might be overwhelming for beginners due to the range of options.
- The FAT32 option is available when formatting a partition larger than 32GB.
Steps to format a partition in Disk Management:
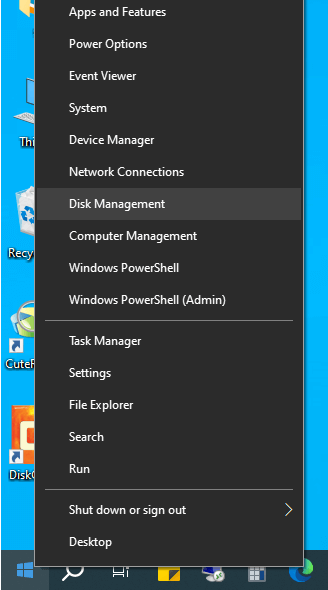
Step 1. Right-click the "Start" button and select "Disk Management" to open Disk Management, as the picture below.
Step 2. Locate and right-click the partition you want to format. Then select "Format".
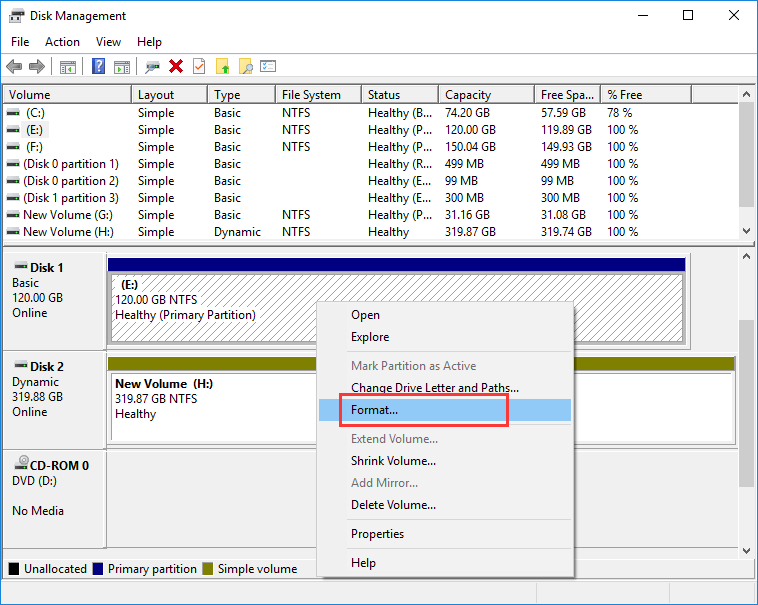
Step 3. Choose file system, allocation unit size, and volume label. Then click "OK".
Step 4. Confirm the operation to format the drive.
Diskpart is a command-line utility in Windows that offers powerful disk management capabilities. It's designed for advanced users who need precision and flexibility in managing storage devices. Diskpart differs from File Explorer and Disk Managements in that it operates takes through typed commands in Command Prompt or PowerShell. So the tool is not friendly for average users, and yet it is ideal for those who want to perform operating that are not available via standard graphical interfaces. Simply put, if you just want to format hard drives, the first three tools are good enough.
Advantages:
- Allows for detailed control over partitions and volumes.
- Supports to perform tasks not available in Disk Management.
Limitations:
- It requires that users should have a good understanding of command-line syntax and commands.
- If commands are misused, you might face data loss issues.
Steps to use DiskPart commands to format a drive in Windows PowerShell:
Step 1. Right-click the Start menu and select "Windows PowerShell (Admin)".
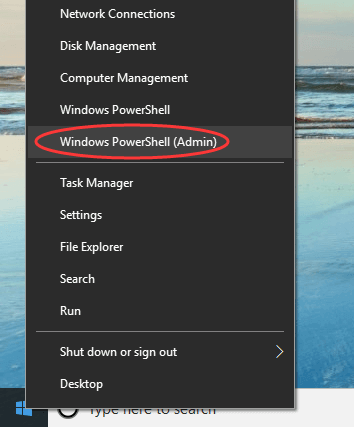
Step 2. Type diskpart and press Enter key.
Step 3. Type following commands one by one and press Enter key after each command.
List volume (this command will list all partitions on this computer)
Select volume # (please replace # with the volume number that you want to format)
Format fs=NTFS quick (this will perform a quick format to the selected partition with the NTFS file system)

Formatting a hard drive in Windows can be done easily using the tools mentioned above. For basic tasks, File Explorer and Disk Management are sufficient. If you need more control or are dealing with complex tasks, DiskPart and DiskGenius Free Edition provide advanced features.
1. How do I check my hard drive format?
You can check hard drive format in Windows with following steps:
Step 1. In Windows File Explorer, right-click on the drive you want to check and choose "Properties".
Step 2. In the General tab, look for the File System field. This will show whether the drive is formatted as NTFS, FAT32 or other file system.
2. How can I format my hard drive?
You can use hard disk formatting software to format your hard drive. You can find 4 free formatting tools in this article as well as the step-by-step instructions to format a drive. Be sure to back up any important data before formatting, as this process will erase all data on the drive.
3. What is drive formatting software?
The drive formatting software is a program that can prepare a hard drive, SSD, SD card or other storage devices for use by erasing data and setting up a file system. The disk formatting tool can either be built into the Windows operating system, e.g., File Explorer and Disk Management, or it can be a third-party program such as DiskGenius Free Edition.
4. What is low level formatting of hard disk?
The low-level formatting is the process that prepares a hard drive for use by creating the physical tracks and sectors on the disk. The process is typically performed by the manufacturer before the drive is sold. For end-users, the low-level formatting is not necessary all the time unless there are bad sectors to be repaired.
5. What is the best format option for HDD?
For most users, the best format option for a hard drive on Windows is NTFS file system. That's because NTFS supports large file size, efficient storage management, is required for installing Windows. If you want to use the hard drive on non-Windows computers, FAT23 or exFAT will be the preferred format, considering the compatibility issue.
6. What is the best disk formatting tool for Mac?
The best disk formatting tool for Mac should be the built-in Disk Utility. Disk Utility is versatile tool that can help users to format, partition, and manage drives. It supports various file systems, including APFS (Apple File System), HFS+ (Mac OS Extended), FAT32, and exFAT. For most users, Disk Utility provides all the necessary features in an intuitive interface, making it the go-to tool for disk formatting on Mac.
7. How do I format a drive on my Mac?
You can use the Disk Utility to format a drive on Mac, here're the steps:
Step 1. Open Disk Utility by searching for it in Spotlight or navigating to Applications > Utilities.
Step 2. Select the drive or partition you want to format from the list on the left. Click the Erase button at the top of the window.
Step 3. Choose a name for the drive and select the desired file system (APFS, Mac OS Extended, FAT32, or exFAT). Click Erase to format the drive.
DiskGenius is a one-stop solution to recover lost data, manage partitions, and back up data in Windows.
Download