Position: Resource - Partition Management - Format USB flash drives and external hard drives to exFAT for Windows & Mac
Should I format to exFAT? If you're considering the best file system for your USB flash drive or external hard drive, exFAT might be the ideal choice in certain situations. You will find it is true when you want to transfer large files across devices and need compatibility with Windows and MacOS. exFAT has broader compatibility with multiple operating systems than NTFS; and unlike FAT32, exFAT does not have the 4GB file size limit. Thus, exFAT file system is frequently used by many modern storages.
| Format to exFAT on Windows: | Format to exFAT on Mac: |
|
Format your USB flash drives, external hard drives, or internal hard drives to exFAT, and here are 4 methods… |
It's easy to format USB flash drives or other drives to exFAT on Mac… The step-by-step guide |
The exFAT (Extended File Allocation Table) file system was introduced by Microsoft in 2006, and it is designed to bridge the gap between FAT32 and NTFS. The exFAT file system is mainly optimized for flash storage devices like USB drives and SD card, and it has standout features over FAT32, for example, the 4GB file size limit is removed, larger partition sizes are supported. The structure of exFAT is simpler than NTFS, so it can achieve faster performance on portable drives. However, exFAT lacks features like journaling and built-in encryption.
Here is a table that lists the key features of exFAT file system, and you can device which to use it on your USB flash drives and external hard drives.
| Features | exFAT |
| Compatibility |
exFAT is supported by both Windows and macOS, as well as many modern devices like smart TVs, gaming consoles, and cameras. |
| File Size Limit | Unlike FAT32, exFAT does not have the 4GB limit for individual files. |
| Partition Size | exFAT can handle partitions as large as 128PB (petabytes). |
| Efficiency |
It offers faster read/write speeds and reduces wear on storage devices, so it's effective for USB drives and SD cards. |
Now that you know what exFAT is and why it's advantageous, let's explore how to format your drive in both Windows and macOS.
Windows makes it straightforward to format a drive. Follow these steps:
First, back up your data. Formatting will remove all data on the drive, so you should ensure you back up any important files before formatting.
Second, connect the USB drive. Insert your USB drive or external hard drive into your computer. Then open This PC or File Explorer to check if the drive is recognized correctly.
Third, start the formatting process. In Windows, we have multiple ways to format a USB drive to exFAT, you can choose one based on your own preferences and requirements. Below are 4 USB formatters and step-by-step guides to achieve this:
If you're looking for an intuitive tool to format drives, DiskGenius Free Edition is an excellent choice. It's particularly helpful if other methods fail or if you need additional partition management features, for example, convert MBR to GPT without data loss, format 64GB or larger SD cards to FAT32, format drives to EXT4 in Windows, migrate Windows OS to HDD/SSD without reinstallation, and so on.
Step 1. Free download DiskGenius Free Edition from its official website. Install it on your computer and then launch it.
Tip: if you do not want to install any software, you can download the portable version.
Step 2. Connect your USB flash drive or external hard drive to the computer. Then you can find it in DiskGenius after the drive is connected correctly.
Step 3. Right-click on the partition you want to format and choose "Format Current Partition".

Step 4. In the dialog box, choose exFAT as the file system. Then click "Format" button.
As you can see, with DiskGenius, you can also format a drive to FAT32, NTFS, ext4, ext3, and ext2.

Step 5. Confirm the operation and click "Yes" to start the formatting process.

In some cases, you may want to format many USB drives to exFAT, and it will be ideal if these USB disks can be formatted at a time. Here is a solution to automate a process for formatting multiple USB drives to FAT32/exFAT/EXT4/NTFS at one time.
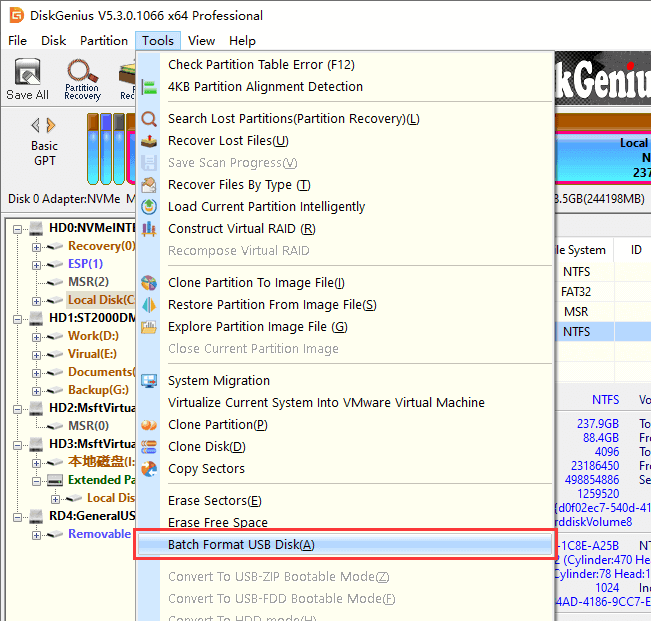
Step 1. In DiskGenius, click "Tools" – "Batch Format USB Disk".
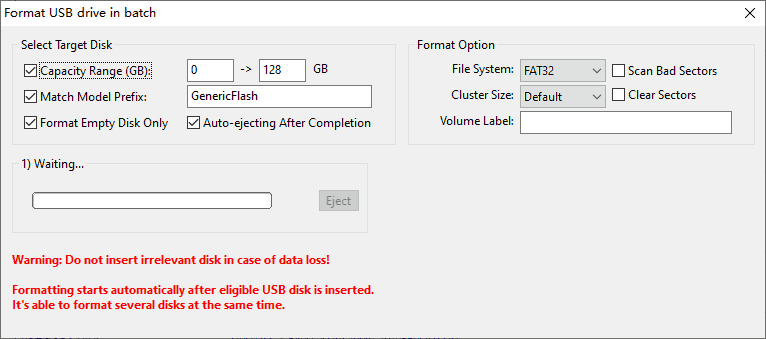
Step 2. Configure formatting criteria.
Here you need to set some criteria for USB drives to be formatted, for example, capacity range, prefix, etc. Once the USB drive connected to the computer matches these criteria, it will be formatted automatically by the software.
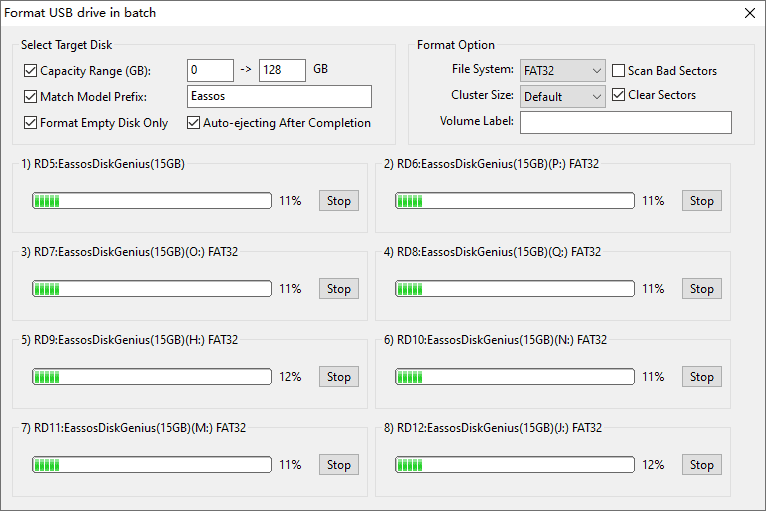
Step 3. Connect USB drive to the computer, and the software will recognize those eligible drives and format them automatically. Once the USB drive is formatted successfully, it will be safely ejected from the computer.
In File Explorer, formatting is quick and doesn't require additional tools or technical knowledge.
Step 1. Connect your USB flash drive or external drive to the computer, and you can find them in File Explorer.
Step 2. Right-click the drive you want to format and choose "Format" from the context menu.
Step 3. Choose exFAT from the file system dropdown menu. Then click "Start" button.
Also, you can give the drive a name in the Volume Label field. As to the "Allocation Unit Size", you can leave it as default if there are not specific needs.
Step 4. Click "OK" to confirm and start the formatting.

Disk Management is a built-in utility in Windows, and it is free to use. Disk Management provides more control over drive management and offers advanced options, such as create, format, delete, extend, and shrink partitions. Here are steps to format a drive in Disk Management.
Step 1. Right-click on the Start menu and select "Disk Management". This will open Disk Management.
Step 2. You can see all drives connected to your computer, locate the one you want to format. Be sure to identify the correct drive to avoid formatting the wrong one.
Step 3. Right-click the drive and choose "Format".
Step 4. Now in the format window, set file system to exFAT, and click "OK" to start confirm and start the formatting.

Diskpart is a command-line tool that provides precise control for advanced users, and you can use it when Disk Management or File Explorer fails to work as expected. However, if you're not vary familiar with these commands, then skip this method. That's because a single mistake can lead to data loss.
Here are steps to format a partition to exFAT file system using Diskpart in Windows PowerShell.
Step 1. Right-click on the Start menu and choose "Windows PowerShell (Admin)".
Step 2. In Windows PowerShell, type diskpart and process Enter key.
Step 3. Execute the following command one by one:
List disk
Select disk # (Please replace # with the number of the USB drive).
List partition
Select partition # (Please replace # the number of the partition you want to format)
Format fs=exfat quick

For macOS users, formatting a USB drive or external hard drive to exFAT is a straightforward process. We can use the built-in Disk Utility to do the formatting. This tool provides an intuitive interface that simplifies the task.
Note: Formatting erases all existing data on the drive, so you should back up important files first.
Here're steps to format a USB drive to exFAT in MacOS:
Step 1. Open Disk Utility by searching for it in Spotlight (press Command + Space and type "Disk Utility").
Step 2. In Disk Utility, select your drive from the list on the left-hand side. Be careful when choosing the drive.
Step 3. Click the Erase button at the top of the window. Then you can choose exFAT from the format dropdown menu.
Step 4. Click Erase, and Disk Utility will format the drive.
It seems that formatting a drive is always a straightforward process, and yet sometimes issues may arise during formatting. Once of the most common issues is that the USB drive connected but not showing up in computer. In this case, you can try using a different USB port or computer. Another issue is that the exFAT option might not appear as an option in Windows File Explorer or Disk Management. When this happens, you should check if the drive is corrupted first. In addition, the formatting may fail if the drive is write-protected.
Apart from knowing how to deal with possible issues, you should also keep in mind the following things to get yourself ready to format a drive.
First, although exFAT is widely supported, it's always to double-check your target device such as the SMART TV or gaming console supports exFAT in advance. The most important thing is to back up important data before formatting.
DiskGenius is a one-stop solution to recover lost data, manage partitions, and back up data in Windows.
Download