Position: How Tos - Partition Management - How to fix "The disk is write protected" error on USB drives?
DiskGenius - Your best option to remove write protection, check and repair bad sectors, recover lost files from unreadable drives, and format a partition to NTFS/FAT32/EXT4.
ô Free DownloadQuick Navigation:
The write protection on USB flash drives or SD cards is a handy function aiming to prevent accidental file deletions and block suspicious files like virus and un-authorized sources. External data storage devices are very common devices, and they are widely used these days, as they are portable and users can take them anywhere they want. When a USB drive is write-protected, it becomes read-only. This means that any action involving writing, such as adding, editing, or deleting files, will be denied. You won't be able to create new files, modify existing ones, delete data, or format the drive. Another reason for enabling write protection is to prevent others from copying or sharing the contents stored on the device.
When you try writing data to such disks you'll get the error message "The disk is write-protected. Remove the write-protection or use another disk", as shown in the image below.
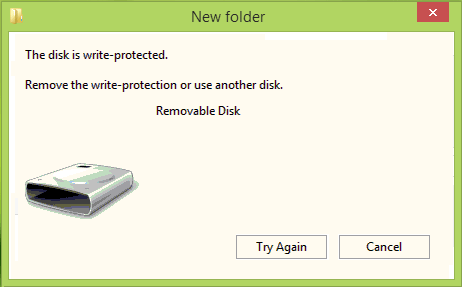
However, this feature can become frustrating if not used correctly or if the USB drive becomes corrupted. In such cases, encountering the error message "The disk is write-protected" can be quite stressful. You won't be able to access the data on the USB drive, and the only potential solution may seem to be formatting the drive entirely - a task that's not always straightforward. What's worse, if the files on the drive are important, formatting is far from ideal since it will erase all your data. So, before considering formatting, it's crucial to first disable or remove the write protection from the USB drive. Here's a real-life example from a forum:
"I recently bought a new laptop that installs Windows 10. I have four USB flash drives and one of them is now marked 'write-protected' for no reason, as I didn't do anything to it. I found a solution for windows XP and tried on my own computer. But it didn't remove write protection. I just want to copy files from the USB disk to computer and then reformat it. Can you help me on the write protection removal thing on Windows 10 computer or retrieve data?"
There are several reasons why this error might occur, and the most common ones are listed below:
The read-only switch
Many memory cards and USB flash drives have a small physical switch along the side. This switch controls the write protection, making the drive read-only when enabled.
The flash drive is full
If the flash drive is full and has no remaining free space, it may automatically become write-protected. To check, right-click on the drive, select "Properties," and see how much free space is available.
Security settings
Some computers, or their administrators, may have security settings in place to block writing data to USB drives. These settings can be modified through the computer's registry to allow writing access.
The read-only file or folder property
If certain files or folders on the drive are set to "Read Only," you will encounter this error when trying to copy, edit, or replace them. To fix this, go to the file's Properties and check if the "Read-only" option is selected.
Virus attack
A virus can infect your USB drive, leading to various issues such as data corruption, file loss, system crashes, and device failures.
The drive is damaged or has bad sectors
If none of the above causes seem to apply, your USB drive may be damaged or have bad sectors. Over time, drives can reach their natural lifespan due to limitations in how much data can be read and written. Bad sectors prevent normal read and write operations, so you may need to use HDD test tools to verify the drive's health condition.
If you have stored some important data on your flash drive, then it's a good choice to enable the write protection before inserting it to computers which is not well protected by antivirus software. Public or shared computers can expose your flash drive to viruses, so write protection helps reduce the risk of infection. While it's not a foolproof method, someone with technical knowledge can still disable it, it's a helpful extra layer of protection. Here's a simple guide to enable write protection on your flash drive:
Method 1. Use the physical lock switch
Some flash drives and memory cards come with a physical switch for the write protection. Thus, you can simply locate the switch on the side of the device and slide it to the "Lock" position to enable the write protection for the drive.
Method 2. Set drive security permissions
You can also set the security permissions in Windows to prevent writing actions to the USB flash drive. Here are the steps:
Step 1. In Windows File Explorer, right-click the USB drive and choose "Properties" from the context menu.
Step 2. In the Properties window, go to the Security tab. Under the "Group or user names", select "Everyone" and click the "Edit" button.
Step 3 This step sets the permissions to deny the write access. In the "Permissions for Removable Disk" window, you can see a section labeled "Permissions for Everyone" with two columns of checkboxes. Then check the boxes under "Deny" for permissions like Full Control, Modify, and Write.
Step 4. Click Apply, then OK to save your settings.
Many USB drives and SD cards come with a physical lock switch that enables or disables write protection. To check if this is the issue, examine your flash drive or SD card for a small switch, usually located on the left or right edge. If the switch is in the "Lock" position, simply slide it to the "Unlock" position.
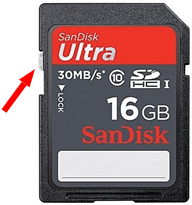
If this doesn't fix the write protection error, try the other solutions below.
Another method to resolve the "The disk write-protected" error is by editing the Windows registry. Sometimes, the write protection can be enabled through the registry, which can also prevent writing actions to USB drives. Thus, you can disable the setting in Registry to regain full access to read and write on your removable drives. Follow these steps to disable write protection through the Registry Editor:
Step 1. Open the Registry Editor. Type "regedit" in the search bar next to the Start button, and you can find the Registry Editor. Click it to open it. If prompted by User Account Control, click Yes.
Alternatively, you can open the Registry Editor via the Run commands: press Windows + R to open the Run dialog > type regedit.exe and hit Enter.
Step 2. In the left panel of the Registry Editor, navigate to the following path:
HKEY_LOCAL_MACHINE\SYSTEM\CurrentControlSet\Control
Next, look for a key names "StorageDevicePolicies" and open it. If it does not exist, you can create it by right clicking on "Control", selecting "New" – "Key", and naming it "StorageDevicePolicies".
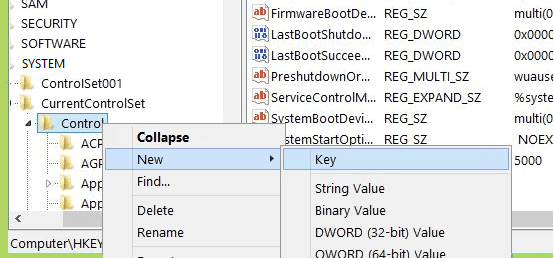
Step 3. Once you're in the "StorageDevicePolicies" key, right-click the empty space on the right-hand side. The select "New" > "DWORD (32-bit) Value" and name it "WriteProtect".
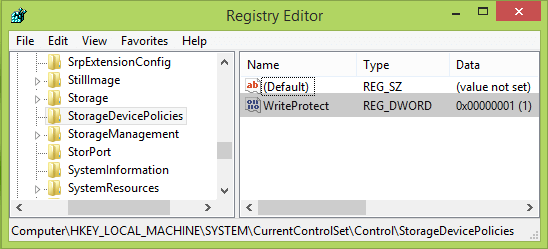
Step 4. Modify the WriteProtect key. Double-click the WriteProtect key you just created and set the Value data to 0. Click OK to save the changes.
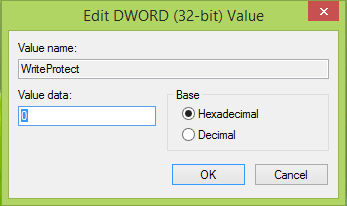
Step 5. Re-plug your USB drive. Close the Registry Editor and unplug your USB drive. After reconnecting the drive, the write protection should be disabled, and you should now have full access to read and write data.
You can also modify the read and write attributes of your USB drive or SD card using Command Prompt with a simple set of commands. You can follow steps here to clear the write protection attribute for flash drives or SD cards:
Step 1. Open Command Prompt.
Click the search bar next to the Start button and type cmd. Click "Run as administrator" from the searching result. If prompted by User Account Control (UAC), click Yes.
Step 2. In the Command Prompt window, type diskpart and press Enter.
Diskpart is a built-in Windows tool for managing disk partitions and can be used to midify USB drive attributes. If you encounter the error "The request could not be performed because of an I/O device error", it may indicate physical damages to the drive.
Step 3. Run the following commands one by one and press the Enter key after each command.
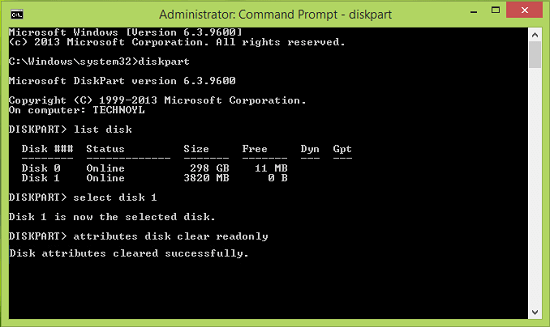
Step 4. Once you see the message "Disk attributes cleared successfully", close the Command Prompt and unplug your USB drive. Reconnect it to check if the write protection issue has been resolved.
Sometimes, the write protection error may be caused by permission settings on your account. It's possible that you don't have the necessary write permissions for the USB drive. Follow these steps to ensure proper write access for your user account:
Step 1. Open the USB drive's Properties.
In File Explorer, right-click on the USB flash drive and select "Properties" from the context menu.
Step 2. In the Properties window, go to the "Security" tab. Under the "Permissions for Everyone" section, verify whether the "Write" permission is selected.
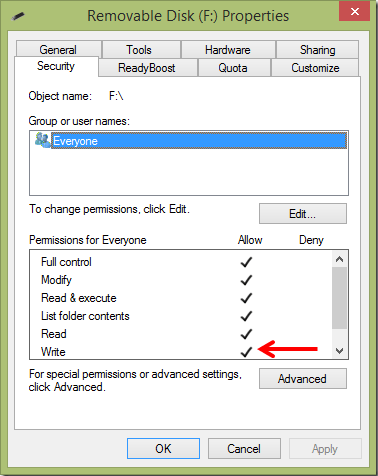
Step 3. If the "Write" feature is not checked, select your use account and click "Edit". In the new window, click "Add", enter the account name in the "Enter the object names to select" box, and click "OK". Then make sure the "Write" permission is ticked.
If your USB drive is running out of free space, you may encounter a write protection error when trying to store files to the drive. Checking the available space can help determine if this is the cause.
Step 1. Double click This PC on your desktop to open Windows File Explorer.
Step 2. Locate the USB drive, right-click on it, and select "Properties". Then you can see a pie chart that displays the Used space and Free space on the drive. If there is little or no free space, you may need to delete some files or transfer them elsewhere to free up disk space.
If your USB drive is infected with a virus, it may become unreadable or write-protected. Every time you use a USB drive, especially after connecting it to a public or shared computer, it's important to scan for viruses or malware. Infections can delete or corrupt files, fill the drive with junk data, or make the device completely unreadable.
To resolve this, manually scan the USB drive with reliable antivirus software and remove any detected threats.
DiskGenius Free Edition provides an easy way to remove the read-only status from your disk. Follow these steps:
Step 1. After installing and launching the software, locate the disk that is write-protected. Right-click on it and select "Change Device State" from the menu, then click "Read-only".
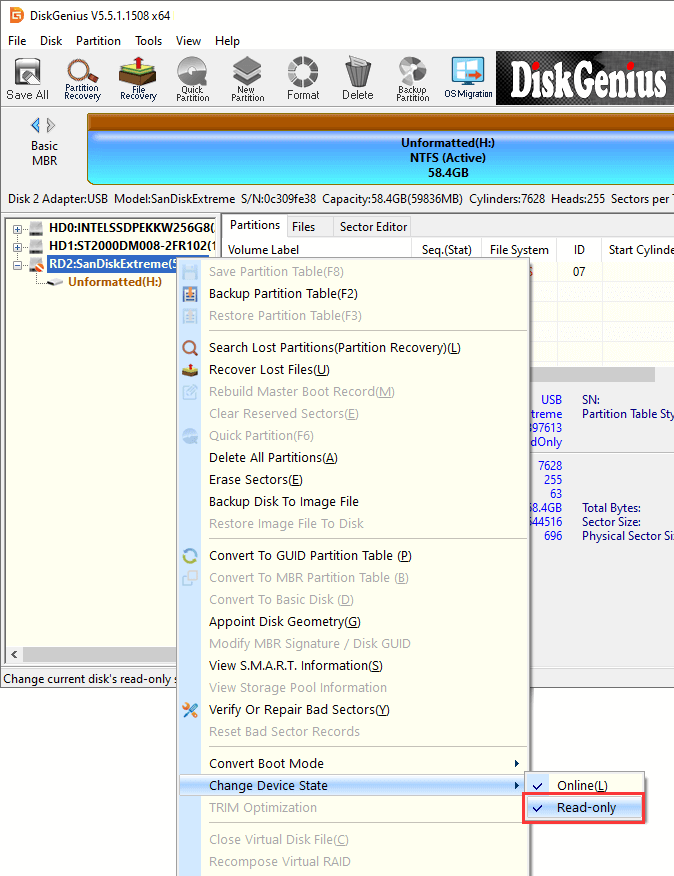
Step 2. Confirm the operation. Once the read-only status is successfully removed, applications will be able to perform write operations on the disk and its partitions. Click "OK" to confirm, and the read-only protection will be disabled.

In most cases, formatting a write-protected disk is not possible because the process requires writing a new file system. When you attempt to format the drive, you may encounter errors like "The disk is write-protected" or "Windows was unable to complete the format". However, you can try the following method to bypass the issue and format the drive.
Warning: Formatting will erase all data on the drive. If the files on the drive are important, make sure to recover data from the USB drive before proceeding with the format.
Step 1. Restart your computer and boot into the Safe Mode.
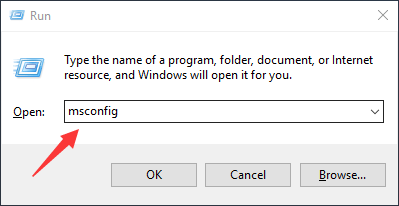
Press Win + R to open the Run dialog. Type msconfig and press Enter to open the System Configuration window.
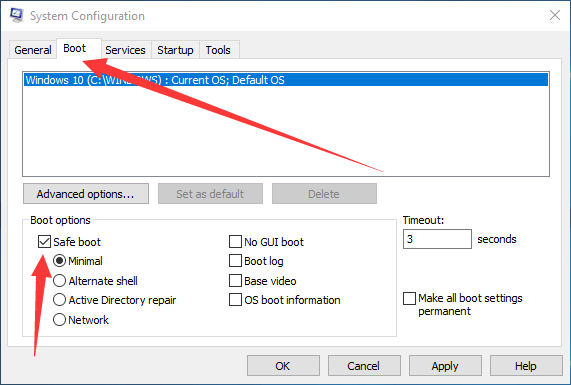
Go to the "Boot" tab. Under "Boot options", check the box next to "Safe boot" and select "Minimal". Click "OK".
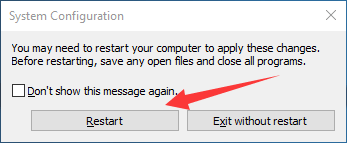
Then restart your computer and boot into Safe Mode.
Step 2. Open Command Prompt. Press Win + R to open the Run dialog. Type cmd and press Enter to open the Command Prompt.
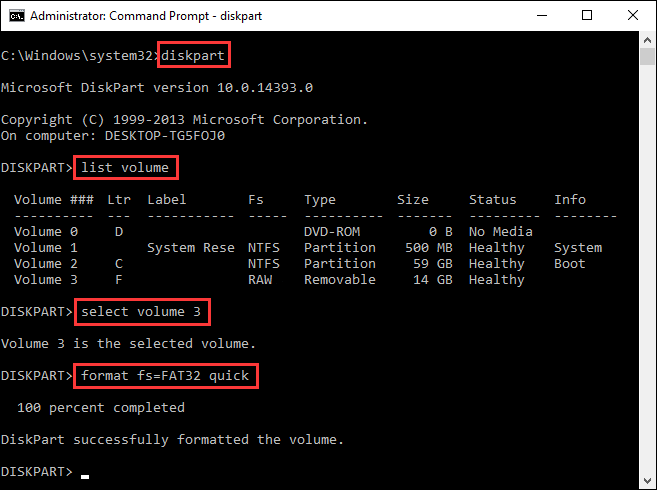
Step 3. Type diskpart and press Enter key. Then execute following commands one by one:
List volume (This command will list all the partition on the computer, you need to identify the volume number of the USB drive.)
Select volume # (Replace # with the volume number of the USB drive)
format fs=FAT32 quick (This command formats the USB drive to FAT32)
Step 4. Exit the Safe mode and restart computer to Windows. Press Win + R, type msconfig again, go to the Boot tab, and uncheck Safe boot. Click OK and Restart to boot normally.
Bad sectors on a hard drive or flash memory are areas that become inaccessible or unwritable due to physical or logical damages. When a disk contains bad sectors, it may slow down or even stop working properly. You can follow steps below to check and repair bad sectors on the drive:
Step 1. Install and run DiskGenius Free Edition. In the left pane of the software, select the USB drive, and click the "Disk" > "Verify Or Repair Bad Sectors".
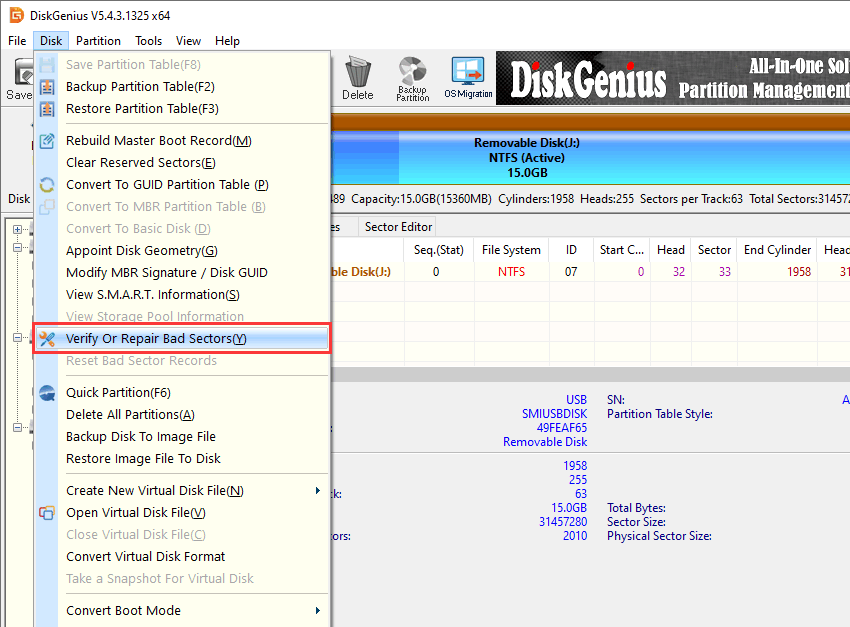
Step 2. Click the "Start Verify" button, and the software will begin scanning the disk for bad sectors. Once the process is complete, DiskGenius will generate a report detailing the number of bad sectors found on the drive.
Step 3. If bad sectors are detected, you can attempt to repair them using the software. However, repairing bad sectors may cause data loss for the affected drive, so it's important to back up any important files before proceeding.
If you need to recover files and folders from a write-protected flash drive, you can rely on DiskGenius, a full-featured data recovery software. This software works in a read-only manner, which means that the data recovery process does not disturb the lost data, and thus it is safe to use. Here's why DiskGenius is a great choice for recovering data from various storage devices:
Download the free trial of DiskGenius from the official website and install it on your computer. Then you can follow these steps to recover lost data from a write-protected flash drive:
Step 1. Select the flash drive where you want to recover data, click "File Recovery" button and click "Start". DiskGenius will start to scan the drive to look for recoverable data.
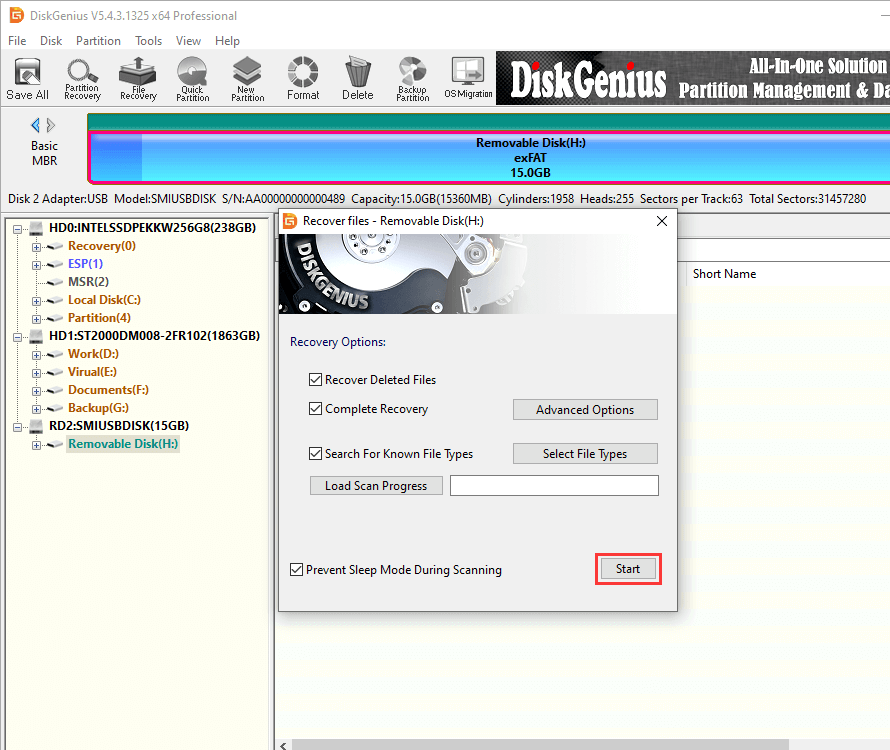
Step 2. Wait for the scanning to complete. DiskGenius lists recoverable files while it is scanning selected drive so that you can preview files easily. If all needed files have been found out, you can pause canning process and recover data.
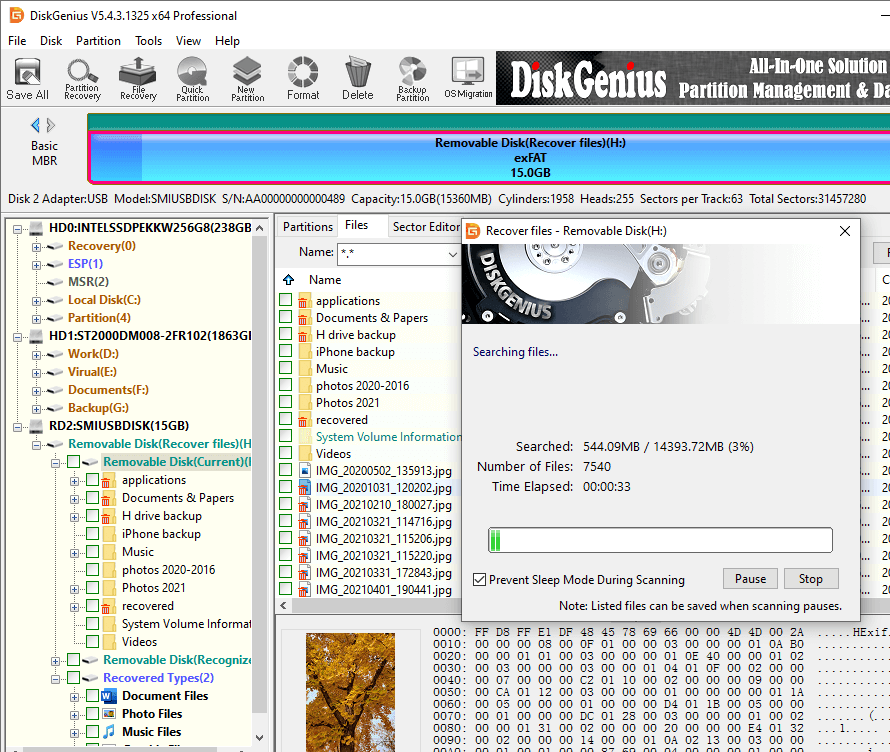
Step 3. Preview lost files to make sure whether they are still recoverable. Once the scan is complete, you can double click a file to view file content.
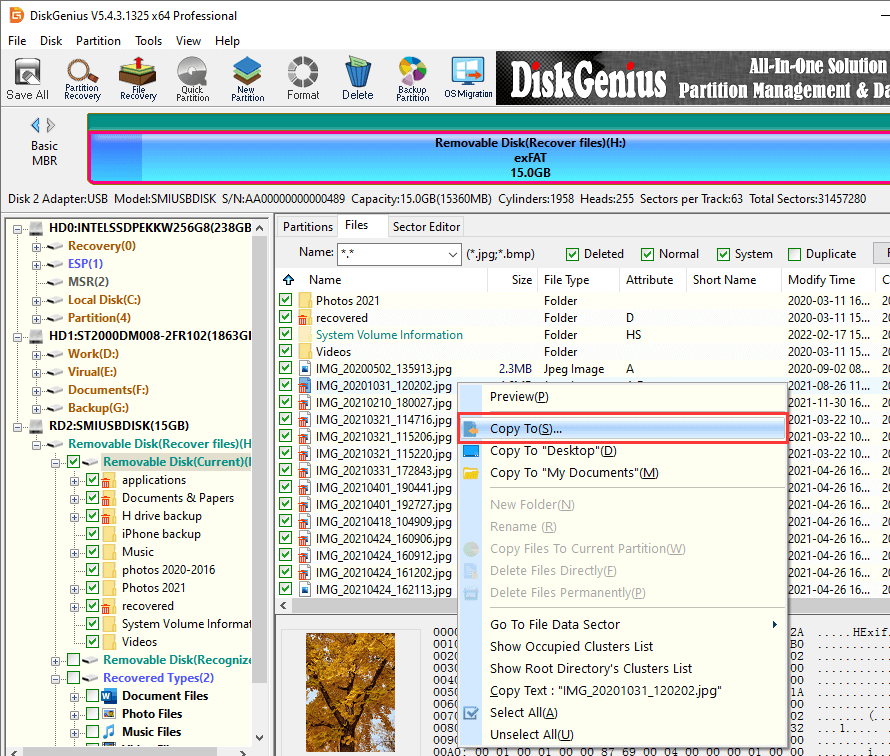
Step 4. Select files you want to recover and copy them to a secure location on your computer.
1. Why is my disk suddenly write-protected?
There are several reasons why a disk might suddenly become write-protected. It could be due to a physical lock switch on the device, changes in the system's security settings, a virus infection, or the disk being full. Additionally, it may be caused by file system corruption or bad sectors on the drive.
2. How do I change a write-protected disk to normal?
- Check for a physical lock switch and ensure it is in the unlocked position.
- Disable write protection through Windows Registry by modifying the StorageDevicePolicies key.
- Use Command Prompt to clear read-only attributes with the diskpart tool.
- Verify the security settings of the drive to ensure you have the correct permissions.
3. Why is my SD card unlocked but still write-protected?
If your SD card is unlocked but still shows as write-protected, it could be due to:
Corrupt file system on the card.
A virus or malware infection.
Bad sectors on the SD card.
Write protection enabled via software or operating system settings.
4. How do you write protect a USB stick?
To enable write protection on a USB stick, you can try one of the following methods:
Way 1. Use the physical switch, if available, to lock the device.
Way 2. Modify the drive's permissions in Windows by setting "Deny" for write access under the Security tab.
Way 3. Edit the Windows Registry to enable write protection using the StorageDevicePolicies key.
5. How does SD card write protect work?
Some SD cards have a small physical switch on the side that allows you to lock or unlock the card. When the switch is in the "lock" position, the card is write-protected, preventing any modifications or deletions.
6. How do you unlock a write-protected file?
To unlock a write-protected file, you can try these ways:
Method 1. In Windows File Explorer, right-click the file, select Properties. Uncheck the "Read-only" option in the Attributes section.
Method 2. Check the drive's permissions to ensure you have write access.
Method 3. If the file is part of a system or protected directory, you may need administrative rights to make changes.
DiskGenius - A go-to recommendation for utilities like file recovery, partition recovery, disk management, data backup, system migration, disk wiping, and more.
ô Free Download