Position: How Tos - Partition Management - How To Resize Partition in Windows 11/10/8/7 Without Data Loss? - 3 Ways
Table of Contents
Resizing a partition is the process of changing partition's size via extending or shrinking it. You can either increase a partition's size or shrink it based on your needs. Besides, you can also split a partition into two partitions or add free disk space to any existing partition.
A partition, also called drive or volume, is a part of continuous logical space on hard disk. A hard drive can be divided into multiple partitions which can be used to store a variety of files such as operating system and personal data. If your hard drive has very large capacity, and you can create more than one partitions on it, so that you can separate Windows, installed application and individual data by storing files on different partitions.
However, when you partition a hard disk, there might be chances that you are not satisfied with the partition size or number the first time you try. For example, one partition might be too small to hold all your data. If your system partition (Windows drive) is running out of free space, computer may slow down or even cause other issues.
How do I resize a partition in Windows 10 for free? Fortunately, resizing partition in Windows 10, Windows 8, Windows 7, Windows Vista and Windows XP becomes a lot easier than previous versions of Windows systems. We can use system built-in tool to resize volume as well as free partition manage to change partition size without data loss. In this article, we'll show you different methods to resize partition in Windows.
There are a number of reasons that users want to change partition size, and here we list the most common ones:
Disk Management is a Windows built-in utility, first introduced in Windows XP for the purpose of replacing fdisk command. It allows users to view and manage disk volumes on computer. Users can view disk layout, file system, status, capacity, type, etc. Besides, it allows users to create, delete, format extend or shrink partition with easy steps. Now we'll show you how to resize partition in Windows Disk Management.
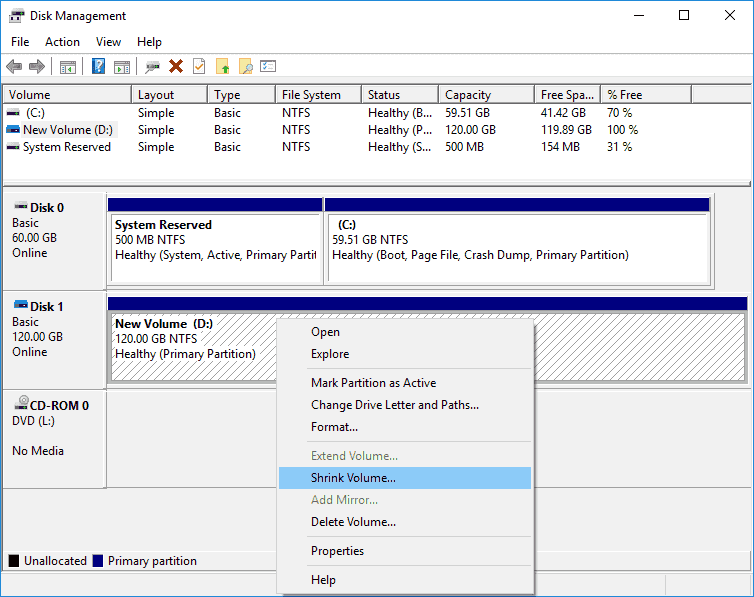
Step 1. Open Disk Management: Go to desktop and right-click on This PC ("Computer" in Windows 7) icon and click Manage option from context menu. Click Disk Management under Storage from the Computer Management window.
Step 2. Choose the partition you want to resize, right-click on it and select "Shrink Volume" option. If you want to increase the partition size, then choose "Extend Partition".
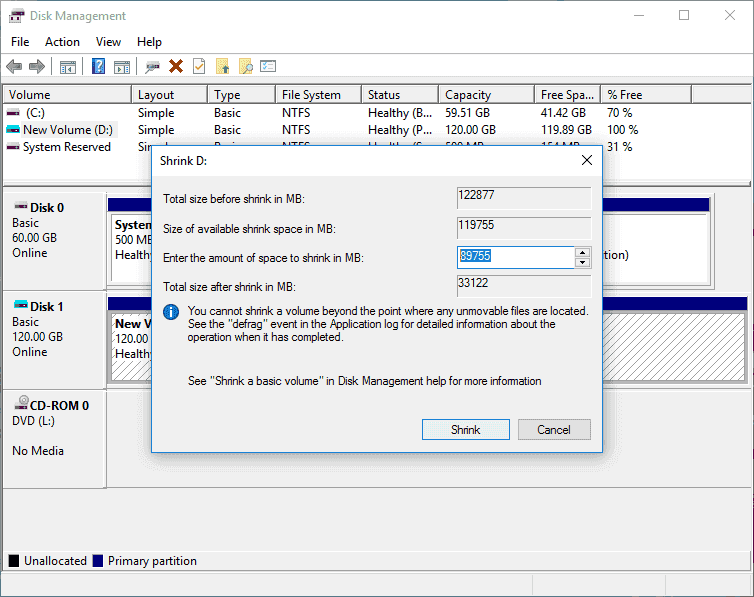
Step 3. Input the space you want to change and click "Shrink button". When you enter the amount of space to shrink, please note the unit is MB, for example, if you want to shrink 10GB from this volume, you should input 10240.
This solution gives three examples to show how to extend and shrink partition as well as add free space to an existing partition without losing data. In this section, we use a free partition manager program to complete these tasks.
Free Download free partition manager to resize partition in Windows
DiskGenius Free is high-end Windows partition manager software, and it is compatible with all versions of Windows systems including PC and server OS. It allows users to create, format, delete and convert partition; it is also able to move, resize, extend, shrink and split partition without damaging a single bit of data.
This guide below will extend a partition by moving free space from one partition to another without damaging existing data, and steps below also apply to extend C drive.
Step 1. Download and install DiskGenius Free Edition on your computer. Run the software and you can see its interface showing all partitions and disks on your computer with detailed parameters.
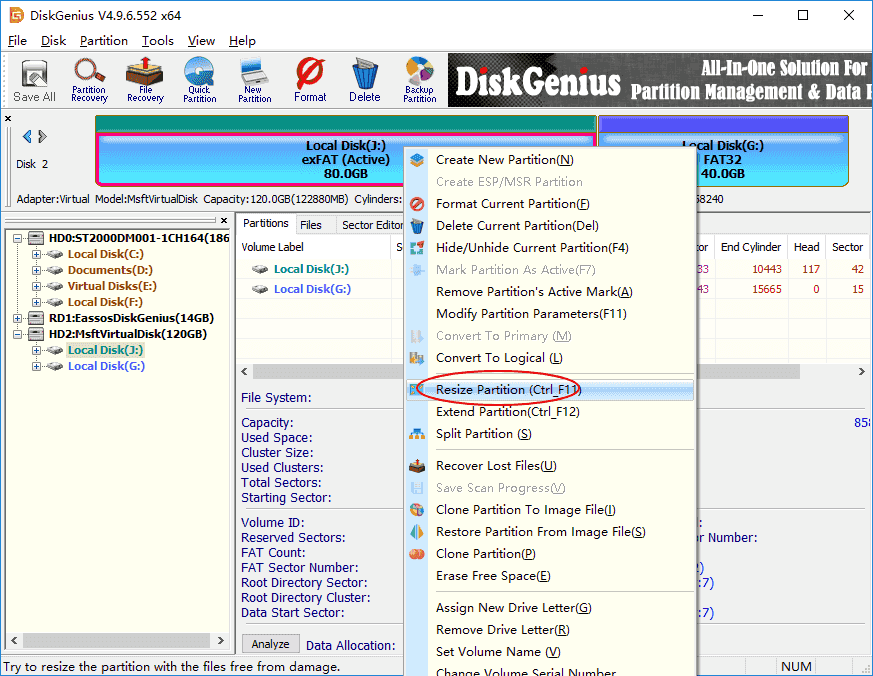
Step 2. Find and right-click on the partition you want to increase size and select "Extend Partition" from the displayed menu.
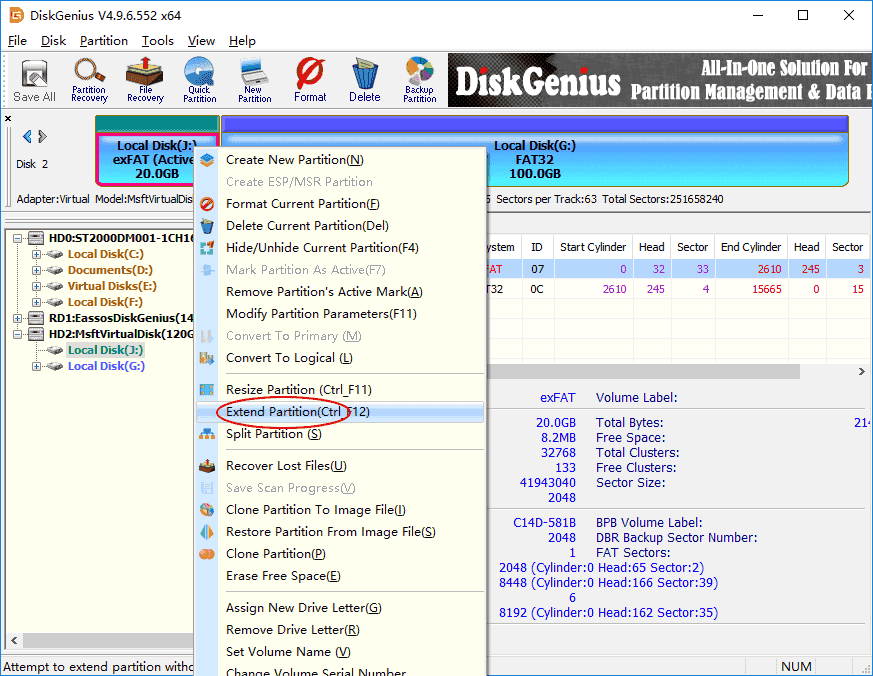
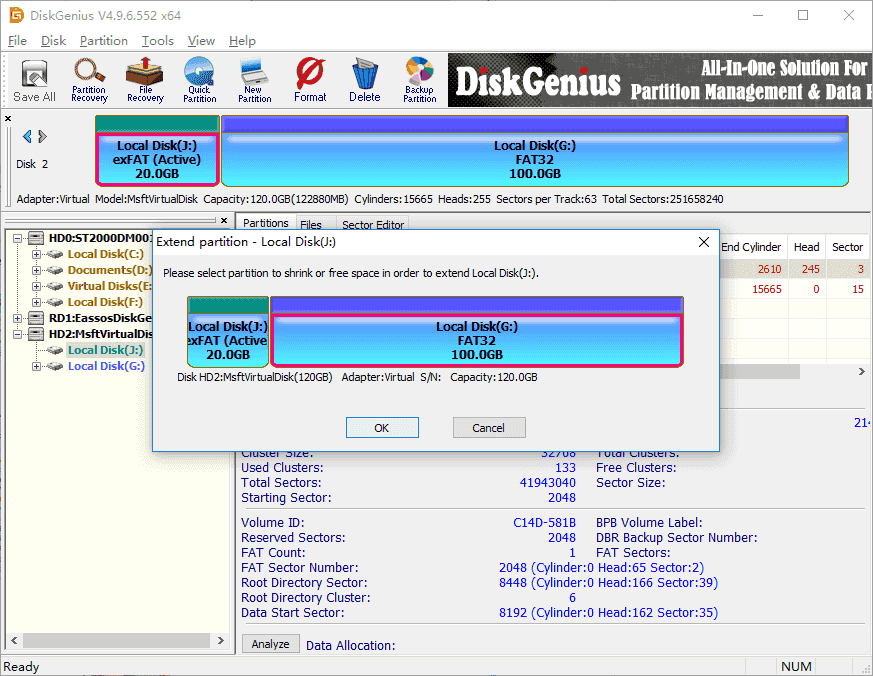
Step 3. Select the partition which contains enough free space and click "OK", so that you can move free disk space from this volume.
Step 4. Set disk space you want to move between partitions. You can either drag the partition or enter exact number to decide how much free space you want to transfer. Then click "Start" button.
Step 5. The program starts to resize partition based on your settings. Wait for the process to complete.
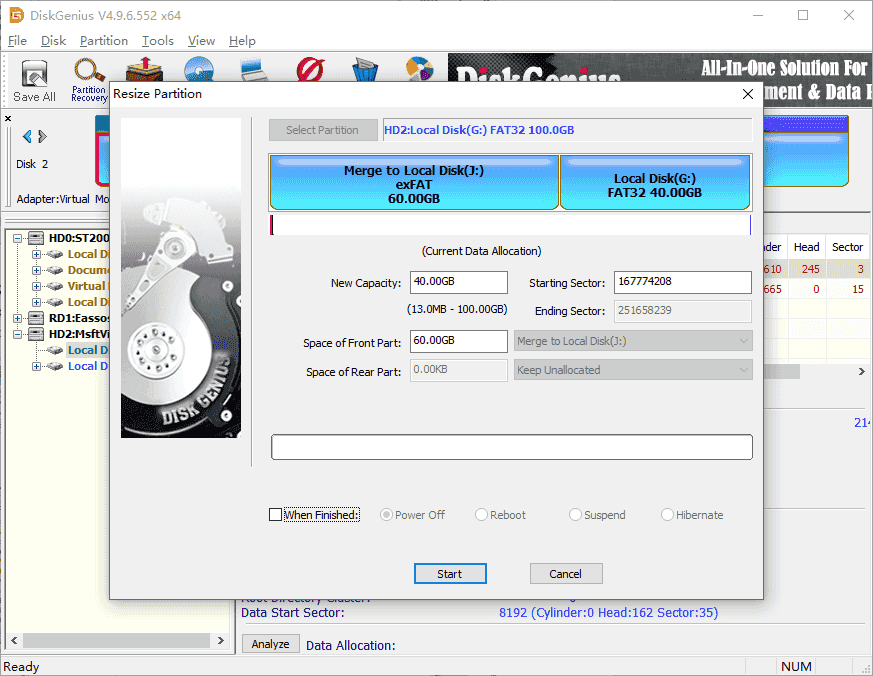
This tutorial shows you how to shrink a partition without data loss. The disk space shrunk from the disk can be added to other partitions, kept unallocated or created new partition.
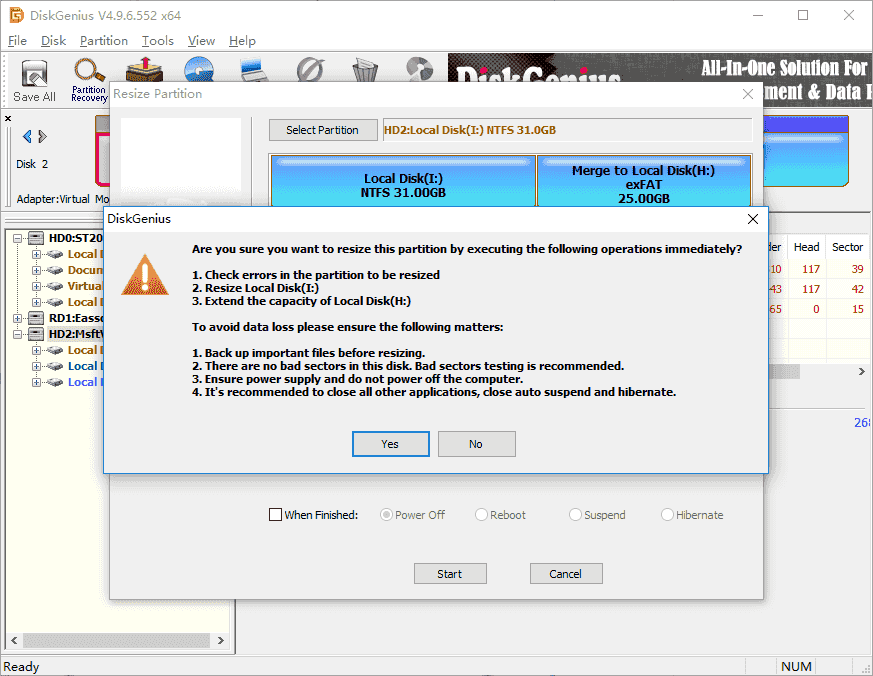
Step 1. Right-click on the partition you want to shrink and select "Resize Partition" from context menu.
Step 2. On the Resize Partition window you can set disk space you want to decrease.
You have three options on the disk space cut from the big partition: "Create New Partition", "Keep Unallocated" and "Merge to Local Disk". You can make the decision in line with your own requirement.

Step 3. Click "Start" button and the program starts to resize the partition based on your settings. Click "Complete" button when the process finishes.
Since system cannot store data on free/unallocated disk space, you need to create new partition on it or add it to current partition so that you can make use of this disk area. Now we'll show you how to add unallocated space to an existing partition without affecting existing data.
Step 1. Launch DiskGenius free version from your PC, right-click on the unallocated disk space and select "Allocate Free Space To". Then you can choose which partition to add this free space.

Step 2. DiskGenius prompts operations to be done. Click "Yes" and it starts adding unallocated space to partition.
Repartitioning a hard drive which is not properly partitioned is another solution to change partition size and partition number. During partitioning hard drive you can set partition type, number, size, volume name, drive letter, etc. thus you can arrange partition according to your needs.
Disk partitioning will delete all current partitions and data before creating new volumes, thus you'll lose all data on the disk which already contains volumes. On this occasion, you need to backup data before repartitioning hard drive. Besides, you also need to reinstall Windows if the disk to be partitioned is the one where Windows is installed.
Before partitioning hard drive, you should plan partition layout in advance, for example, which partition table to use, how many partitions you need and what the partition size you want, etc. As to tools to partition/repartition a disk you can use free partition manager which makes the process intuitive and very simple. You can complete the process with several clicks.
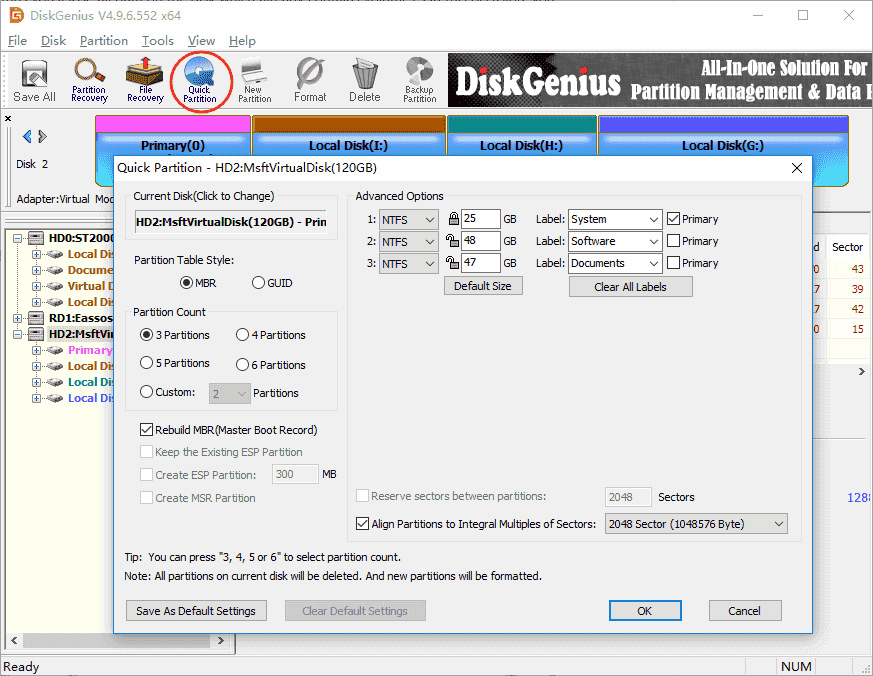
Step 1. Connect the hard drive you want to repartition and launch DiskGenius Free Edition.
Step 2. Select the disk to be partitioned and click "Quick Partition" button from the toolbar.
Step 3. Select partition number, size, type, 4K alignment, etc. and click "OK" button. Wait for a couple of seconds and the disk will be partitioned successfully.
Though the partition resizing process is easy and does not cause data loss, there are some things you should pay attention to when resizing partition for data security.
As we've mentioned it is surprisingly easy to resize partition in Windows 11/10/8/7/XP, and you can either extend or shrink partition depending on your requirement. Both Disk Management and DiskGenius Free Edition can help you resize Windows partition, but the latter one works more efficiently when dealing with complex situations. Don't be afraid to do it, but also don't go overhead. Resizing a partition which contains errors may lead to severe issues such as data loss. If you have any questions or need help on resizing partition in Windows 10, please feel free to email our support team.
 Facebook
 YouTube
 X
X