
Updated on May. 23, 2023
Position: Resource - Partition Management - How to Partition SSDs in Windows 11/10/8/7?
DiskGenius - The best free disk partitioning tool to format SSDs to FAT32, extend partition without losing data, migrate Windows 11 to HDD or SSD, check & repair bad sectors, etc. in Windows 11/10.
Do I have to partition my SSD? Is it healthy to partition my SSD? Partitioning an SSD (Solid-State Drive) is similar to partitioning a traditional hard drive, and the process is generally the same regardless of the storage medium. Partitioning an SSD in Windows can have both advantages and disadvantages, depending on your specific needs and circumstances. In short, whether it is good to partition your SSD in Windows depends on your specific requirements and preferences. If you have a clear plan for organization, want to separate different types of data, or need to set up a dual-boot configuration, partitioning can be beneficial. However, if you don't have a specific need for partitioning or prefer simplicity, keeping your SSD as a single partition may be more suitable. Here are some considerations:
Advantages of partitioning an SSD:
Disadvantages of partitioning an SSD:
This guide will show you how to partition an SSD in Windows 10 Disk Management. Remember to plan the partition size and consider your storage needs before proceeding. Note that the steps may vary slightly depending on the specific version of Windows you are using, but the general process remains similar.
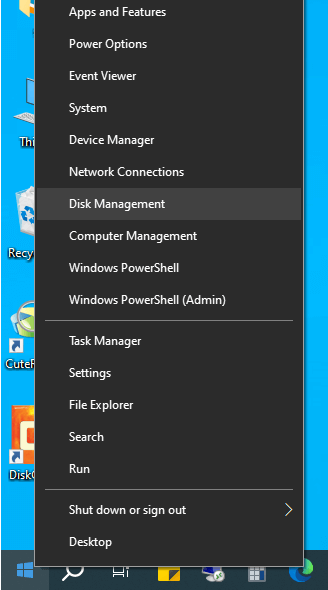
Step 1. Right-click on the Start menu and choose "Disk Management" from the menu. This will open the Disk Management utility.
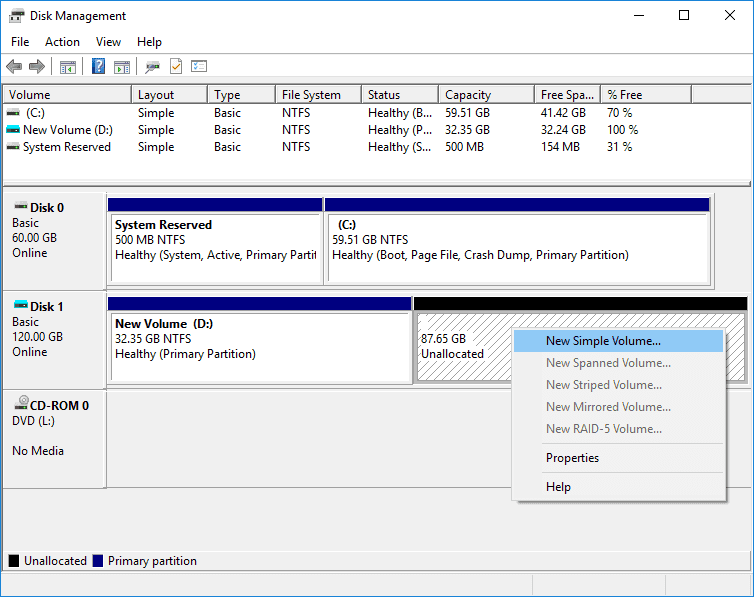
Step 2. Locate the SSD you want to partition and identify the unallocated space on the SSD.
In the Disk Management window, you'll see a list of disks connected to the computer. Find the SSD you want to partition. Moreover, you should also locate unallocated space on the SSD so that you can create a new partition. If there is unallocated space on the SSD, you can proceed to the next step. Otherwise, you'll need to shrink an existing partition to get unallocated space (Right-click the partition and select "Shrink Volume", and then follow prompts to specify the desired size).
Step 3. Right-click the unallocated space on the SSD and choose "New Simple Volume". The New Simple Volume Wizard will open.
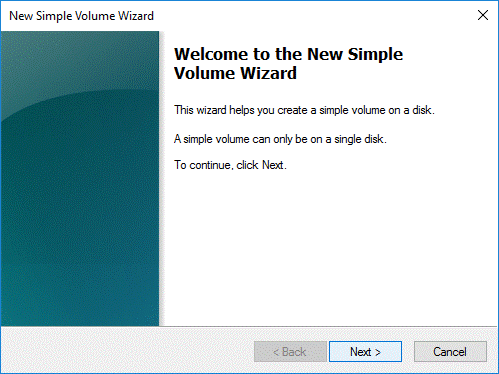
Step 4. In the New Simple Volume window, click "Next" button to continue.
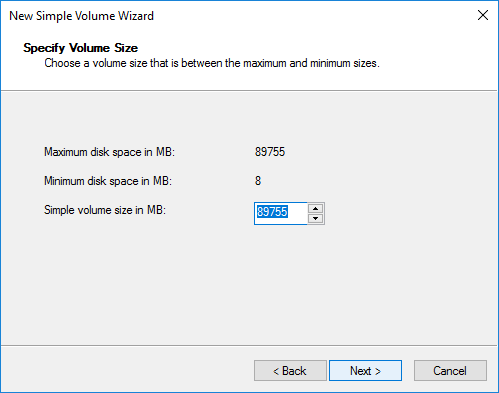
Step 5. Specify the size for the partition to be created and click "Next" button.
The partition size entered here are calculated in megabytes (MB), so make sure you enter a proper number. You can accept the default maximum size if you just want to create one partition on the available space.
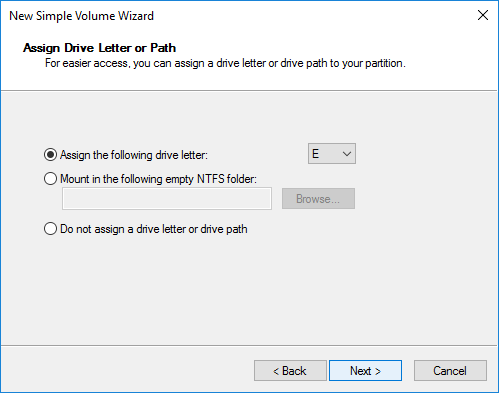
Step 6. Select a driver letter from the dropdown menu and click "Next" button.
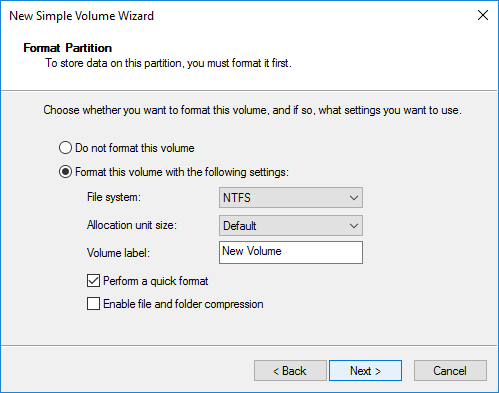
Step 7. Select a file system type that you want to use for the partition and click "Next" button.
The NTFS file system is the default and recommended file system for local drives, and yet if you want to create a large FAT32 partition or EXT4 partition, then try third-party disk partitioning software like DiskGenius Free Edition.
Step 8. View all settings for the new partition. Click "Finish" button if everything is okay.
Then Disk Management will create the partition, format the partition and assign a drive letter for it.
This part will show you how to partition an unallocated SSD (re-partition SSD) via simple steps as well as how to create a partition on an existing partition. These tasks are done by a free disk partition program – DiskGenius Free Edition. In addition to partitioning SSDs, you can also use DiskGenius to manage your SSDs:
Way 1: Partition the SSD using "Quick Partition" Feature (Re-partition the SSD)
Step 1. Open DiskGenius Free Edition and locate the SSD you want to partition.
All disks connected to your computer are listed in DiskGenius. Select one disk from the left pane, and you can view detailed information on the interface, for example, capacity, SN, sector size, disk GUID, partition table type, adapter type, etc.
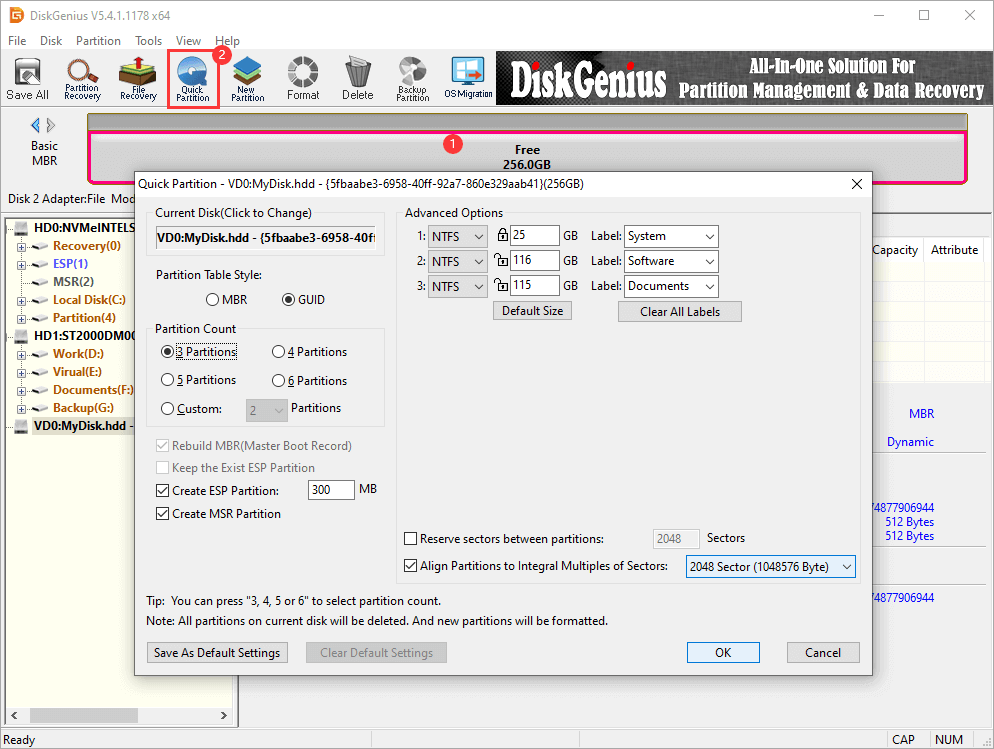
Step 2. Select the SSD you want to repartition, click "Quick Partition" on the toolbar. Then the Quick Partition window will open.
Be cautious to select the correct disk, as partitioning operations will remove any existing partitions and files. If you choose the wrong disk, you will suffer data loss issue.
Step 3. In the Quick Partition window, select a partition table between MBR and GUID, select partition count, set partition size, choose file system type, and select "Align Partitions to Integral Multiples of Sectors".
Click "OK" after configuring these settings, and DiskGenius starts to create and format partitions right away. A few seconds later, partitions will be created successfully, and you can view them in File Explorer.
Way 2: Create a New Partition on an Existing Partition without Losing Data
If there are already partitions on the SSD for which you want to partition, but you don't want to delete any partition or files, you can follow steps below to create a new partition based on an existing partition. The process neither formats the partition nor deletes files.
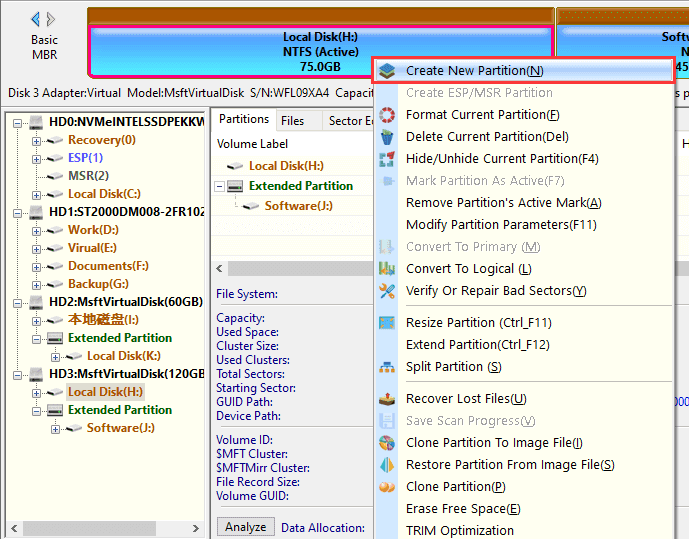
Step 1. In DiskGenius, Right-click a partition on the SSD and choose "Create New Partition".
It is recommended to choose the partition which is large and has much free disk space.
Step 2. Set partition size for both old and new partitions by dragging the edge of these two partitions or enter the exact number. Then click "Start" button.
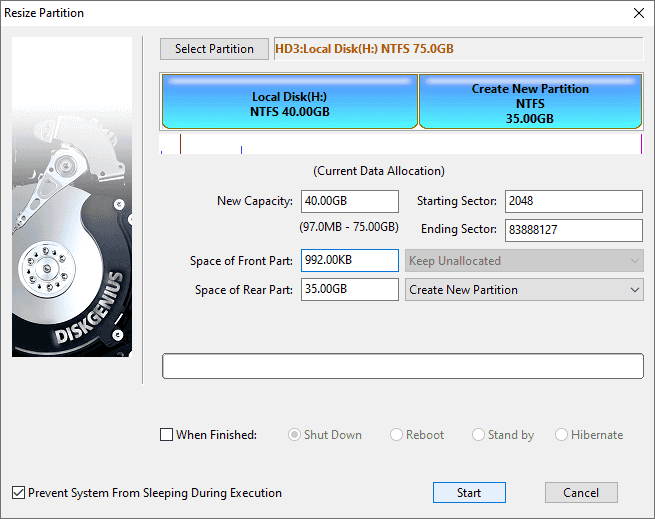
Step 3. Read any messages prompted by the application and follow the wizard to finish creating the partition.
DiskPart is a command-line utility in Windows that can be used to partition various storage devices, including SSDs. DiskPart commands are capable of creating, deleting, formatting, and modifying partitions on SSDs. Here's a general outline of how you can use DiskPart to partition an SSD:
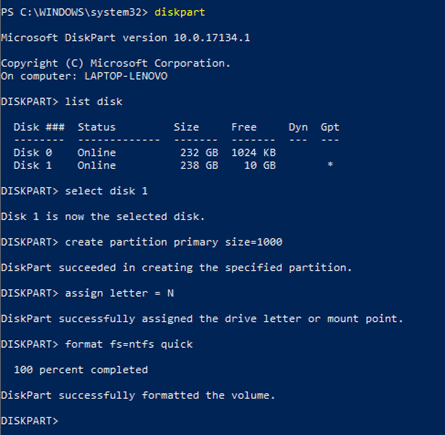
Step 1. Press Windows + E and choose "Windows PowerShell (Admin)".
Step 2. In Windows PowerShell, type diskpart and press Enter key.
Step 3. Type following commands and press Enter key after each command.
List disk (This command will list all available disks connected to your computer. Identify the SSD you want to partition based on its size or other attributes and remember the disk number)
Select disk # (Replace # with the number of your SSD so that it will be selected)
Create a partition primary (This will create a primary partition on the SSD. If you want to set the partitions size, then add parameters to the command, for example, create a partition primary size=1000)
Assign letter=N (Replace N with desired driver letter for the partition)
format fs=NTFS quick (This command will format the newly created partition as NTFS. You can replace NTFS with desired file system, for example exFAT.)
It's important to note that DiskPart commands directly modify disk partitions, so it's crucial to use them with caution and double-check your actions to avoid unintended data loss. Make sure to back up any important data on the SSD before proceeding with partitioning.
How to divide SSD storage in Windows 11 or Windows 10? The partition on your SSD can be divided into two partitions without formatting or deleting files. You may want to better organize files or install operating system, and yet there is a single large partition on the SSD. One of the solutions will be splitting the partition into two without affecting existing files. Here are steps to split an SSD partition:
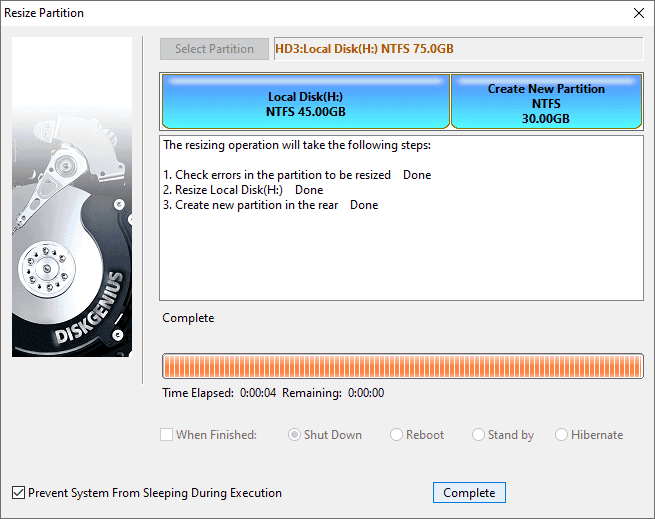
Step 1. In DiskGenius, right click the partition that you want to split and choose "Split Partition" from the context menu.
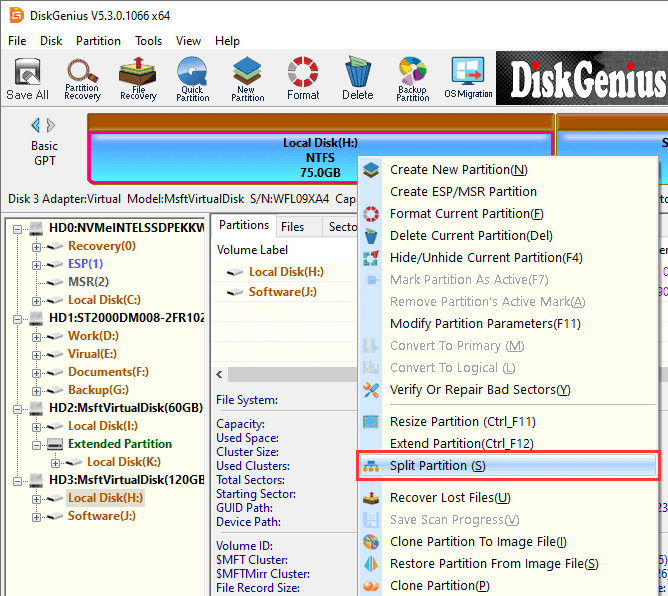
Step 2. Specify size for both partitions and click "Start" button.
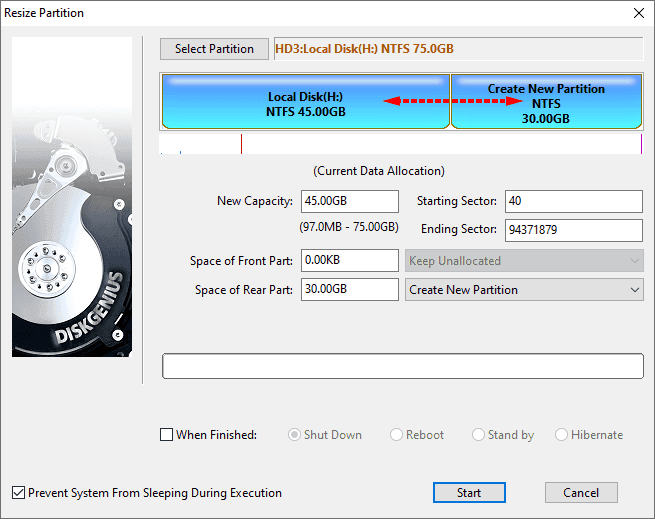
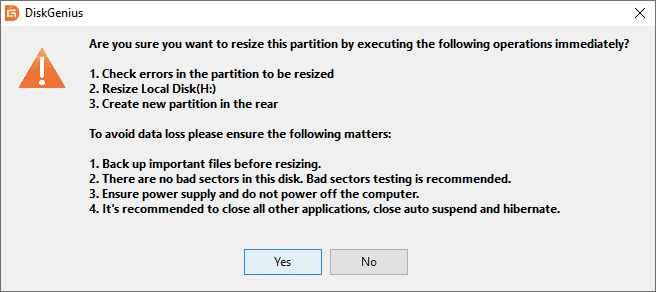
Step 3. Read messages on the dialog box which tells steps to be done and things should be noted. Click "Yes" button if you want to continue.
Step 4. Wait for the process to complete.
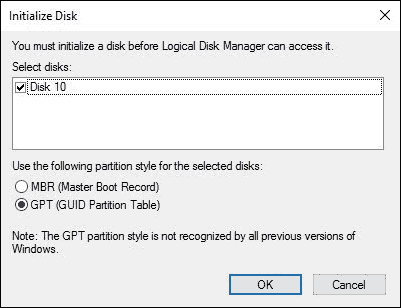
Usually, a newly bought SSD typically does not have any partitions by default. When you purchase a new SSD, it usually comes unpartitioned and appears as unallocated space in the Disk Management tool or any partitioning software you use. Unallocated space means that the SSD has not been divided into separate partitions or allocated for any specific use. It is a blank canvas for you to partition and format according to your needs. Thus, you need to initialize the SSD after it is installed on your computer. An easy way to initialize the SSD is right-clicking it in Disk Management and choosing "Initialize Disk":

Then select the appropriate partition style (MBR or GPT) and click "OK" button.
In addition to installing and initializing the SSD, there are several factors should be considered. By taking these precautions and carefully planning your partitioning process, you can reduce the likelihood of issues and ensure a smoother experience when partitioning your SSD.
MBR VS GPT, Which Is the Better Choice for Your Computer? GPT (GUID Partition Table) is generally considered better for SSDs (Solid State Drives) compared to MBR (Master Boot Record) for several reasons:
It's important to note that GPT is the recommended partitioning scheme for most SSDs, particularly in newer systems with UEFI firmware. However, if you have an older system that only supports BIOS or if you have specific compatibility requirements, MBR may still be suitable. In such cases, it's essential to consider the limitations of MBR and ensure it meets your needs.
As you can see, either partitioning an SSD or resizing partition is a simple task, and you can do it on your own. If the SSD contains files, do remember to back up your important data before repartitioning your SSD or hard drive to safeguard against any potential data loss or corruption. Should you need any help regarding partitioning an SSD, hard drive or USB drive, feel free to contact the support team who would like to provide you with free technical support.
1. Is it OK to make partition on SSD?
Yes, it is perfectly okay and acceptable to make partitions on an SSD (Solid State Drive). Partitioning an SSD can provide various benefits such as performance, better performance and flexibility. By planning carefully and considering your specific needs, you can effectively utilize the advantages of partitioning while ensuring efficient data management on your SSD.
2. How to partition SSD disk in Windows 10?
To partition an SSD disk, you can use the built-in disk management tools in Windows 10, for example, create new partitions, merge unallocated space, format SSD, etc. You can also use third-party partitioning tools like DiskGenius Free edition to manage and partition your SSD disk. The free disk partitioning software provides additional features and more advanced functionality compared to the basic Disk Management.
3. How to split SSD into 2 partitions?
To split an SSD into 2 partitions without losing data, you can use either Windows Disk Management or third-party disk partitioning freeware DiskGenius.
In Disk Management, you need to shrink the SSD drive to get unallocated disk space first. Then create a new partition on the unallocated space. For DiskGenius, the SSD drive will be divided into two partitions directly, the partition splitting process does not affect or deleting existing data. Here are steps to split a partition without losing data.
4. Should I partition my SSD for Windows 11?
Partitioning your SSD for Windows 11 is not a mandatory requirement, but it can be a useful strategy depending on your specific needs and preferences. The decision to partition your SSD for Windows 11 depends on your specific requirements and preferences. If you value organization, need a dual-boot setup, or prefer to separate system files from personal data, partitioning can be beneficial. However, if these factors are not significant considerations for you, or if you are comfortable managing your files within a single partition, partitioning may not be necessary.
5. How to partition SSD in laptop?
There are several options available when partitioning an SSD in laptop, for example, partition the SSD in Windows Disk Management, partition SSDs using Diskpart commands, partition the drive using free disk partitioning software.
6. Does partition make SSD slower?
Partitioning an SSD itself does not make it slower. The act of creating partitions on an SSD does not directly impact its performance. Modern SSDs are designed to handle partitioning and perform optimally under normal usage. The benefits of partitioning, such as improved organization, data management, and separation of operating system files from user data, often outweigh any potential performance impact.
To ensure optimal performance, it is recommended to keep your SSD firmware up to date, maintain sufficient free space, perform regular disk maintenance, and follow best practices for SSD usage.
7. Can I partition 256GB SSD?
Yes, you can partition a 256GB SSD. Partitioning is a process that divides a disk into separate sections or partitions, and the size of the disk does not restrict the ability to create partitions.
With a 256GB SSD, you have a significant amount of storage space to work with. You can create multiple partitions on the SSD based on your specific needs and preferences. For example, you can allocate one partition for the operating system and programs, and another partition for storing personal files, documents, and media.
When partitioning, it's important to consider the size requirements of each partition and allocate space accordingly. Be mindful of leaving enough free space for the SSD to maintain optimal performance. It's also a good practice to back up your data before performing any partitioning operations to protect against potential data loss or corruption.
8. How should I partition my 1TB SSD?
When partitioning a 1TB SSD, the partitioning strategy will depend on your specific needs and preferences. As to steps of partitioning an SSD, you can follow guidance discussed above.
9. How many partitions should I have on 2TB SSD?
You can decide the number and sizes of partitions based on your specific requirements. For example, you may want additional partitions for specific purposes, such as a partition for virtual machines, a partition for media editing projects, or a partition for gaming libraries. It is also okay to have one 2TB partition on the drive as long as it meets your needs.
10. Can you merge SSD partitions without losing data?
Merging SSD partitions without losing data is technically possible, but it involves more complex procedures and carries a higher risk of data loss compared to other partition operations. For example, in Disk Management, you need to delete a partition to get unallocated space which will be merged to another partition. It is always recommended to back up your data before attempting any partition modifications, including merging partitions.
11. Can SSD be partitioned for dual boot?
Yes, an SSD can be partitioned for a dual-boot setup. Partitioning the SSD allows you to install and run multiple operating systems on separate partitions of the same drive. This enables you to choose between different operating systems when starting up your computer. Ensure that your SSD has sufficient capacity to accommodate multiple operating systems and associated programs/files.
12. How to partition SSD without OS?
To partition an SSD without an operating system installed, you can use a bootable partition management tool. Here's a general guide on how to partition an SSD without an operating system:
Step 1. Create a bootable USB drive using DiskGenius Free Edition.
Step 2. Boot the computer from the USB drive.
Step 3. Select the SSD drive you want to partition and click "Quick Partition".
Step 4. Select partition number and size. Then click "OK" button.
13. How to increase C drive space in Windows 11 without formatting?
In Windows 11, you can increase the space of the C drive (system partition) without formatting by utilizing the Disk Management tool, Diskpart commands or DiskGenius Free Edition. For detailed steps, refer to the page: How to Extend C Drive without Data Loss In Windows 11/10/8/7?
14. How to change partition size in Windows 11 without formatting?
Partition size can be changed without losing data, and there are various ways to resize a partition, see the article: How To Resize Partition in Windows 11/10/8/7 Without Data Loss? [3 Ways]
It's important to note that the resizing process may take some time, especially if you're working with large partitions or a significant amount of data. Additionally, make sure you have a backup of your important data before making any changes to your partitions to avoid the risk of data loss.
15. How to re partition without destroying the data in Windows 11?
Disk repartitioning process deletes all partitions and data, causing data loss. If you want to repartition a drive without destroying the data in Windows 11 or Windows 10, you need to back up files to another disk before partitioning the disk.
DiskGenius - Free disk partition software for Windows users who want to partition a hard drive or SSD with 4K alignment, split a drive without losing data, convert MBR to GPT, erase disk data, etc.
DiskGenius is a one-stop solution to recover lost data, manage partitions, and back up data in Windows.
Download Facebook
 YouTube
 X
X