Position: Resource - Disk Utilities - How to Fix Black Screen on Windows 10 Without Losing Data?
Table of contents:
For most Windows users, the computer black screen should be one of the most challenging problems to encounter, for there is not any information we can use to figure out the causes or solutions. What's more, the black screen prevents us from accessing Windows, which seems that there is little we can do to get it repaired.
The black screen issue on Windows 10 computers can be roughly classified into two types. The first is the general and plain black screen, which means the screen is totally dark without showing anything else. The other type of black screen problem is usually called "Windows 10 black screen with cursor". Just as the literal meaning, it indicates the computer display is black and there is a cursor shown on. Usually, the cursor tracks the movement of mouse. According to the feedbacks on the Internet, the Windows black screen with cursor issue happens more frequently than the problem without the appearance of a cursor. Moreover, the situation that the cursor gives response to mouse movement is not a bad sigh, which means the Windows operating system is not totally dead to some degree.
Either issue can happen on startup Windows 10, before / after logging in Windows, or after installing updates, etc. Whatever the situation you are facing, the issue won't repair on its own, and you need to try a couple of fixes to get Windows back to work.
Causes behind the black screen can vary from one to another, because it can range from logical issues like drivers, system updates to physical problem for example, damaged/malfunctioning graphic or hard drives. Although the black screen issue does not give any information except for a cursor, you can find some clues below to why my Windows 10 PC/laptop stuck on a black screen:
During the procedure of troubleshooting unbootable computer, you may need to try several fixes some of which has the risk of damaging data. Therefore, if you care more about data than the computer OS, it is strongly recommended to backup or recover data from the crashed computer in the first place. The easiest data recovery method is DiskGenius.
DiskGenius runs smoothly on Windows 11/10/8/7/Vista/XP and Windows Servers. The free edition offers the feature to create a bootable USB drive which can be used to deal with unbootable computes. In addition to recovering deleted/lost files and partitions, DiskGenius also supports to clone hard drive, clone partition, backup a partition or hard drive into an image file, migrate Windows 11/10 OS, read/write EXT4/3/2 drive, manage partitions on virtual disk, dynamic disk, etc.
Reminder: it is also a good idea if you can take out the hard drive from the problematic computer and then connect it to another working computer. After that the data backup or data recovery will be much easier. However, this requires that you know how to remove and connect a hard drive properly.
Here is the step-by-step guide of retrieving files from crashed computer with bootable USB drive:
Step 1. Create a bootable USB drive.
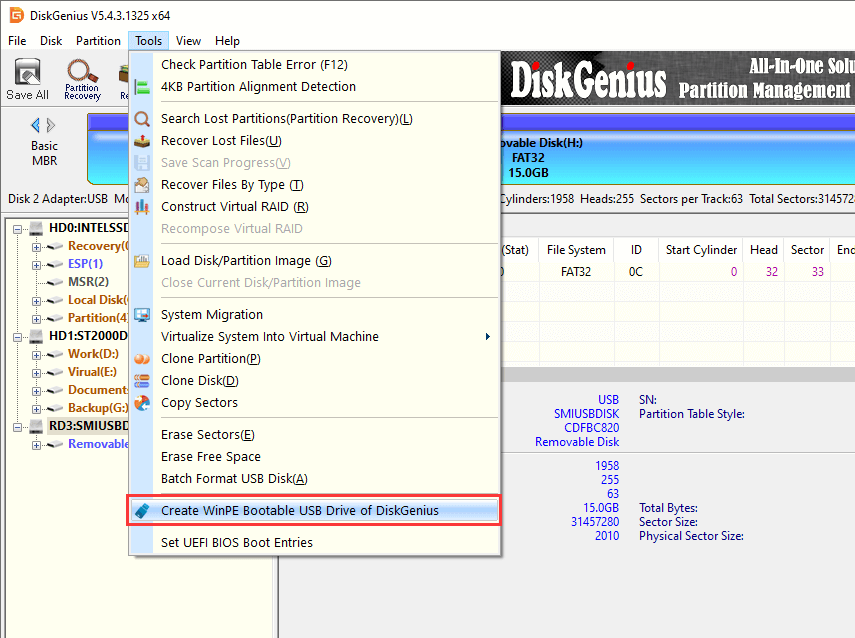
1. Insert a USB drive to computer that can boot to Windows 11/10/8/7 and launch DiskGenius. Make sure the USB flash drive can be recognized by DiskGenius. Then click "Tools" – "Create WinPE Bootable USB Drive of DiskGenius", see the picture below:
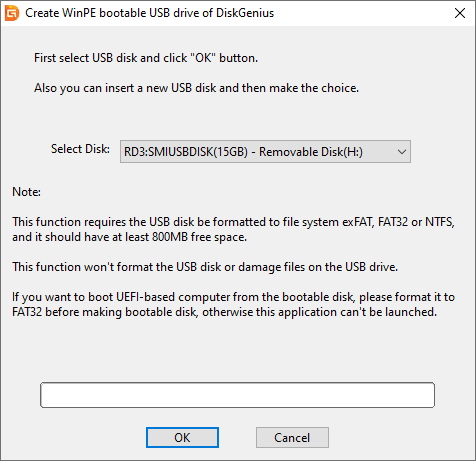
2. Find and select the USB drive from the drop-down list, and then click "OK" button.
Step 2. Boot computer from the bootable USB drive.
1. Connect the USB drive back to the black screen computer and press the power button.
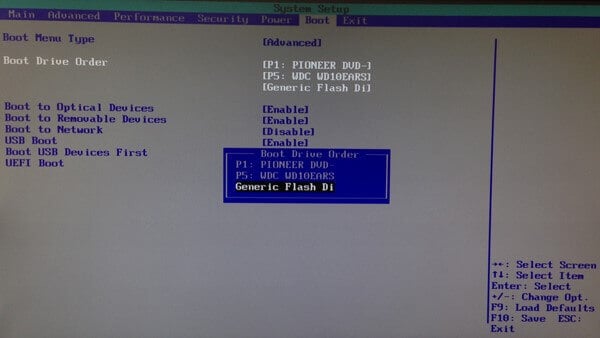
2. Press the specified key prompted on the screen to enter BIOS and change boot sequence. Make the USB drive as the boot device, save changes and exit.
3. Restart computer. Then computer will boot from the USB drive and DiskGenius WinPE edition will be launched automatically.
Step 3. Backup or recover data from the crashed internal hard drive.
It is very likely that your files are recognized and displayed in DiskGenius directly once the application is launched. Select a partition where your files are stored and click "Files" tab, then you can view files. If all files are correct, then copy them to another hard drive.
If you are not that lucky, you just need to go through following steps. It is possible that the partition is inaccessible or disappeared, so file recovery or partition recovery should be performed based on the actual situation.
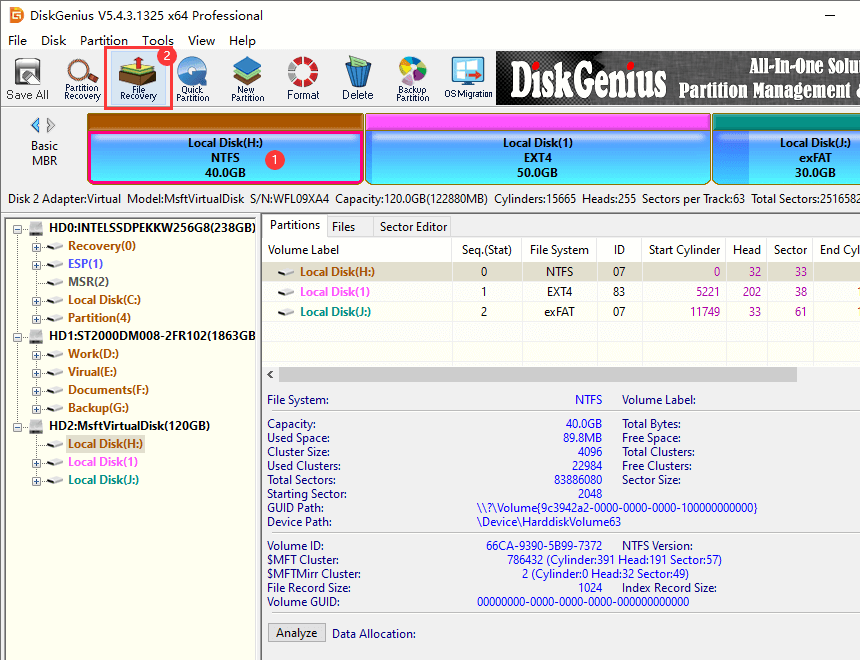
1. Select the partition from which you want to retrieve lost files and click "File Recovery" button.
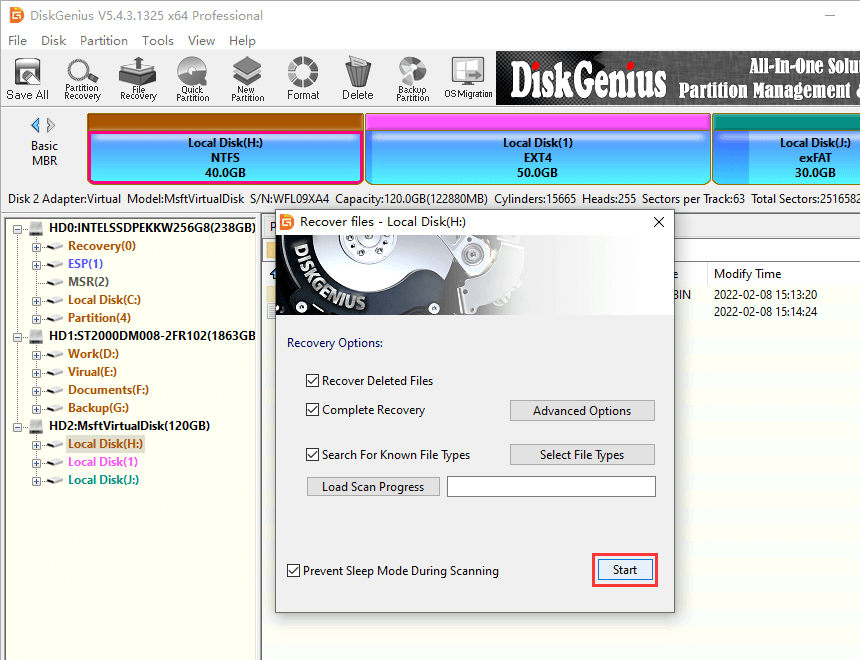
2. Click "Start" button once you see the following pop-up window. After that, DiskGenius starts to scan the drive and look for recoverable files.
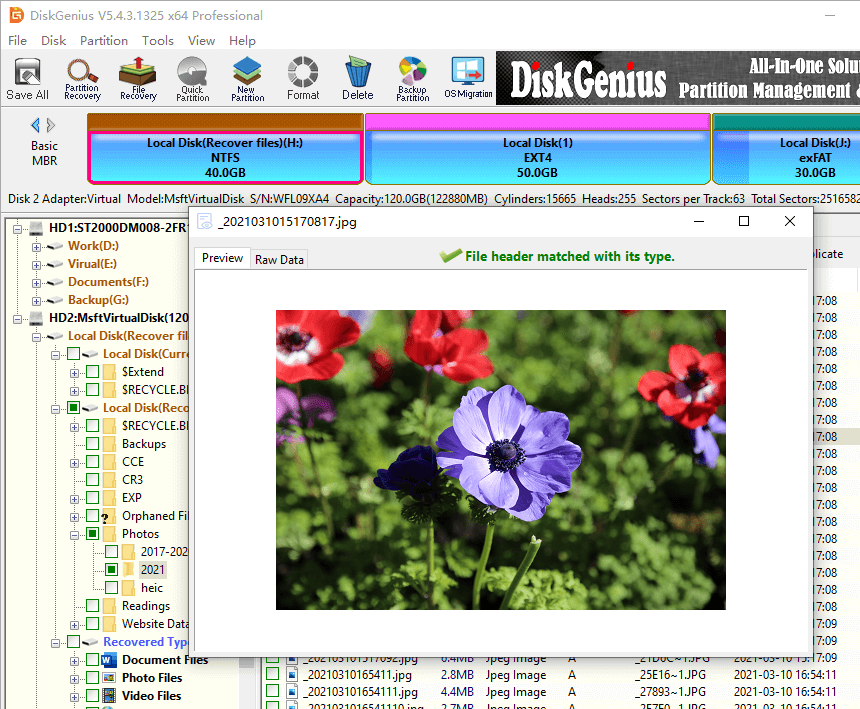
3. Preview lost files to check if they are damaged by the black screen issue. File content can be previewed on a pop-up window, telling if the file is okay or corrupted.
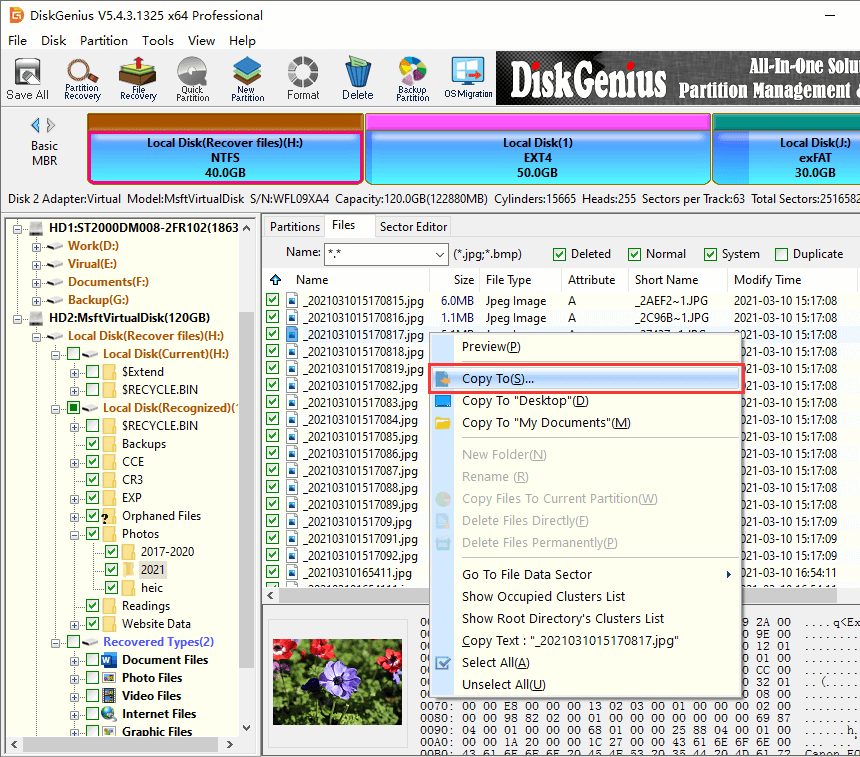
4. Choose files and folders to be recovered, right-click selected data, and select "Copy To". Next, you need to specify a target location to store recovered data.
This part will go through some troubleshooting steps to resolve the issue on Windows 10 computer. No need to feel complicated, even if different solutions are presented here. We will try to explain fixes from the easiest to difficult, so you can start from the first solution until the problem is fixed.
Method #1: Check if there are connection problems
When the black screen problem appears before your computer signs into Windows 10, you'd better pay attention to the connections. Here are some points for your reference.
Check the connections for graphic card. First, you need to make sure the physical connection of the graphic/video card is good, for example, disconnect and reconnect the graphic card after shutting down computer. For some computers that have both a discrete and integrated graphic card, you should also figure out whether the discrete card is causing the problem (Moreover, some updates of UEFI and BIOS may also disable the discrete graphic card). On top of that, you can also try a different video card to determine whether the black screen issue has something to do with a broken graphic.
Check display. The connection between the display and computer might be lost. Windows key + Ctrl + Shift +B is the key combo you can try to restart the vireo driver and refresh the connection.
Remove non-essential peripherals. It has been reported by many users that some connected devices can be the reason of black screen. To eliminate this aspect, you just need to disconnect all unnecessary devices, such as USB drives, docking station, printers, Bluetooth, etc. After that, restart computer and see if the problem still exists.
Method #2: Restart Windows Explorer service
Sometimes, the black screen occurs after logging in Windows 10, and you can still use the mouse. This might be caused by Windows Explorer process. Here is a quick guide to restart the process.
Step 1. Press Ctrl + Alt + Delete and choose "Task Manager". (If the Taskbar is available, you can easily launch Task Manager with it)
Step 2. Locate and right-click the "Windows Explorer" service, then click "End task" option.
Step 3. Click "File" menu and choose "Run new task" option.
Step 4. Type explorer.exe in the input box and click "OK".
Method #3: Check the boot order
The boot device on your computer should be the hard drive or SSD where Windows operating system is installed, or the bootable media (e.g. a USB drive, DVD) that stores boot options.
Step 1. Restart computer and press the prompted key (e.g., F2, Del) repeatedly during the startup to enter BIOS
Step 2. Select "Boot" entry or something similar and see if the boot device is set correctly.
Apart from checking the boot order, you can also try resetting BIOS/UEFI to default settings: In BIOS, find the item saying "Load defaults" or "Optimized defaults". The item is named differently based on the brand of your device. Select the option and reset it to default settings.
Method #4: Test hard drive
The computer crash is one of the signs of hard drive failing. When the hard drive is in bad health status, you should act quickly to rescue files. Here are two simple ways to test hard drive.
Way 1. Check S.M.A.R.T. information.
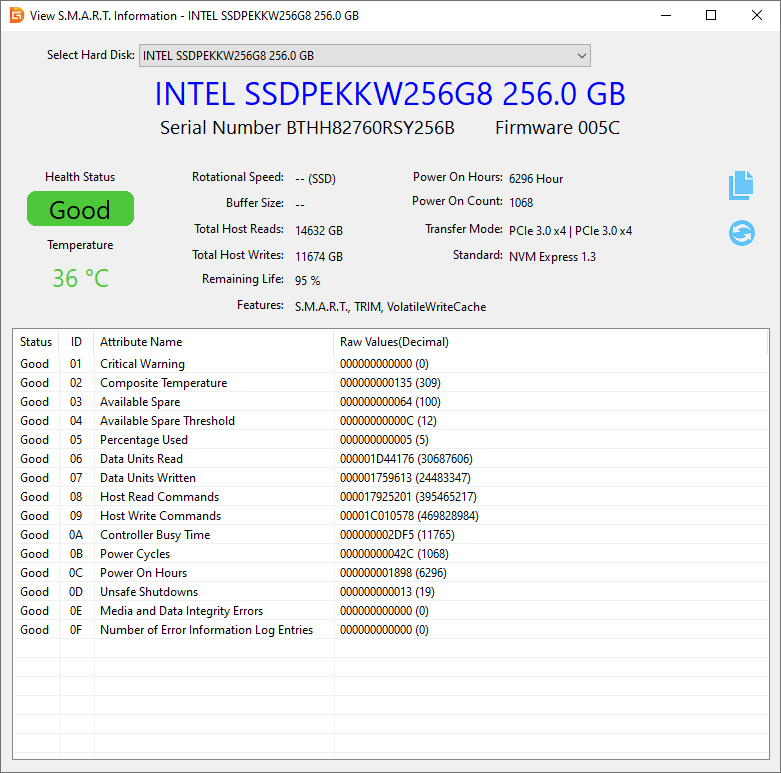
S.M.A.R.T. information monitors hard drive health status in different aspects, and we can get a quick and overall condition of hard drive by viewing S.M.A.R.T. information. DiskGenius Free Edition includes a S.M.A.R.T. tester:
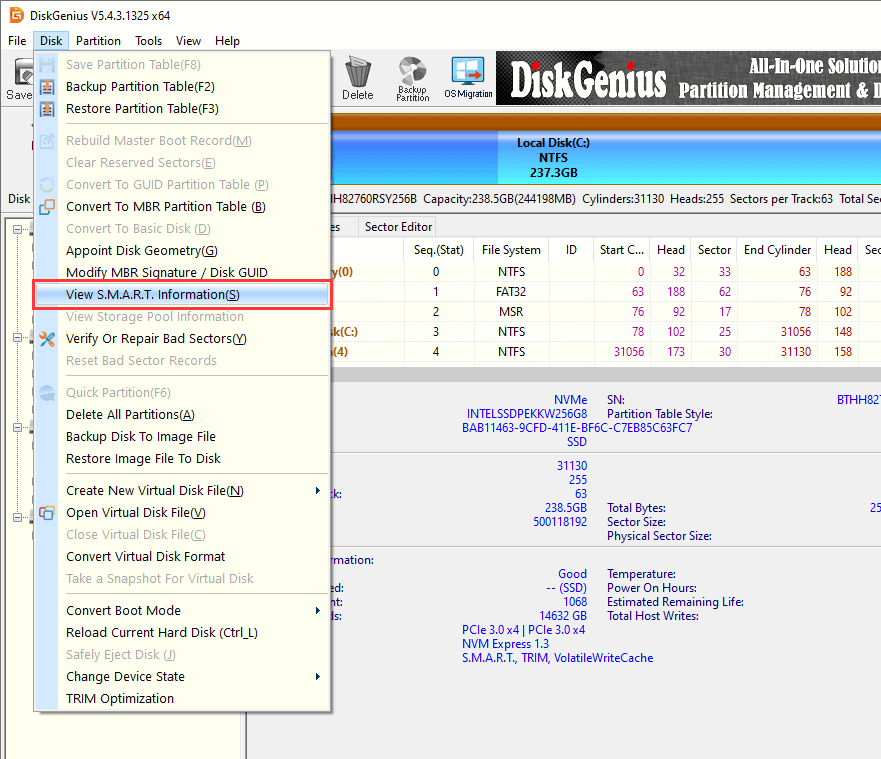
1. Run DiskGenius Free Edition, select the hard drive or SSD you want to test on the left pane. Then click "Disk" – "View S.M.A.R.T. Information".
2. Now the pop-up window gives the detailed information. If the "Heath Status" says "Bad", "Warning", "Damaged" or something like that, you should back up or recover data as soon as possible.
Way 2. Check or repair bad sectors for hard drive.
Bad sectors not only prevent data access but also makes hard drive not recognized. Once a hard drive develops bad sectors, it is recommended to backup or recover data first and then replace it with a new one. Here is how to check bad sectors with DiskGenius Free Edition. The feature of repairing bad sectors is also provided, and yet it is not suggested to run bad sector repairing before all files get backed up. Because the bad sector testing repairing process, unlike the bad sector testing process, will damage data.
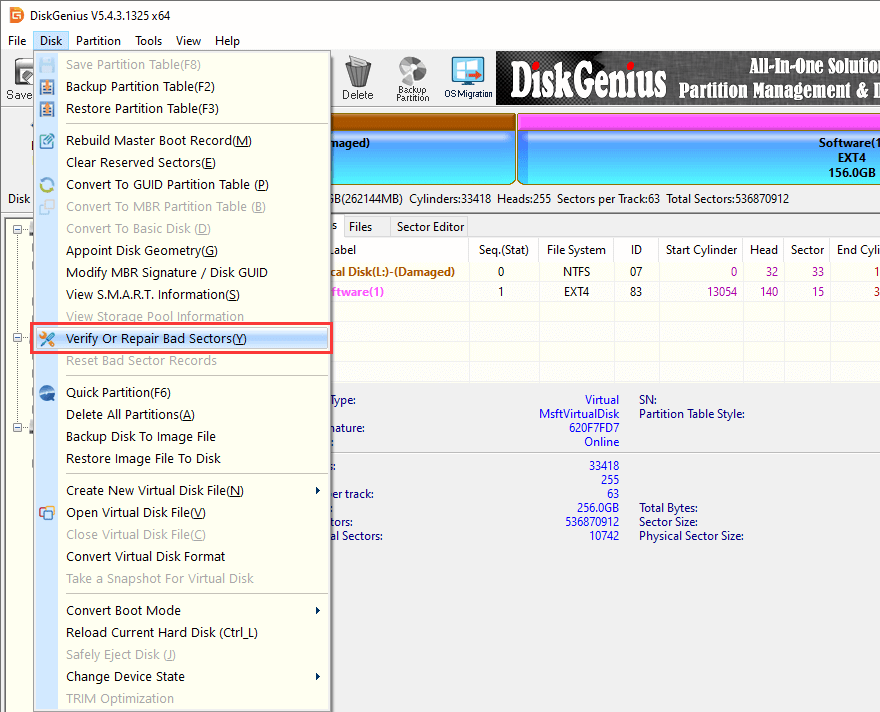
1. Launch DiskGenius Free Edition, select the hard drive, SSD or external hard drive you want to test, and choose "Verify Or Repair Bad Sectors" from the "Disk" menu.
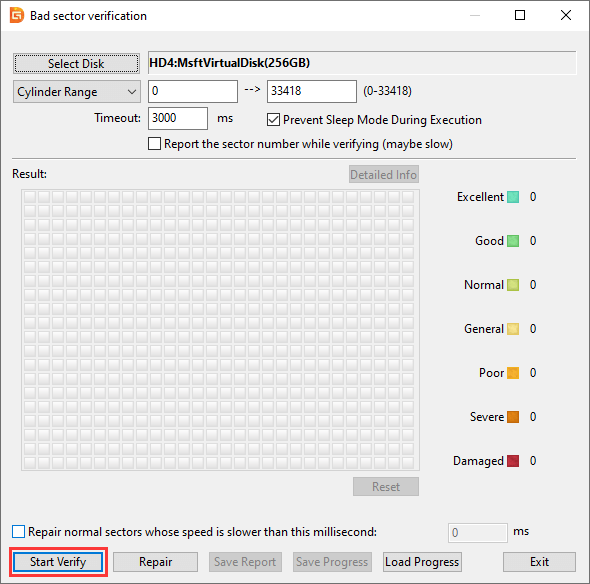
2. Click "Start Verify" button.
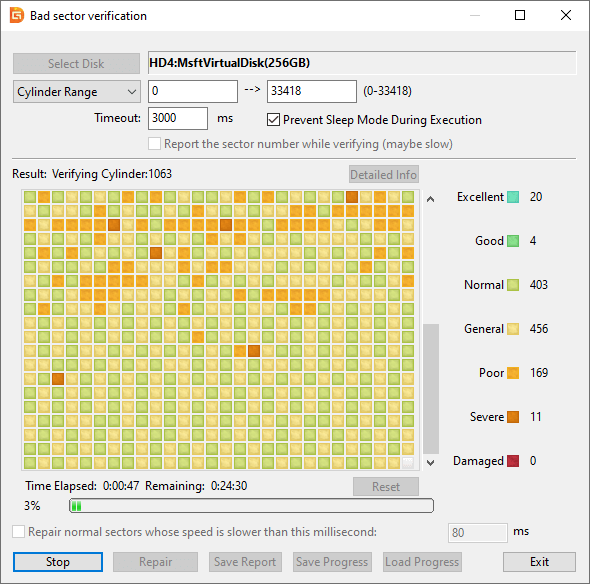
3. DiskGenius is scanning the chosen disk and verifying if there are bad sectors.
Method #5: Windows Automatic Repair
Since the computer is no longer bootable, a recovery drive is needed here in order to access the Windows Repair. Here is a guide to create a Windows Recovery drive for Windows 11/10.
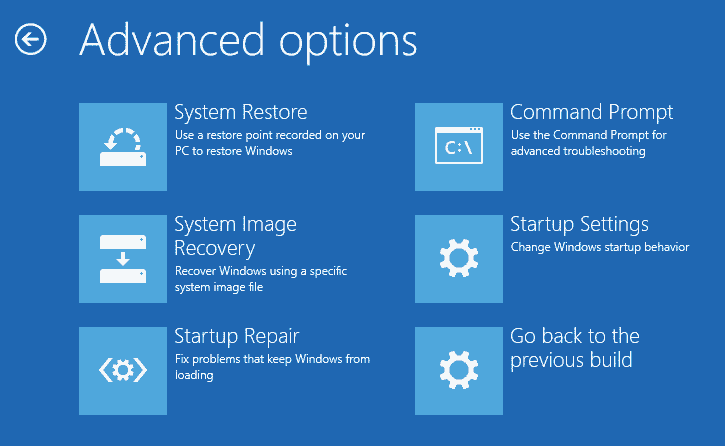
Step 1. Use the recovery drive to boot computer. When you see the following screen, click "Advanced options" button.

Step 2. Click Troubleshoot > Advanced options > Startup Repair.
Method #6: Boot into Safe Mode
After booting into Safe Mode, you can try more fixes, such as repair corrupted drivers, remove buggy updated, uninstall software, etc. To access Safe Mode, the Recovery Drive is needed here too.
Step 1. Use the recovery media to boot the computer, choose Advanced option >Startup Settings > Restart.

Step 2. Select "Enable Safe Mode with Networking" by pressing F5 once the "Startup Settings" screen shows up.

Fix 1. Reinstall drivers for graphics
1. Right-click "Start" menu and choose "Device Manager".
2. Expand the item "Display Adapters". Right-click the graphic adapter and choose "Uninstall device".
Fix 2. Rollback graphic drivers
1. Right-click "Start" menu and choose "Device Manager".
2. Expand the item "Display Adapters". Right-click the graphic adapter and choose "Properties" options.
3. Click "Driver" tab and hit "Roll Back Driver" button.
4. Select a reason why you want to roll back drives and click "Yes" button.
Fix 3. Uninstall improper system updates
If your computer gets the black screen issue after install some system updates recently, then go to uninstall the patch manually.
1. Right-click "Start" menu and choose "Settings".
2. Then click Apps > Apps & features > Programs and Features > View installed updated.
3. Highlight the update you installed recently and click "Uninstall".
4. Restart computer and check if the black screen problem is fixed.
Method #7: Restore system to a previous status
System restore is a good option to fix any system problems, for it can help you go back to a previous working status with ease. The system backup might be made by Windows or some third-party backup software like Isoo Backup. So the detailed system restoring steps are different depending on how you created the backup.
Note: Back up important files which are stored on system partition (usually C drive), for the system restore undo system changes you made after the backup.
Method #8: Fix black screen during Windows 10 installation
It's not uncommon to see a black screen from time to time during the installation of Windows 10. In most cases, the installation process is running in the background, but the black screen should not take too long. If it keeps a couple of hours, you should take some steps, for example, shut down computer (force power off), then unplug peripherals, test hard drive, try a new installation image, etc.
1. When I startup my computer the screen is black?
Computer black screen on startup is common to see. Generally, you need to make a couple of checks and attempts before you find the very solution to Windows 11/10 black issue, for example, check hard drive connection, display drives, test hard drive bad sectors, reinstall drivers, remove buggy system updates, etc.
2. How do I fix a black screen with just the cursor Windows 7?
First, you can try ctrl+alt+del. When Windows 7 black screen with cursor ctrl+alt+del not working, the following solutions may help a bit:
3. What do I do if my computer turns on but the screen stays black?
When computer turns on but stays on black screen, you can first try press the key combination: Windows +Ctrl + B, then see if it helps. If this does not make difference, you will need to boot to the Safe Mode to try solutions discussed in this page above.
4. How do I fix black screen when installing new programs on Windows 11/10 computer?
To get rid of the problem, go through following steps:
Step 1. Boot to Windows safe mode.
Step 2. Run SFC and DISM in Command Prompt.
Step 3. Check and reinstall graphic drives.
Step 4. Delete and reinstall the program.
Hopefully, this guide can help you troubleshoot the problem successfully. If none of these solitons works, you may need to try reinstalling Windows from scratch. To keep your data safe while fixing the black screen issue, perform data recovery or data backup at the very beginning. DiskGenius shall be an ideal option for the task.
DiskGenius - An ideal choice to rescue data when computer is crashed, partition becomes RAW, hard drive is formatted, or partitions are missing in Windows 11/10/8/7.

DiskGenius is a one-stop solution to recover lost data, manage partitions, and back up data in Windows.
Download