
Updated on Jun. 11, 2025
Position: Resource - Disk Utilities - How To Fix Kernel Security Check Failure in Windows 11/10/8/7?
DiskGenius - Free disk partition software to rebuild MBR, create a bootable USB drive, manage UEFI boot options, migrate Windows OS to HDD/SSD, and so on in Windows 11/10/8/7.
If you encounter a blue screen error at startup on your Windows 11/10 device, you may be presented with a stop code that indicates the source of the issue. The stop code can vary depending on the cause of the error, but some users have reported seeing the KERNEL_SECURITY_CHECK_FAILURE stop code. This common error has led many users to search for ways to fix the Windows 11/10 kernel security check failure. Fortunately, resolving this issue is not difficult.
Before we explore the solutions, it's important to understand the main causes of blue screen errors and kernel security check failures:
- Installed software conflicts
- Memory problems
- Virus infection
- Incompatible or outdated drivers
- Corrupted Windows system files
- Damaged hard disks
Here are the common scenarios that you may encounter this blue screen error, and hope you can get some clue to solutions:
Once you have identified the cause of the kernel security check failure, you can try different solutions to resolve the issue based on your specific situation. However, before attempting any of the fixes outlined in this article, it's advisable to perform some basic troubleshooting steps first. For instance, running a full virus scan can help remove any malware that may be causing the error. It's also a good idea to back up any important files before proceeding with the fixes to prevent data loss in case of unintended consequences. Once you've taken these precautions, you can proceed to try the solutions provided below.
Memory problems can cause blue screen errors and stop code kernel security check failure. So how do you identify memory problems? Fortunately, Windows has built-in memory diagnostics tools to help you identify memory problems, which makes the whole process easier.
This section will show you how to run the memory diagnostic tool in Windows 11/10.
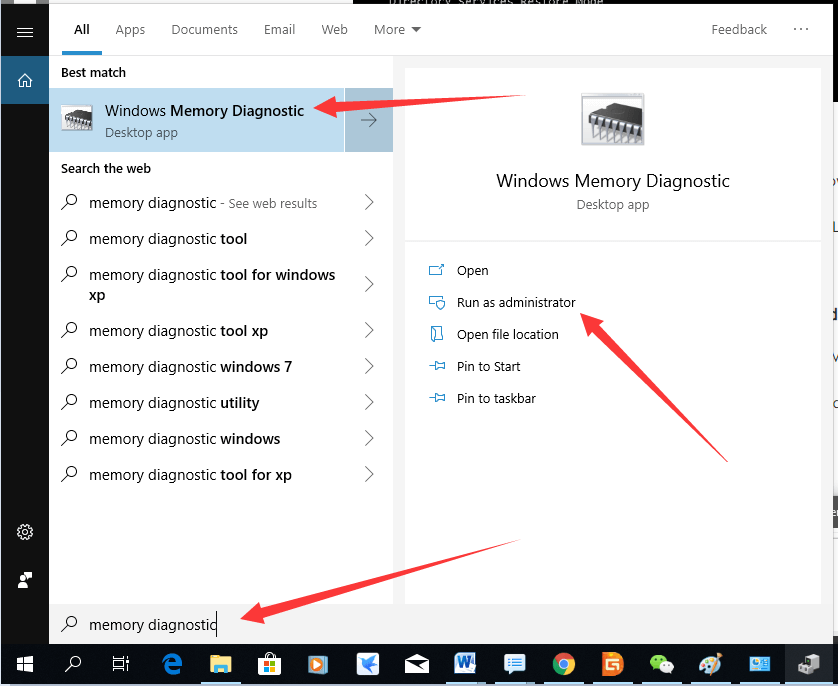
Step 1. Start the memory diagnostics tool.
Type memory or mdsched in the Windows Cortana search box. Find the Windows Memory Diagnostic that best matches to the tool, then click Run as administrator.
Step 2. Check whether there is a problem using the tool.
Select one of the two options to check for memory problems on your computer.
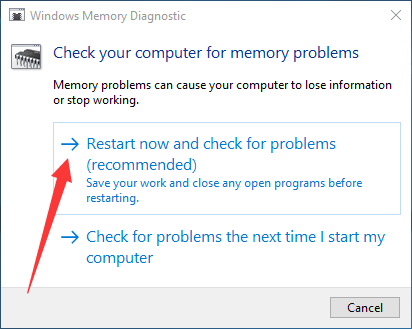
Whichever you choose, follow the prompts to check for memory problems on your computer.
If a memory problem is found, replacing the current memory card with a new one may solve the kernel security check failure.
You can boot into Safe Mode and see if the problem goes away. If the error kernel security check failure disappears, it means that the culprit is a program on your computer. You can uninstall it and fix the problem.
If you don't know how to boot Windows 11/10 into safe mode, follow the steps below:
Step 1. Restart your computer to access the Advanced Startup options menu.
1. Open the Settings using one of the following methods: Press the Windows key + I on your keyboard to open Settings, or right-click the Windows Start button and select Settings.
2. Choose Update & Security > Recovery.
3. Under Advanced Startup, select Restart Now.
Step 2. Boot into Safe Mode with Networking.
After the computer restarts to the "Choose an option" interface, select Troubleshoot.
Enter Advanced Options > Startup Settings > Restart.
After your computer restarts, you will see a list of options. Select 4 or press F4 to start your computer in safe mode. If you need to use the Internet, select 5 or press F5 for Safe Mode with Networking.
After booting the computer into safe mode, you can determine if any software is causing the problem.
If there is no problem in safe mode, the issue is caused by software. You can identify the software one by one. Once identified, uninstall the software that caused the kernel security check failure in Windows 11/10.
A kernel security check failure may be caused by a newly installed driver, an outdated driver, or driver incompatibility.
If you encounter the problem after installing a new hardware driver, you can try uninstalling or reinstalling it. If you have recently upgraded to Windows 11/10 from an older version, you may need to update the driver. It is possible that the driver you used in the previous version of Windows is not compatible with the new one, which can cause the kernel security check failure stop code.
First, run the built-in Driver Verifier Manager in Windows to check for damaged drivers. Then follow these steps to uninstall, reinstall, or update them:
Step 1. Open Device Manager.
Use either of the following methods to start Device Manager.
Right-click the Windows 11/10 Start menu and choose Device Manager. Or, enter Device Manager in the Windows search box and select the best match.
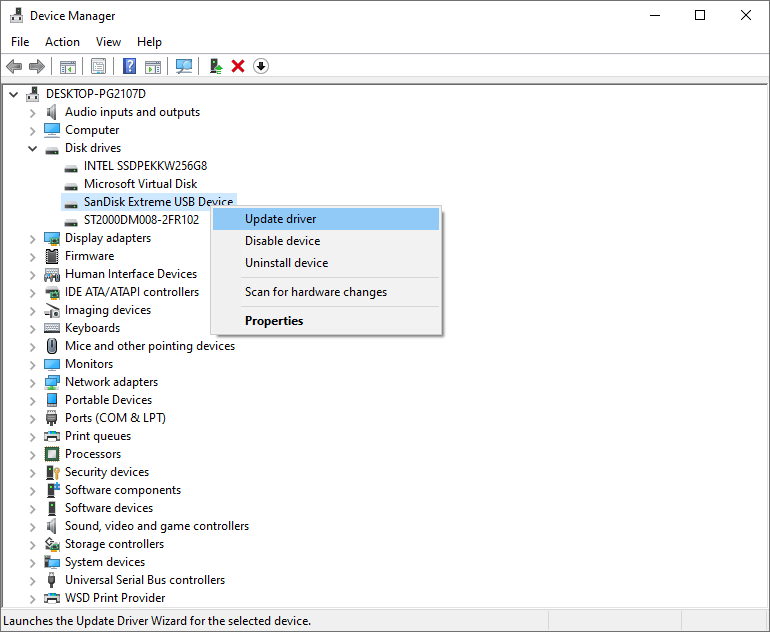
Step 2. Uninstall, reinstall, or update the drive.
Locate Disk drives and double-click it.
Select the drive that may be causing the problem.
Right-click and choose Update driver or Uninstall device.
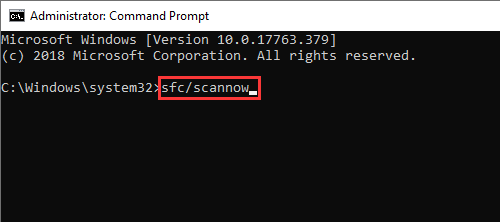
Step 1. Open command prompt in Windows 11/10.
Type cmd in the search box, right-click the best match and select Run as Administrator. Click Yes to continue with administrator rights.
Step 2. Run the SFC scan.
Type sfc /scannow and press Enter to check and repair corrupted system files.
It may take some time to complete the system file check. Be patient. It won't be long.
If your system files are corrupted and sfc /scannow is not enough to fix them, you can use the DISM tool for a deeper repair.
In the Command Prompt, type the following command and press Enter.
DISM /Online /Cleanup-Image /RestoreHealth
The tool will begin scanning and repairing the Windows image.
This process may take several minutes and requires an internet connection to download necessary files from Windows Update.
Once completed, you will see a message indicating whether the operation was successful.
After DISM completes, run the System File Checker again: sfc /scannow
If you are a skilled user of Windows computers, or the blue screen error cannot be solved by methods above, you can try these advanced methods. Please note that these troubleshooting methods are recommended for experienced users.
Driver Verifier is a built-in Windows tool designed to detect unstable or incompatible drivers in the operating system. Here're the steps:
Important: Driver Verifier makes the system more likely to crash on purpose to reveal faulty drivers. Be sure to disable it after testing.
Step 1. Type verifier in the search box next to the Start menu and click “Run as administrator” when you see verifier in the search results.
Step 2. In the Driver Verifier Manager Window, choose Create standard settings and click Next.

Step 3. Choose Select driver names from a list and click Next.

Step 4. Check all drivers or non-Microsoft drivers. Then follow the prompts to restart your PC.

If the blue screen (BSOD) still occurs, take note of the error information and analyze it using WinDbg.
When a BSOD occurs, Windows generates a small memory dump file that contains technical details about the crash. Here are steps to analyze it:
Step 1. In Windows File Explorer, open the path: C:\Windows\Minidump\, and you should see one or more .dmp files.
Step 2. Download and install Windows Debugging Tools (part of the Windows SDK) from Microsoft's official site.
Step 3. Open WinDbg (x64) from the Start menu.
Step 4. Click File > Open Crash Dump and select the latest .dmp file.
Step 5. After the file loads, type the following command in the command box at the bottom, and press Enter.
!analyze -v
Step 6. WinDbg will display detailed analysis, including:
Bug check code and parameters
The name of the driver or system component responsible
Stack trace and potential cause
Step 1. Restart your computer and press the BIOS/UEFI key (commonly Del, F2, Esc, or F10) during startup.
Step 2. Once in the BIOS/UEFI setup, navigate to the Boot or Security tab.
Step 3. Find the option named Secure Boot. If it's enabled, try setting it to Disabled; If it's disabled, you can test enabling it — but do this only if your drivers and system support it.
Step 4. Save the changes and exit the BIOS (usually by pressing F10). After rebooting, observe whether the issue persists.
Additionally, you can also check if your BIOS version is the latest: Go to the motherboard manufacturer's website and compare your current BIOS version (shown in BIOS or via msinfo32) with the latest available. If it is outdated, follow the vendor's official instructions to update safely.
While the blue screen errors often happen without warning, you can reduce the possibility of such errors by following tips below:
First, make sure your Windows operating system and drivers are running the latest versions, as regular updates can fix known bugs and improve compatibility. You can check for updates via Settings > Windows Update, or download the latest drivers from the official websites of your motherboard, graphics card, and other hardware manufacturers.
Second, always create a backup before major changes, such as installing a major system update, new drivers, or hardware. If something goes wrong, you'll have a way to roll back your system to its previous state.
Third, use compatible software. Some older or unverified programs may not work well with the latest version of Windows and could cause system instability. You can download software from official websites or other trusted sources whenever possible.
Fourth, regularly check the health status for hard drives and memory. We all know that faulty memory or disk issues can also lead to system crashes. It's easy to check the health status, for example, you can use the Windows' built-in Memory Diagnostic Tool, the chkdsk command in Command Prompt, or DiskGenius Free Edition to scan for problems.
Lastly, enable Windows Defender or use antivirus software. Malware or viruses can damage system files and trigger security check failures. Make sure you're using reliable antivirus software, keep it updated, and run regular scans to catch threats early.
If your data is lost due to some of the above operations and you did not back up your files, it is recommended to download and run the latest version of DiskGenius (Free Download DiskGenius Online) immediately. The sooner you act, the greater the chance of successful recovery. Follow these steps to recover lost data:
Step 1. Create a bootable USB drive for DiskGenius WinPE edition and boot your computer from this USB drive.
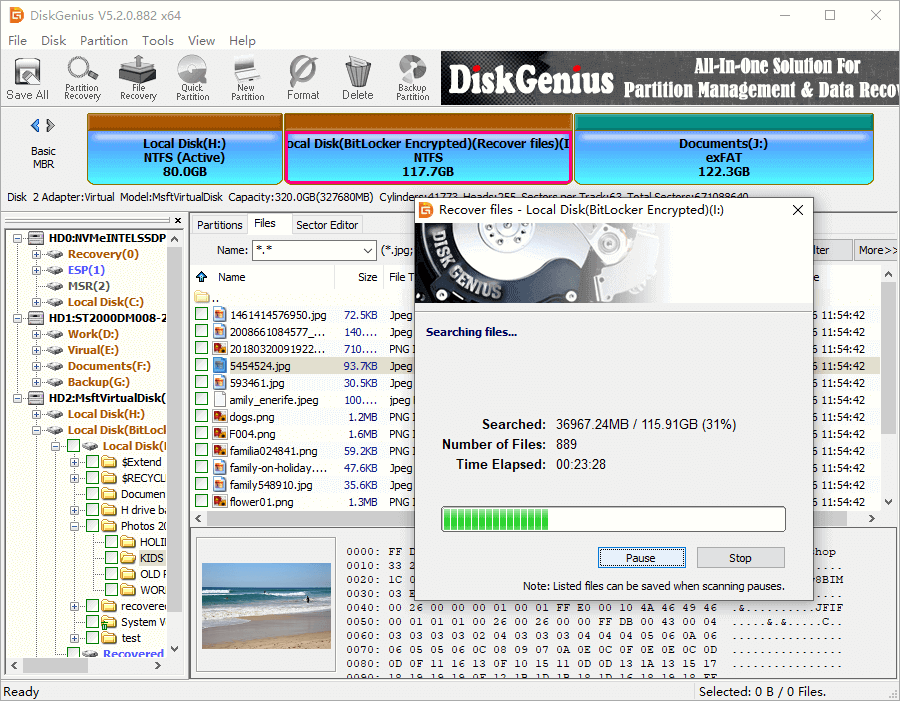
Step 2. Select the hard drive where the data is lost, click the File Recovery button, and then click Start.
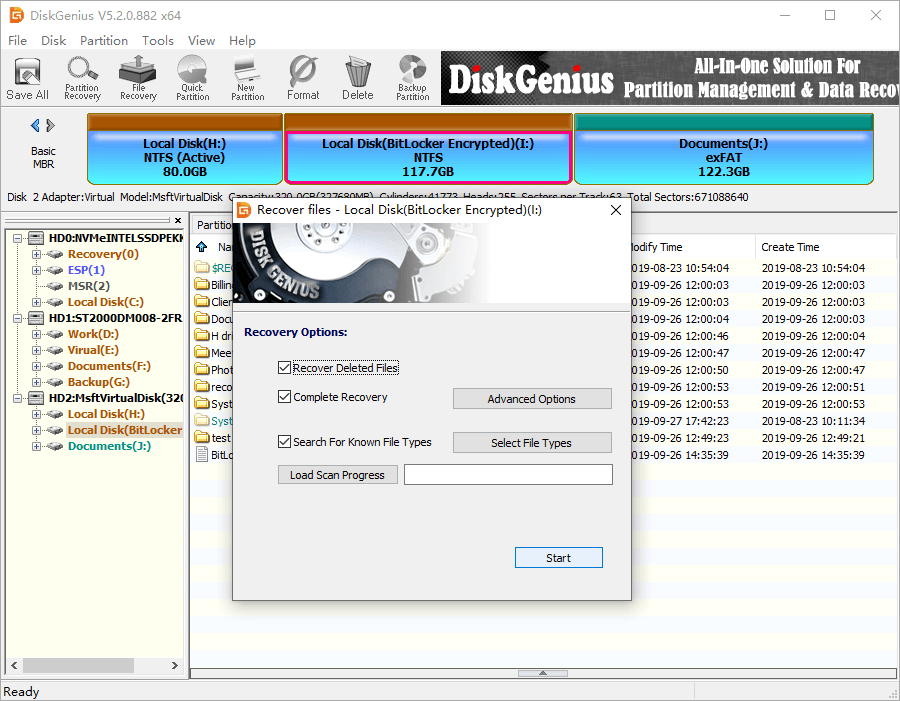
The scanning process of DiskGenius takes some time.
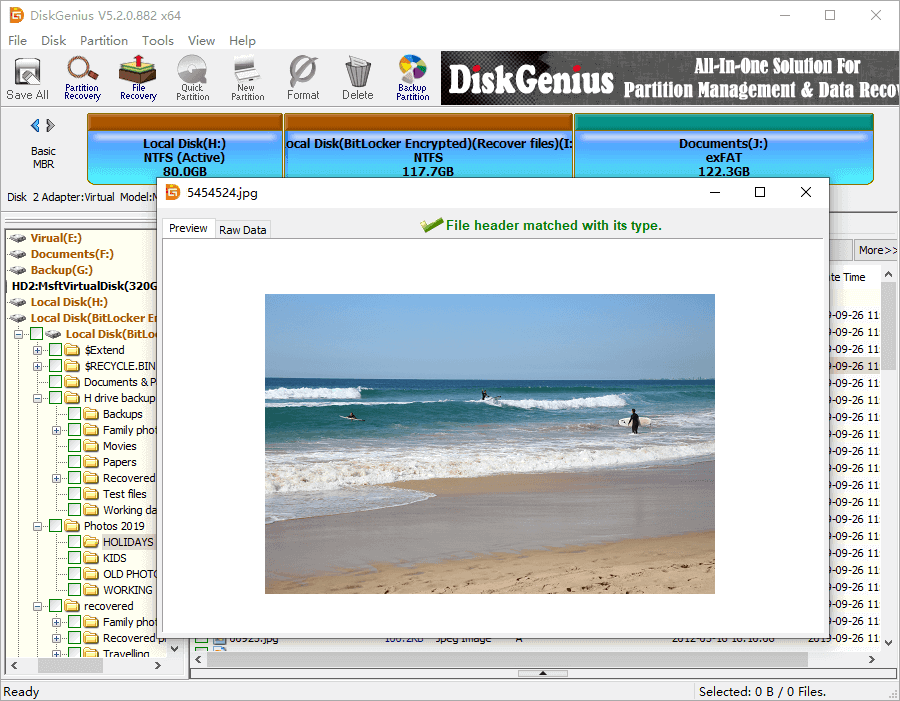
Step 3. Double-click to preview the files listed after scanning.
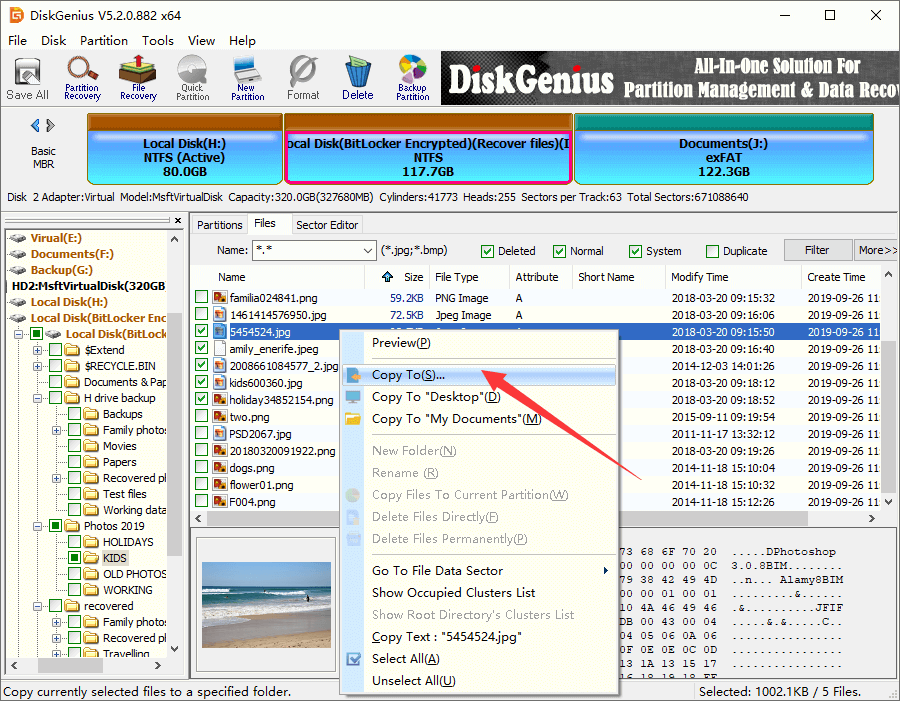
Step 4. Select and right-click files you want to rescue, and choose Copy To to restore these files to a safe location.
The Kernel Security Check Failure is just one of many types of blue screen errors in Windows. Understanding how it compares to other common errors can help you identify your problem more accurately. Here's a brief comparison of a few frequently encountered stop codes:
| Stop Code | Error Name | Typical Cause | What it means |
| 0x00000139 | KERNEL_SECURITY_CHECK_FAILURE | Incompatible drivers, memory errors, or corrupted files | System kernel found a critical issue during a security check. |
| 0x0000003B | SYSTEM_SERVICE_EXCEPTION | Outdated drivers or software conflicts | A system service has caused an exception in kernel mode |
| 0x0000007E | SYSTEM_THREAD_EXCEPTION_NOT_HANDLED | Faulty drivers or system service errors | A system thread created an exception that wasn't handled |
| 0x0000000A | IRQL_NOT_LESS_OR_EQUAL | Bad or incompatible hardware drivers | A driver tried to access memory it shouldn't have |
| 0xC000021A | STATUS_SYSTEM_PROCESS_TERMINATED | Corrupted system files or failed Windows updates | Windows failed due to a serious system process crash |
If your computer has the same problem, just try the solutions above to fix the kernel security check failure in Windows 11/10. If you have any questions about how to fix kernel security check failure, you can contact us by email and we will reply as soon as possible. If you have a better solution, please don't hesitate to share it with us. If you need any help with DiskGenius, please feel free to contact us.
1. What is Kernel Security Check Failure?
Kernel Security Check Failure is a Blue Screen of Death (BSOD) error that occurs when a critical data structure in the operating system is modified or corrupted, leading to system crashes and instability.
2. What causes Kernel Security Check Failure?
There are several factors that can cause Kernel Security Check Failure, including outdated or corrupted drivers, hardware issues, system file corruption, and malware infections.
3. How can I fix Kernel Security Check Failure?
There are several methods you can try to fix Kernel Security Check Failure, including updating drivers, running system file checker tool (sfc/scannow), checking hardware components, and running a malware scan.
4. Can I prevent Kernel Security Check Failure from happening in the future?
Yes, there are several things you can do to prevent Kernel Security Check Failure from happening in the future, including keeping your drivers updated, scanning your system for malware regularly, and backing up your important data on a regular basis.
Also read
DiskGenius - Professional data recovery software that can recover lost files from crashed computers, perform lost partition recovery, restore data from RAW drives, and more.

DiskGenius is a one-stop solution to recover lost data, manage partitions, and back up data in Windows.
Download Facebook
 YouTube
 X
X