Position: Resource - Disk Utilities - The Disk Check Could Not Be Performed Because Windows Cannot Access the Disk
Table of Contents
"I got a problem running disk checking for a corrupted external disk. It is a 1TB external hard drive and always reports 'parameter is incorrect' each time I attempt to open it. Since it can be recognized by Windows File Explorer, I want to run disk checking, hoping it can fix the error. However, the checking process tells the disk check could not be performed because Windows cannot access the disk. I am wondering if there is a method that can repair it without losing data. Do I need to buy a new hard drive? Any suggestion will be greatly appreciated."
The error checking tool, usually used as the graphical version of command line, is a utility in Windows that can scan hard drive and external drives and helps verify, and probably repair errors, ranging from file system issues to physical damages such as bad sectors. Windows error checking tool can be found in drive Properties in File Explorer: right-click the drive you wish to scan > Properties > Tools > Check. However, in some situations, the disk checking process may be blocked an error message:
"The disk check could not be performed because Windows cannot access the disk."

With this error message, the error checking process cannot continue. To get it work, you can try come fixes talked about in the following part. On the bright side, positive outcomes can usually be expected when you attempt at data recovery from drives that Windows cannot access properly. The recovery can be easily achieved with the help of third-party recovery software like DiskGenius. If you are more concerned about rescuing data, then skip to 4 Steps to recover files from inaccessible drive.
Disclaimer: some solutions provided here might remove data on the drive to be repaired. Do create backups or perform data recovery in advance.
Solution #1: Check the connection between disk and computer
Occasionally, the connection between the drive and computer might not work as expected. The error can be the result of a loose connection or faulty cables. For internal hard drives, check if cables are in good status and properly connected. Try other cables in necessary; for external disks, you need to make sure there is not any issue with the USB port or the cable. On condition that this does not work, you should try connecting the disk to other computers.
Note: If you are sure there is nothing wrong with the connection, you can continue with rest solutions.
Solution #2: Change a drive letter for the drive
It has been proved that the "Windows cannot access the disk" error might be caused by drive letter issues in some cases. Thus, you can try changing a drive letter for the drive you wish to check to get the problem solved. In Windows, changing a drive letter can be easily done in Disk Management without causing data loss.
Step 1: Right-click Start menu and choose Disk Management option.
Step 2: After Disk Management opens, right-click the drive at issue and choose "Change Drive Letter and Paths" from context menu.
Step 3: Click Change button and select a letter from dropdown list. Then click OK.
Now a new drive letter is supposed to be assigned to the drive, and you can restart computer and try disk checking again.
Solution #3: Use Windows PowerShell (Admin)
In addition to Command Prompt, you can also use Windows PowerShell to scan and repair errors for the drive. Try these steps:
Step 1: Right-click Start button and choose Windows PowerShell (Admin).
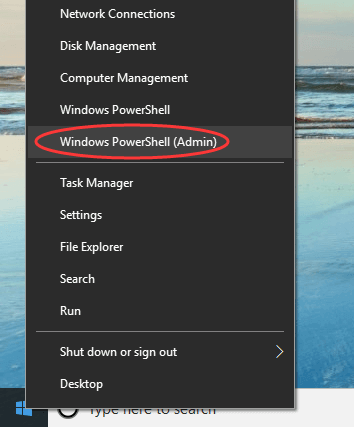
Step 2: Type command Repair-Volume H -Scan and press Enter key. (H is the drive letter of the partition to be checked, and you should replace it with the correct drive letter)
Solution #4: Format the drive
Formatting is the easiest way of fixing inaccessible drives, but it removes all data on the drive. If the above fixes do not work, you can simply to format the drive:
Step 1: Open Windows File Explorer and locate the inaccessible drive.
Step 2: Right-click it and choose Format option.
Step 3: Select a file system type and click Start button. Then click OK to start the formatting.
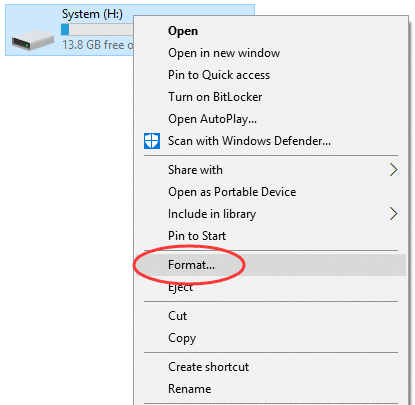
It is possible that the formatting cannot be completed if the disk contains bad sectors. Under the circumstances, try checking and repairing bad sectors.
Solution #5: Check and repair bad sectors for the drive using DiskGenius Free Edition
DiskGenius Free Edition includes the function of checking and repairing bad sectors for hard drives, external hard drives and other removable disks. Here is a quick guide to check bad sectors:
Step 1: Launch DiskGenius Free Edition to get its main interface. Select the drive you want to test and click Disk > Verify Or Repair Bad Sectors.
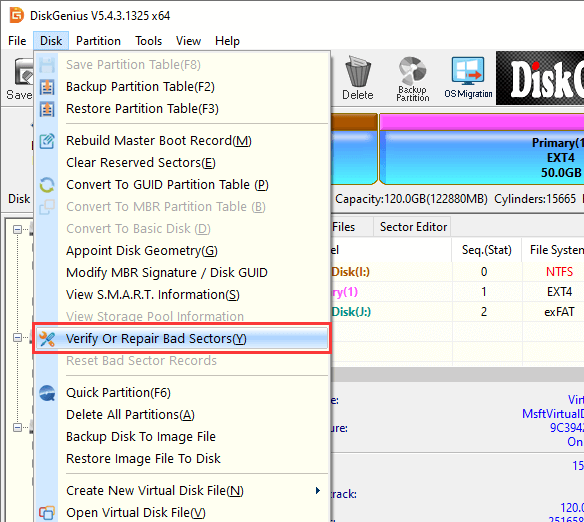
Step 2: Click Start Verify button, and the program will start to scan the disk.
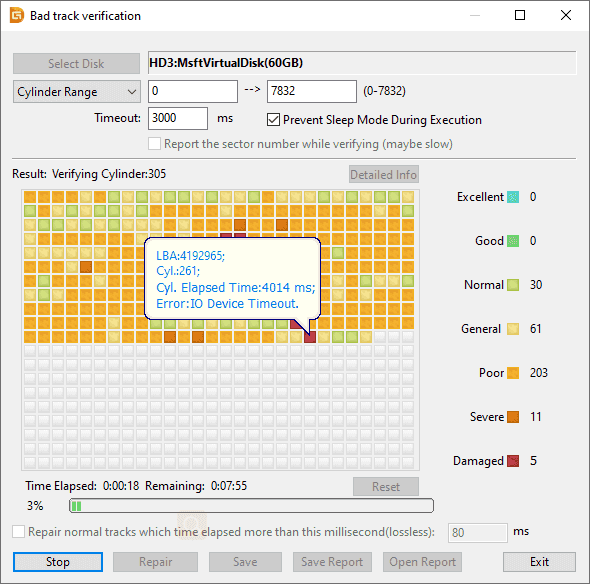
If the disk has bad sectors, you can try repairing them with DiskGenius after it finishes checking bad sectors. Repairing bad sectors will destroy data, and data backup is required before repairing. In case that you want to recover files from the hard drive, refer to this guide: How to recover data from hard drive with bad sectors?
Note: if bad sectors on the affected drive cannot be repaired by DiskGenius, say physical bad sectors, you should send it to professionals to deal with it; or if the drive is still under warranty, you can contact the manufacturer to claim warranty.
When a drive cannot even be accessed by Windows File Explorer or disk checking tool, that does not mean it is damaged to a very bad extent. In some cases, the drive is only logically corrupted, and files on the inaccessible drive can be recovered easily. DiskGenius Professional Edition is effective software to cope with inaccessible drives like recover files from RAW partition, recover unformatted disk, recover data from corrupted memory card and more. Read on to learn how to recover data from not accessible drive using DiskGenius Professional Edition.
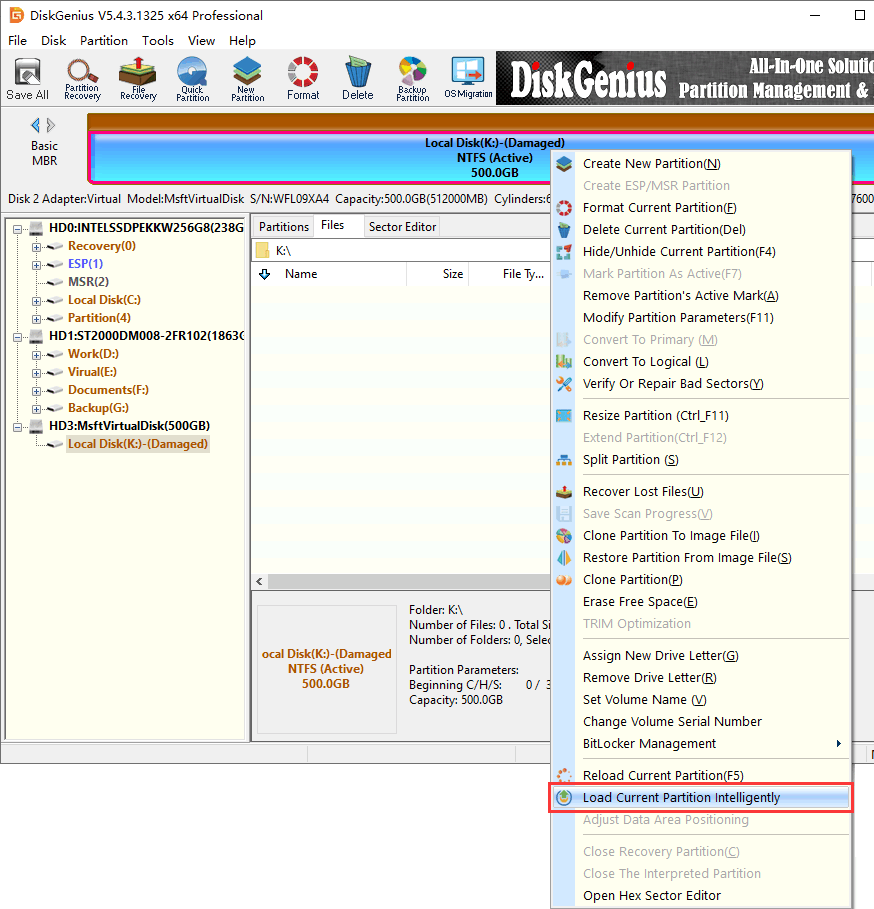
Step 1: Start DiskGenius on your computer where the inaccessible drive is connected. Right-click the drive and click "Load Current Partition Intelligently" under "Tool" menu.
Generally, files of the inaccessible partition will be listed rapidly provided that it is not damaged way too serious. After files are loaded correctly, you can skip to Step 4 and copy files to another accessible drive. No need to be panic if this function does not work, you can move to Step 2 to search for recoverable data.
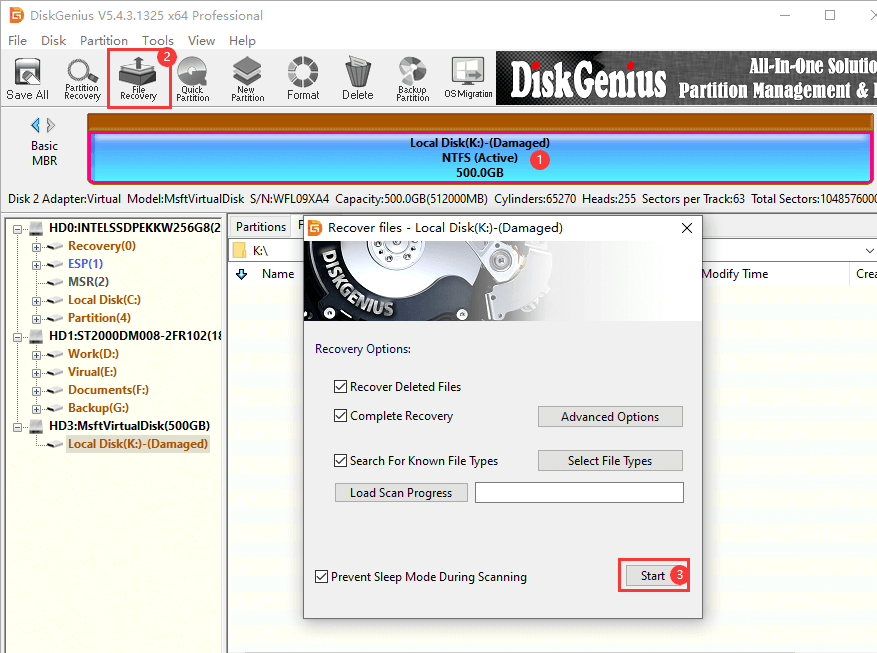
Step 2: Select the drive that Windows cannot access > click File Recovery button > click Start button on popped up windows. After this, the scanning process starts to look for lost files.
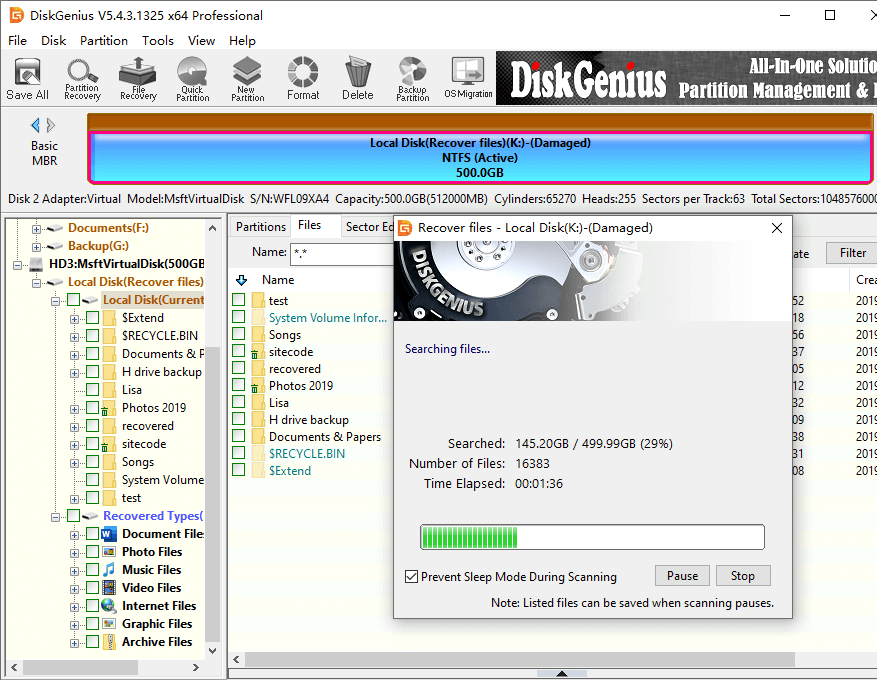
The scanning process may take long time when the drive being scanning is very large in size or it contains bad sectors. Wait for the scanning to complete with patience.
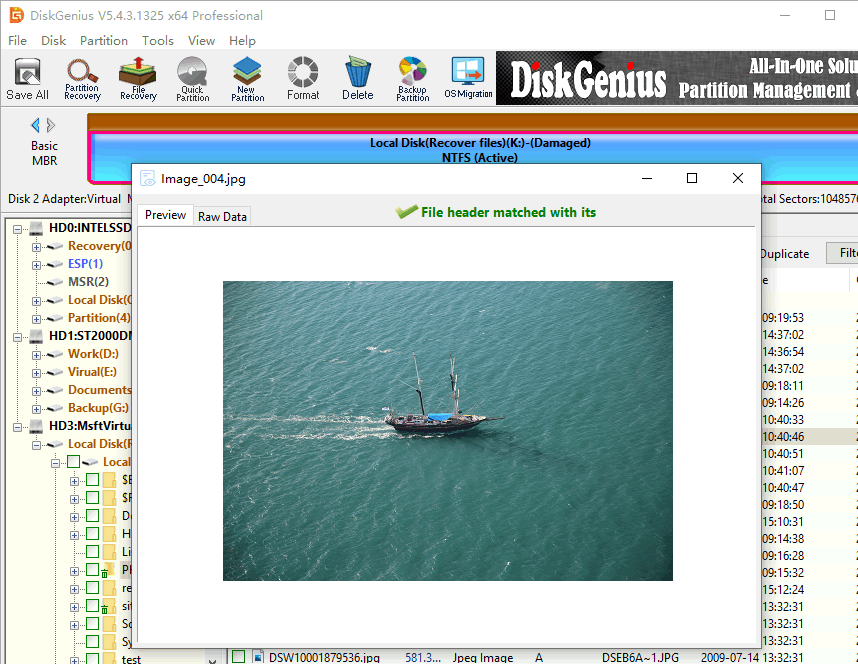
Step 3: Preview files to be recovered and verify if they are correct.
File preview is a convenient way of checking lost files and it helps to estimate the final recovery result, for example, if a picture can be previewed without errors (see the screenshot below), then it can be recovered correctly in the end. On the contrary, if a photo cannot be previewed (opened) in the software, it cannot be recovered properly.
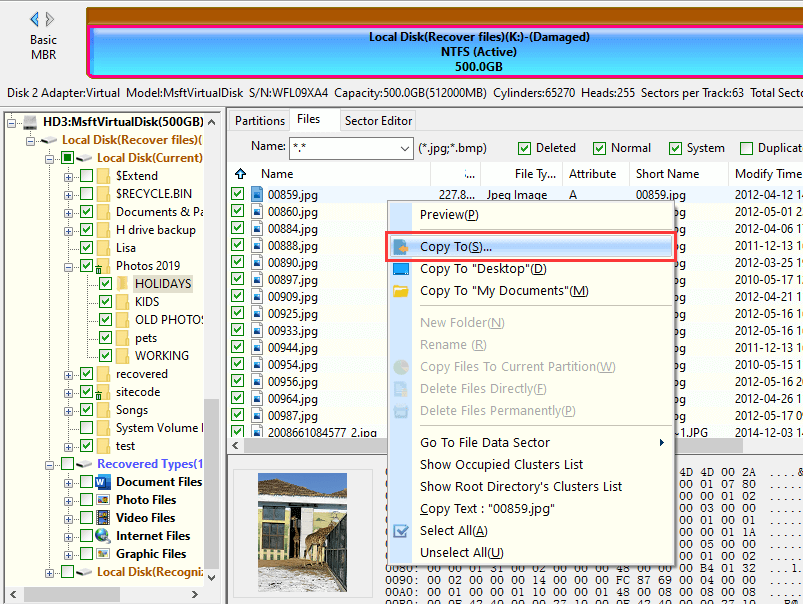
Step 4: Copy files to another drive. Select files and folders you want to restore from the inaccessible drive, and right-click selected data to choose "Copy To". Then you can specify a folder on a different partition or disk to store recovered files.
1. Why can't Windows access the disk?
Occasionally, you may receive "Windows cannot access the disk" error for no apparent reason. Such kind of error usually relates to factors like improper operations, corrupted file system (RAW drive), bad sectors, malware, a faulty connection, physical damage, etc.
2. How do I fix drive is not accessible?
The inaccessible drive means it cannot be opened in Windows due to drive corrupt. Thus, files on this drive are lost. Formatting is the easiest way to fix drive not accessible issue, and yet it erases data and increases difficulty of data recovery. To fix inaccessible drive without losing data, you can try these steps one by one:
Step 1: Use DiskGenius Professional Edition to recover files the not accessible drive. Lost files should be copied to another drive.
Step 2: View recovered files and make sure all of them are recovered correctly.
Step 3: Format the inaccessible drive with a proper file system in Windows File Explorer or Disk Management.
3. Can see hard drive bot cannot access?
The problem that a hard drive can be detected but cannot open in Windows File Explorer can be caused by a couple of reasons, such as, file system errors, outdated or corrupted drivers, bad sectors, lack of permission, encryption, unsupported file system type, etc.
4. How do I fix a chkdsk error?
A chkdsk error usually indicates severe disk problems or disk failure, which should be paid close attention. When it comes to fix a chkdsk error, you can try these methods:
5. What happens if chkdsk doesn't work?
The check disk function, also called CHKDSK, is provided by Windows operating system for the purpose of verifying and repairing errors in file system and disk. However, sometimes, CHKDSK may not work, for example, the disk check process gets stuck, report errors, cannot complete, etc. This might be caused sever problems on the disk or file system you are trying to fix.
In brief, we hope you can fix "The disk check could not be performed because Windows cannot access the disk" error successfully using one of solutions above. If you are fearful of losing valuable data when fixing the issue, you can create backups or execute data recovery using DiskGenius beforehand. Let us know if you need any help to recover lost data or fix errors on your storage devices.
DiskGenius - The best software to recover files from RAW partition/SD card/USB drive efficiently with original file directly, recover formatted partition as well as restore deleted or lost partitions.

DiskGenius is a one-stop solution to recover lost data, manage partitions, and back up data in Windows.
Download