Position: Resource - Disk Utilities - Repairing Disk Errors This Might Take Over an Hour to Complete
"My laptop always gets stuck on the repairing disk error each time before it boots into Windows. After pressing the power button, the screen shows a massage 'Preparing automatic repair' and then another message 'diagnosing your PC' appears. Finally, it goes to and enter the 'repairing disk errors' stage. It seems that the disk repairing process cannot complete. I'd like to know if there is an easy solution to either fix or bypass the error?"
Sometimes your computer cannot boot into Windows 10 or 11 and gets stuck at a black screen with an error message "Repairing disk errors. This may take over an hour to complete". When the message appears, the disk repairing process may take quite a while to finish, for the operating system deems that there are significant issue with the computer and tries to fix it.

In many situations, the repairing process can take a pretty long time, for the problem is complex and beyond the ability of the repairing tool used by the process. For example, the message usually indicates corrupted hard drives, and yet this may not only be a hard disk problem but may also be caused by other factors.
If this is the first time the computer has this problem, it is recommended to wait a little longer for the disk repairing to complete. After the repairing is successful, the computer can boot into Windows 10/11 normally. However, if the repairing process gets stuck or computer enters the booting loop, you should consider trying some fixes on your own to either fix the booting error or rescue personal files.
Why is my PC showing repairing disk errors? There are several factors why your computer might be showing repairing disk errors:
The repairing disk errors this might take an hour problem prevents you from booting into Windows 10/11, and yet you can try following troubleshoots to fix it.
Fix #1: Let the Disk Repairing Process Finish
Some users are very impatient and want everything to be done within a couple of seconds, but most times the process is not that quick. It is recommended to let it scan and finish, and you can come back to computer a few hours later and see if it's finished at that point. If it's still running after several hours, then you can try a manually hard power off your computer (press the power on your computer until computer turns off), which has the chance to get the computer back to Windows normally.
Fix #2: Remove All External Drives
Peripheral devices such as USB drives can be the culprit of the repairing disk errors, and thus you can try disconnecting unnecessary external drives and recently installed hardware like memory.
Fix #3: Run Startup Repair
Step 1. Launch Automatic repair tool.
You can launch the Automatic repair tool without any additional CDs or iso files. The tool is built in Windows and works like a recovery device. Manually turn off computer via hard power off (press the power key until computer turns off) and turn on computer. When you get the BSOD, turn off the computer again. Keep turning off and turning on computer about 3 times. In Windows 10 after three consecutive power offs that are done improperly, the computer will try to launch the Windows RE.
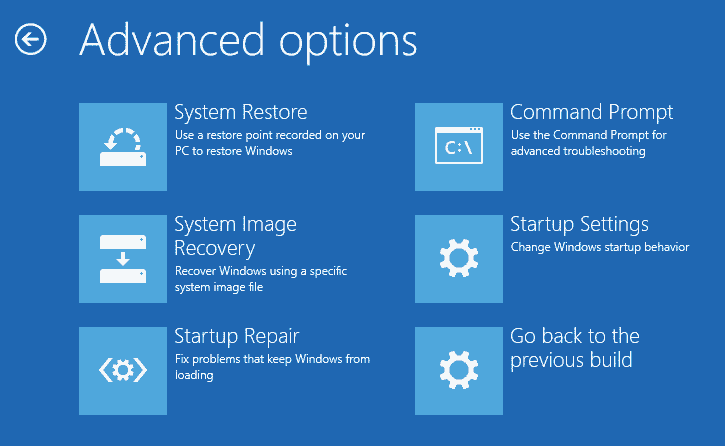
Step 2. Click "Advanced options" button when computer shows the message "Your PC did not start correctly".
Step 3. Click "Troubleshoot" under "Choose an option" and then click "Advanced options".
Step 4. Select "Startup Repair".
If the booting problem can be solved by Startup Repair, your computer will be able to boot into Windows.
Fix #4: Boot into Safe Mode with Network
Step 1. Boot into Windows RE by repeatedly powering off and turning on computer, which is the same the step one in Fix #3.
Step 2. On the "Choose an option" section, select Troubleshoot > Advanced options > Startup Settings > Restart. Then computer restarts automatically.
Step 3. When you see a list of options, press F5 on the keyboard.

Fix #5: Run SFC Scannow in Command Prompt
After booting into Windows Safe Mode, you can try running SFC (System File Checker) to verify and repair problematic system files.
Step 1. Open the elevated Command Prompt.
Open the search menu and type in cmd. Find Command Prompt under the best match and click "Run as administrator". If you receive a user account control prompt, select "Yes".
Step 2. Into this elevated command line window, type sfc /scannow and press Enter key. The sfc is followed by a space.
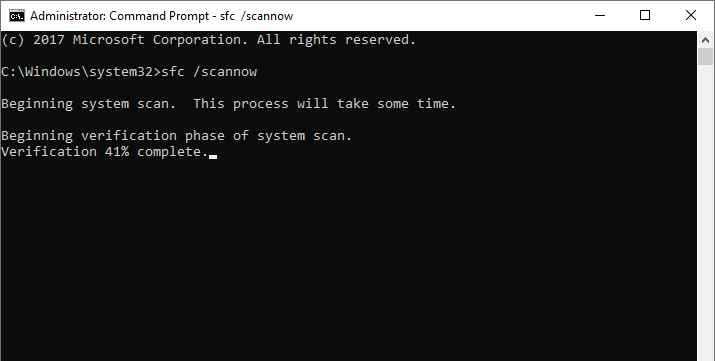
Step 3. This will start the system scan and the scan will take some time to finish. Please be patient.
It'll be good to get the information "Windows Resource Protection found corrupt files and successfully repaired them" when the scanning is done. If SFC not working and corrupted files cannot be repaired, you may need to try other fixes.
Fix #6: Check and Repair Bad Sectors for the Hard Drive or SSD
DiskGenius is free and trustworthy disk repair software for both personal and business users. With this tool, you can test the health condition for hard drives, SSDs and USB drives by viewing the S.M.A.R.T. information, checking and repairing bad sectors. As to checking bad sectors, it is suggested connecting the hard drive or SSD to another computer as a secondary drive or boot into Windows PE instead of booting into Safe Mode. The reason for this is avoiding accessing the hard drive or SSD while checking bad sectors, otherwise the accuracy of the test results will be affected.
Note: It is common to see that a hard drive is badly damaged and no longer reparable using software. In that event, you will have to consider replacing the damaged hard drive with a new one.
Here are steps to check bad sectors using DiskGenius Free Edition:
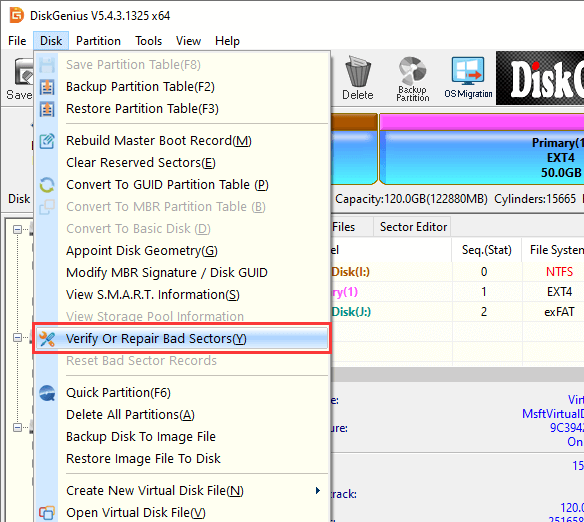
Step 1. Free download, install and launch DiskGenius Free Edition on your computer. Click the disk for which you want to check bad sectors and choose "Disk" – "Verify Or Repair Bad Sectors".
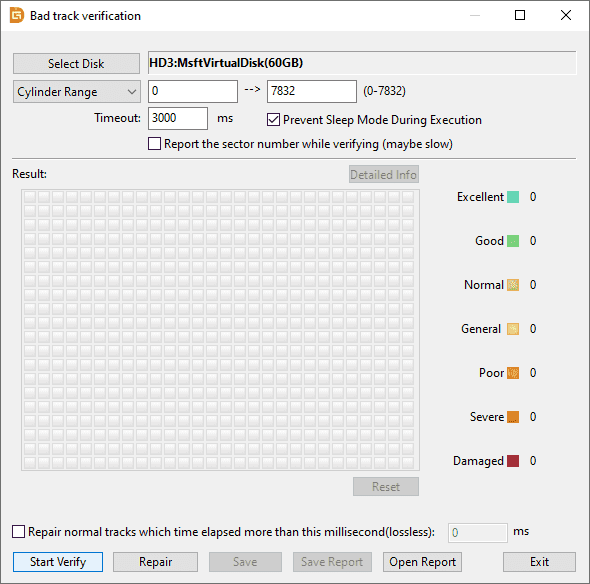
Step 2. On the pop-up window, click "Start Verify" button, and the program starts to scan the drive.
It is not necessarily to change default settings if there are not special requirements.
Step 3. Let the scanning finish. Please wait with patience.
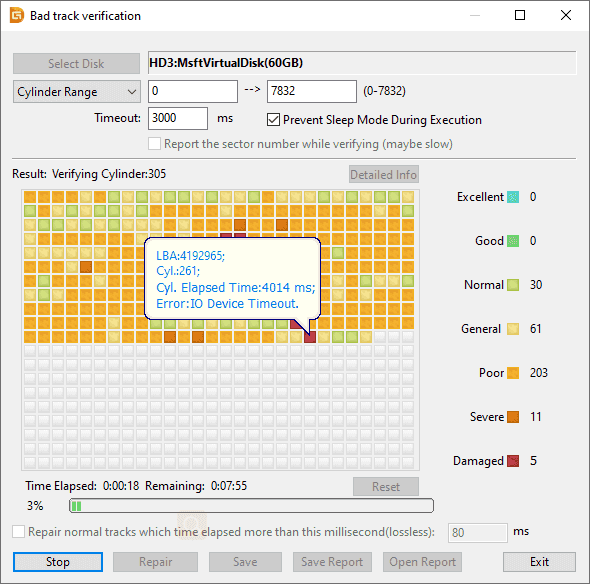
Step 4. Click "OK" when scanning is done.
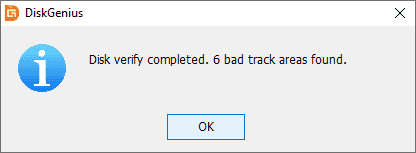
You can also click "Repair" button if bad sectors are detected. Remember to backup files to another hard drive before repairing bad sectors.
Fix #7: Perform System Restore
When it comes to fixing BSOD, restoring computer to a previous backup status is much easier than to reinstalling Windows. However, if you do not have a backup, this solution will not work in your case.
Step 1. Click the searching box and type "create a restore point". The click the item listed under best match.
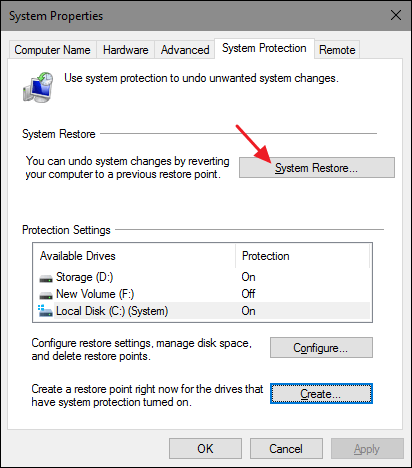
Step 2. On the "System Properties" window, click "System Restore" button.
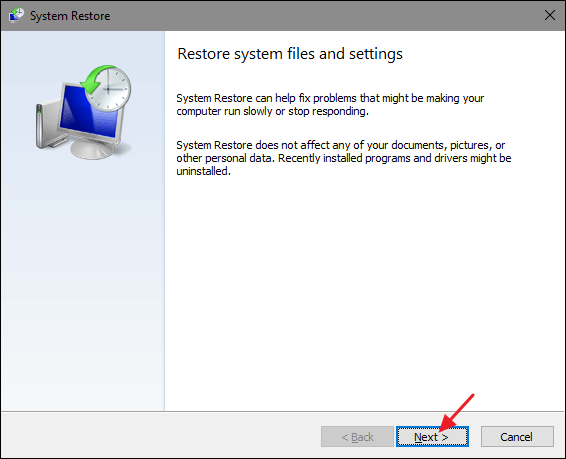
Step 3. Click "Next" to forward.
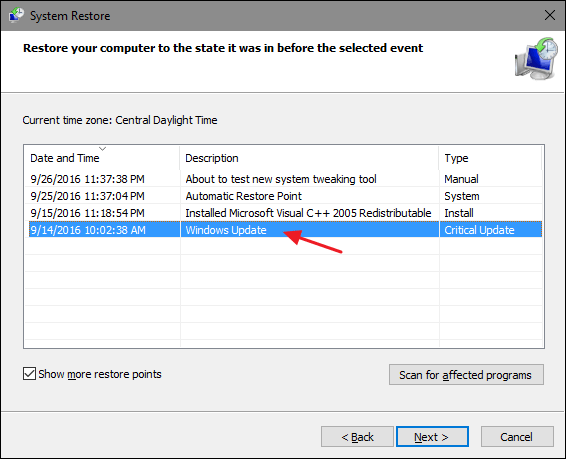
Step 4. View available restoring time points and choose the one you want to restore. Then click "Next" to start restoring system back to a previously working status.
If none of these methods resolve the problem, it may be a sign of a more serious problem with operating system or hardware components, and you should seek professional help from computer's manufacturers to diagnose and fix the issue.
When you encounter the "Repairing disk errors. This might take an hour to complete", there should be something wrong with operating systems or hard disk. The situation is that you cannot access data on the hard drive. Thus, it will be best if you can backup or recover files from the crashed hard drive. DiskGenius provides solutions: it can create a bootable USB drive which can be used to boot computer, and it also supports to retrieve files from corrupted, formatted or unallocated hard disks.
The step-by-step guide to create a bootable USB disk and recover hard drive data:
Step 1. Install and launch DiskGenius. Connect a USB disk to this computer.
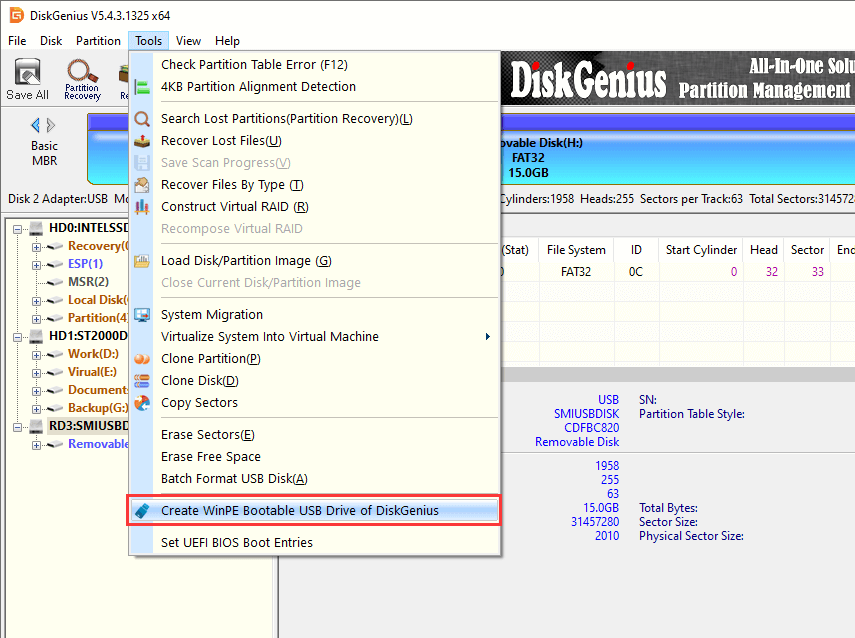
Step 2. Select the USB drive from the left pane and click "Tools" – "Create WinPE Bootable USB Drive of DiskGenius".
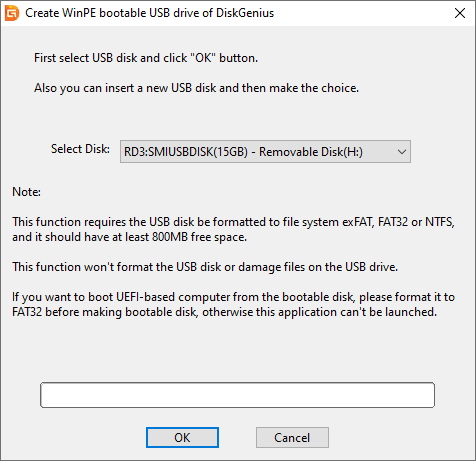
Step 3. Click "OK" button and wait for a couple of seconds.
Step 4. Boot the BSOD computer using the bootable USB disk. DiskGenius will be launched automatically once the computer boots from the USB disk.
To boot computer from USB drive, you need to modify the boot sequence in BIOS first. The specific steps differ from the model and brand of the motherboard inside your computer. You can contact its support team to seek help.
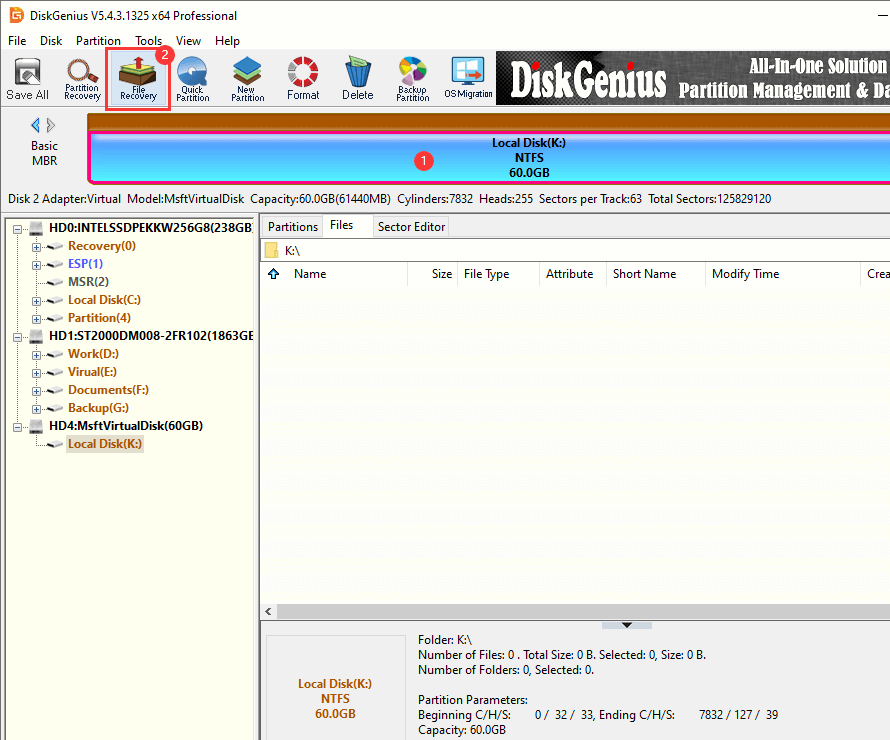
Step 5. Select the drive from which you want to recover lost data and click "File Recovery" button.
The "File Recovery" feature applies to various data loss scenarios, such as, accidentally deletion of important files, hard drive gets formatted, RAW drive, corrupted USB drive, etc.
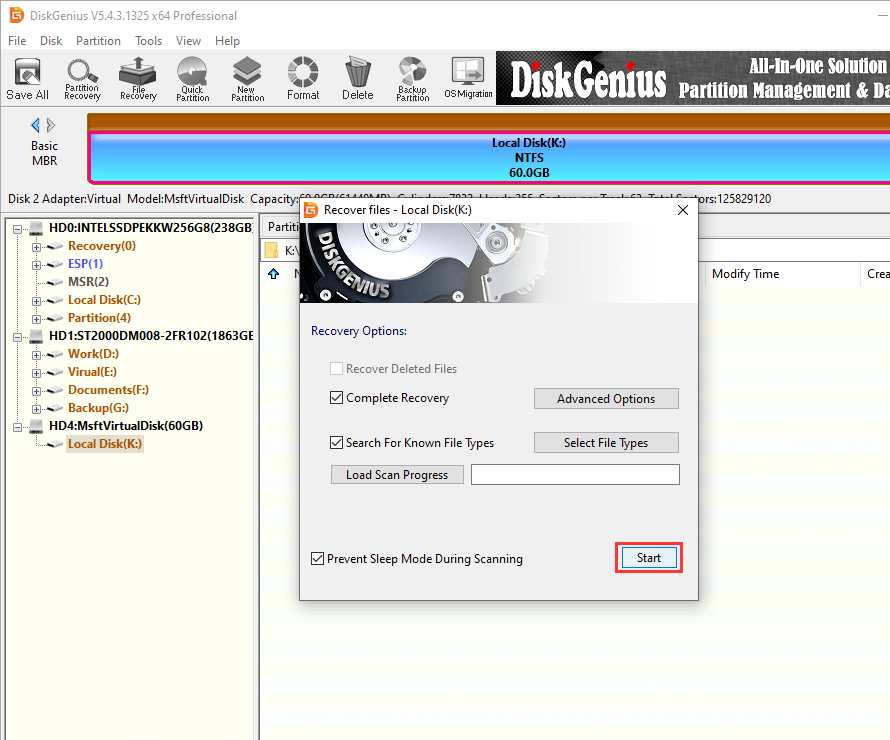
Step 6. Click "Start" button to start the scanning process.
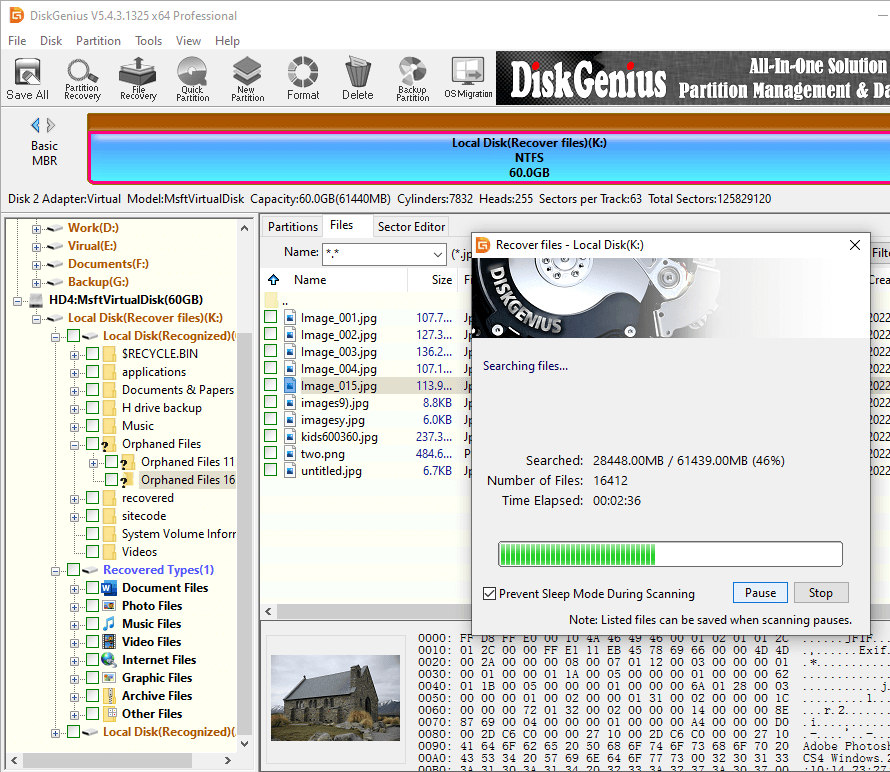
Step 7. Let the scanning finish.
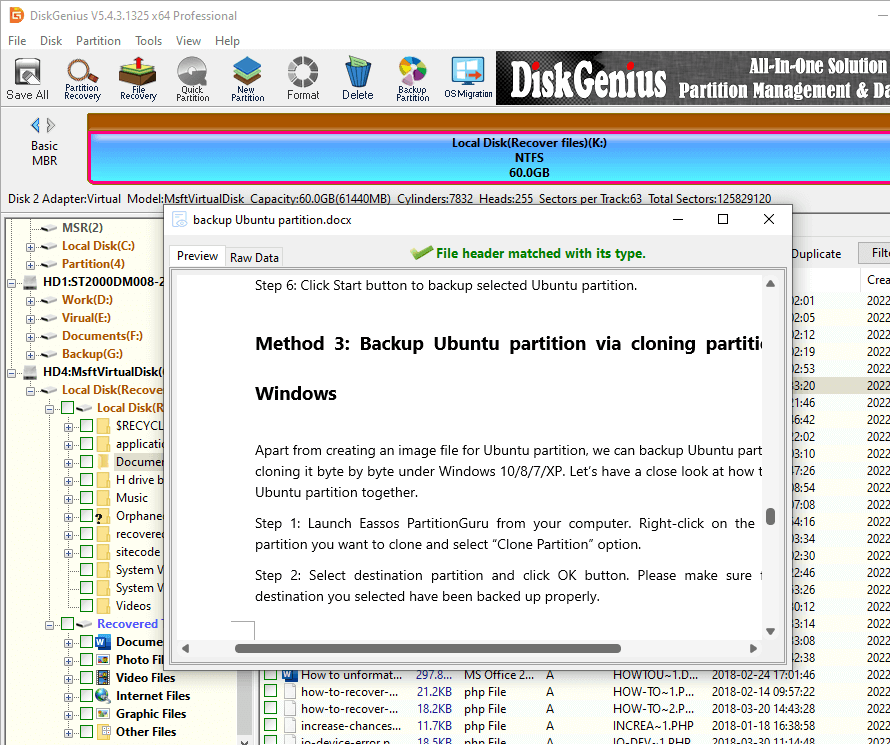
Step 8. Preview lost file to confirm if they are recoverable.
Double-click a file to open the file preview window and check if the file is correct and recoverable.
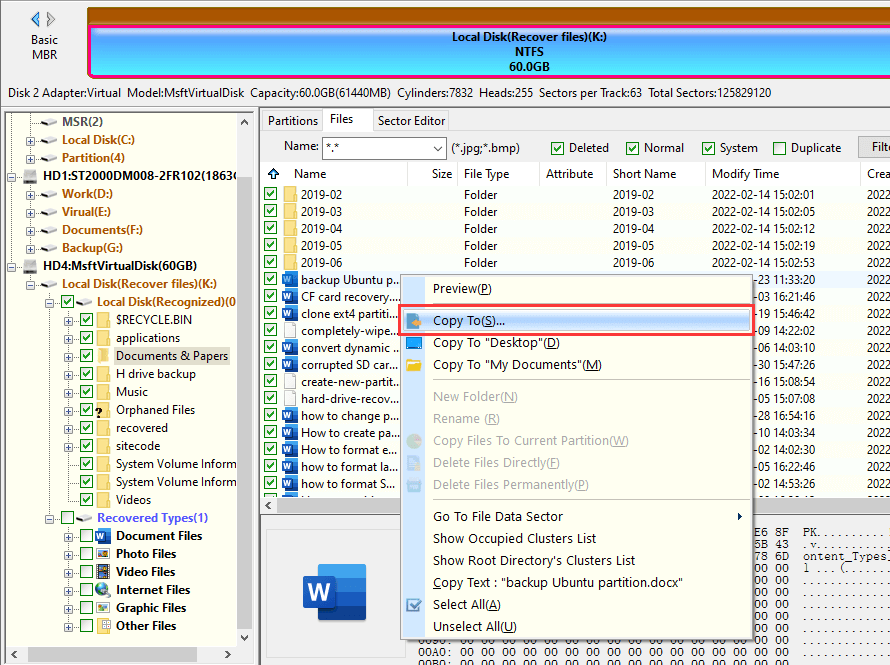
Step 9. Export data. Select files you want to restore and copy them to a different drive.
In most cases, the "Repairing disk errors this might take over an hour to complete" error can be fixed by solutions mentioned above. If the problem persists, you may need to consider reinstalling Windows 10 or 11. Consult a professional technician before performing a clean Windows installation. Should you have any questions or need help regarding checking bad sectors, recover data from corrupted computer, or backup data from damaged hard disk, feel free to contact our support team.
1. How long does Windows repair disk errors take?
The disk repairing error can take a long time, usually over an hour and sometimes can be 4 hours or longer. The time taken by the disk repairing mainly relies on the disk size and the extent of hard disk or SSD damage. If you cannot bypass the disk checking process by restarting computer, you can try solutions discussed in this article to rescue data and fix the error.
2. Can I interrupt scanning and repairing drive?
When it comes to how long we should wait for scanning and repairing disk errors, the suggested action is to let it finish overnight if this is the first time your computer encounters the error. The scanning and repairing task is usually done by chkdsk automatically during system booting. The chkdsk is useful in dealing with such problems, but it may take quite a long time to complete. Thus, you can leave your computer running the repairing overnight. However, if the repairing disk takes over all night, you may as well try some troubleshoots mentioned in this guide.
3. How do you know if preparing automatic repair is stuck?
Your computer is likely to ran into Windows automatic repair loop when you get following symptoms:
4. How do I fix auto repair disk?
If your computer is stuck in an automatic repair loop, try following troubleshoots:
5. How do you bypass, stop or escape a repairing disk error?
To stop or escape a repairing disk error, try methods like boot into Safe Mode, run Automatic Repair, restore system to a previous status, repair hard drive errors, replace damaged hard drive with a new one, etc.
6. How long should attempting repairing take Windows 10?
The usual time taken by the attempting repair ranges from 15 minutes to several hours (or even a day). You can wait for a long time if it is the first time the BSOD error appears. When waiting cannot get rid of the problem, move to some fixes.
7. Does repairing disk error ever work?
Yes, disk repairing does work in many causes, however, it cannot fix all disk errors especially when the problem is serious to some extent. That's why your computer may stop at the repairing process and enter the restarting loop.
8. Which stage of chkdsk takes the longest?
The stage of scanning and checking every sector on the drive to examine stability taker longer time than other stages like verifying file record segment consistency in MFT.
9. What are the signs of corrupted Windows 10 or Windows 11?
When the Windows 10 or 11 gets corrupted, some abnormal symptoms can be noted, such as:
10. Is it normal for CHKDSK to take a long time?
Yes, it is normal for chkdsk command to take a long time to finish checking and repairing disk errors, especially when the hard drive is large in capacity but has slow read/write speed. However, it is abnormal if the chkdsk appears to take forever, for example, the hard drive is seriously damaged, you should try other methods.
More Tutorials
DiskGenius - The best free software for users to back up Windows PCs and Services, such as clone hard drive, migrate Windows OS, image hard drive, back up any partition into an image file, back up partition table, and so on.

DiskGenius is a one-stop solution to recover lost data, manage partitions, and back up data in Windows.
Download