Position: Resource - Disk Utilities - Your PC Ran into A Problem and Needs to Restart
"How do I fix my computer restarting loop? Why does my computer keep getting black screen everything is still on but it just goes black and I need to force shutdown and turn it back on in order to use it? How do you fix your PC ran into a problem and needs to restart we're just collecting some error info and then we'll restart for you?"
The "Your Pc ran into a problem needs to restart" error is one of the typically BSOD (Blue Screen of Death) errors that happen to Windows computers. The message is displayed on a blue screen, indicating something is going wrong and restarting is needed. This error can occur suddenly while you are working on the computer, causing data loss and file corruption.
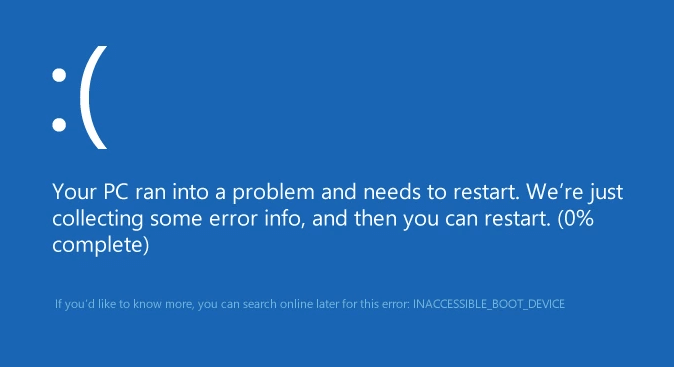
Your PC ran into a problem and needs to restart. We're just collecting some error inform, and then you can restart. (100% complete) If you'd like to know more, you can search online later for this error. Here are some error codes that you may get:
Generally, the BSOD error appears for a couple of second, after which computer restarts and attempts to boot into Windows. Sometimes, the error happens each time Windows boots, i.e., the computer enters boot loop. In this case, Windows will try to recover itself automatically by automatic diagnosing and repairing tools. When the automatic reapir fails, you will probably get another error: Your PC did not start correctly. Press "Restart" to restart your PC, which can sometimes fix the problem. You can also press "Advanced options" to try other options to repair your PC. In this case, you will have to try fixing the issue manually.
Before digging deep into the troubleshooting instructions, we can have a quick look at the reasons behind the error first.
It is not easy to provide the guaranteed solution, because there are so many reasons that you may get the BSOD problem. Hence, you have to try several fixes given below to get the error fixed. Below is a quick navigation of solutions:
Quite often the Windows crash has something to do with external hardware, for example, some of the external devices might be damaged or they over work on computer. Thus, the first fix to the issue is removing all non-essential peripheral attachments to your computer such as external hard drives, printers, phones, USB drives, Bluetooth devices, headphones, scanners, etc. To do so, follow these steps:
Step 1. Shut down computer and then disconnect the power cable.
Step 2. Remove all external attachments except for mouse and keyboard.
Step 3. Start computer and see if the problem is solved. If yes, then you can make sure the BSOD problem is caused by faulty external devices. If the issue persists, then move to next solution.
SFC is a command executed in Command Prompt, helping users to find and repair damaged, inaccessible, or corrupted system files. Running SFC scan is a good option to fix BSOD issues. Here are steps to run SFC:
Step 1. Launch Command Prompt. Type "Command Prompt" in the search bar near the Start menu and click "Run as administrator" after Command Prompt is displayed in searching result.
Step 2. Type sfc /scannow in Command Prompt and press Enter key.
Step 3. This command will scan system files on your computer. Let the process to complete.
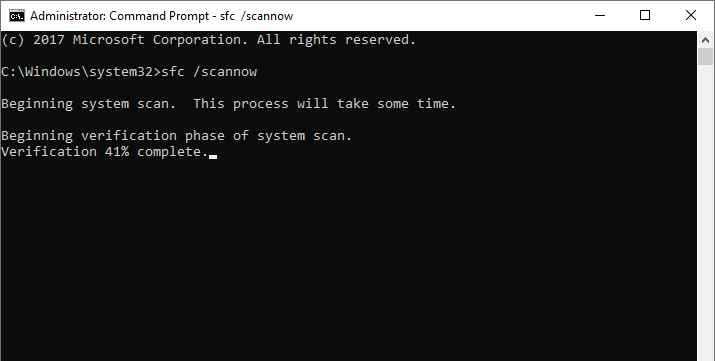
In addition to SFC scan, you can also run DISM scan. Type following command in Command Prompt and press Enter key:
DISM /Online /Cleanup-Image /RestoreHealth
The scanning process may take a while. Wait with patience. Then check if your computer can boot into Windows after these two commands are done.
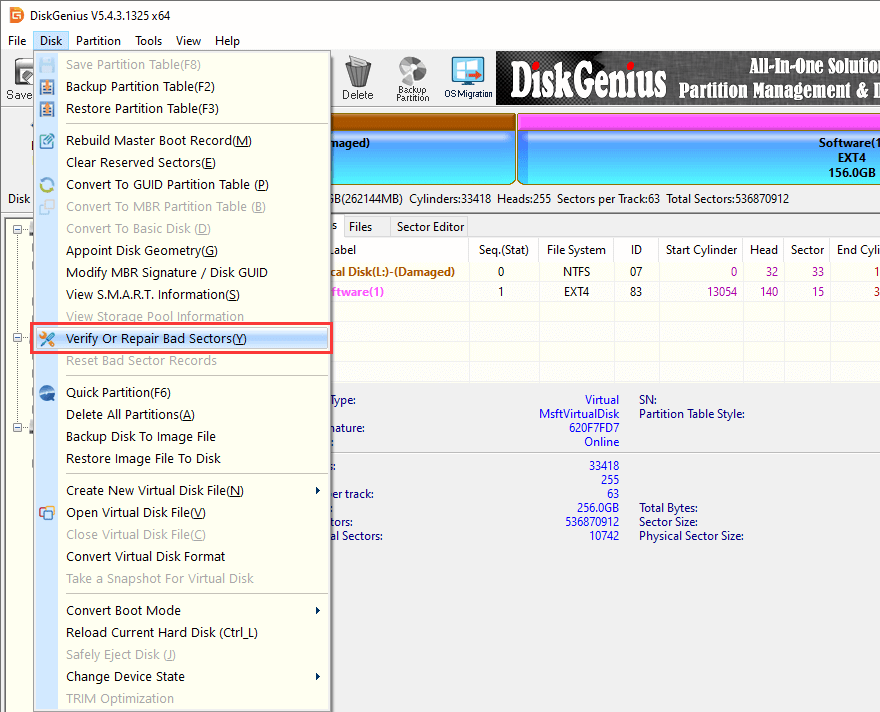
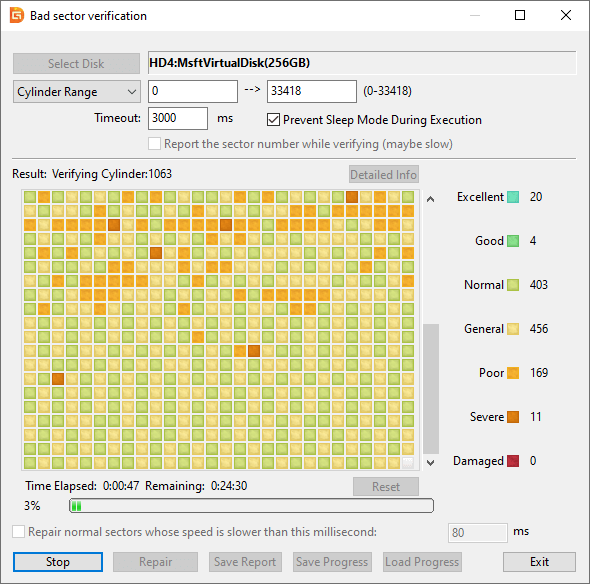
The hard drive or SSD where Windows is installed may have bad sectors. Bad sector area becomes defective, as a result, Windows 11/10 operating system cannot read or write data stored on bad sectors, then BSOD appears. It is easy to find bad sectors on hard drive or SSD by way of running a simple scan. DiskGenius Free Edition provides the feature to check and repair bad sectors for both internal and external disks. You can check bad sectors with following steps at any time:
Step 1. Install and launch DiskGenius Free Edition on your computer. Select the hard drive or SSD for which you want to check bad sectors, and then choose "Disk" – "Verify Or Repair Bad Sectors", see the picture below:
Step 2. Click "Start Verify" button on the pop-up box.
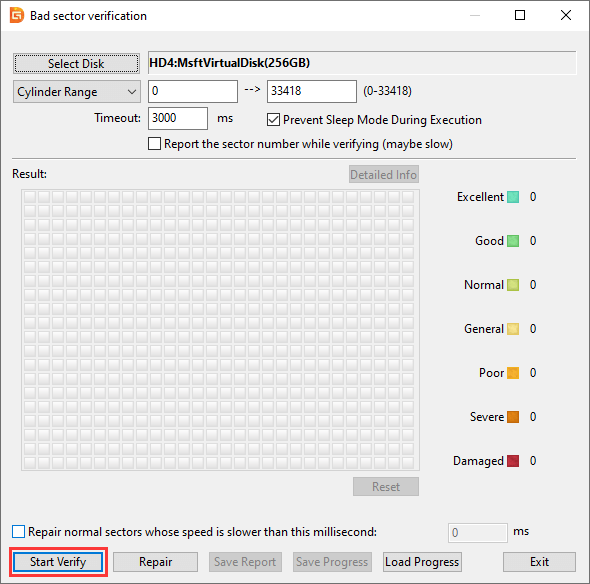
Step 3. Now DiskGenius is scanning the disk and checking if there are bad sectors. Wait for the scanning procedure to complete.
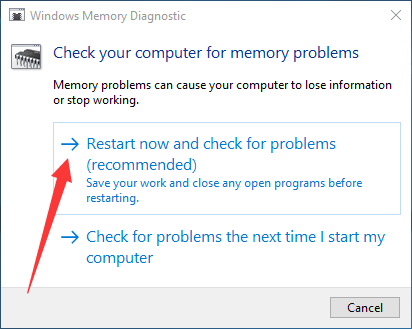
Memory problem can cause your computer to lose information or stop working. To examine whether or not this is true of your case, you can simply test memory by using Windows Memory Diagnostic tool.
Step 1. Save your work and close any open programs.
Step 2. Type "Windows Memory Diagnostic" in the searching box next the Start button. Then click "Run as administrator".
Step 3. Click "Restart now and check for problem (recommended)". Your PC will restart and start check memory.
Step 1. Press Windows and R keys together to open Run dialogue box.
Step 2. Type "control sysdm.cpl" and hit Enter key. Then "System Properties" appears.
Step 3. Click "Advanced" tab and click "Settings" button in the Start-up and Recovery section.
Step 4. Unselect "Automatically Restart" option and choose "Complete memory dump" in the dropdown list for Write debugging information.

Step 5. Click "OK" to save changes and then restart computer.
Faulty registry configurations are also a reason for system crash. It is possible that the system registry settings on your computer are incorrect, for example an entry is configurated with a wrong value, or some key is missing. This solution will show you how to undo recent changes to registry with the help of Command Prompt.
Note: It is recommended to back up current registry files before proceeding with following steps in case that anything went wrong, and you can restore it.
Step 1. Run Command Prompt as administrator. Search for "Command Prompt" using the search bar adjacent to the Start menu and click "Run as administrator".
Step 2. Type following commands in Command Prompt one by one (press Enter key after each command).
C:
CD Windows\System32
CD config
DIR
CD regback
DIR
CD..
REN default default1
ren sam sam1
ren security security1
ren software software1
ren system to system1
CD regback
copy * c:\windows\system32\config
Step 1. Find "Event Viewer" using Windows searching box and launch it as administrator.
Step 2. Select "System" item after expanding "Windows Logs" section.
Step 3. Check errors that happened during the time of your PC ran into a problem. Then fix the error as per the given information.

The BSOD might occur after installing some driver updates, so you can fix it by trying to rollback problematic drivers to a previously working version.
Step 1. Right-click "Start" menu and choose "Device Manager" from the appeared menu.
Step 2. Expand the device for which you've recently updated drivers and click "Properties".
Step 3. Choose "Driver" tab and click "Roll Back Driver" button.
Step 4. Restart computer and check if the BSOD error is fixed.
Windows updates and third-party programs can also be buggy and cause problems. So you can simply remove recently installed apps and updates to get the error fixed.
Uninstall software on Windows 11/10
Step 1. Go to Start > Settings > Apps > Apps & features.
Step 2. Highlight the software you installed recently and click "Uninstall" button.
Uninstall system updates on Windows 11/10
Step 1. Go to Start > Settings > Update & Security > View update history > Uninstall updates.
Step 2. Choose the most recent update and click "Uninstall" button.
Step 3. Restart computer.
It is important to leave enough free space for Windows drive which is usually C drive. When the C drive is running out of space, the OS may become very problematic. There are three methods you can try to increase the free space for system drive.
Way 1: Delete any junk files from C drive and uninstall non-essential programs that are installed to C drive.
Way 2: Migrate Windows OS to a larger hard drive or SSD using DiskGenius Free Edition.
Way 3: Extend C drive with DiskGenius Free Edition. See detailed steps below:
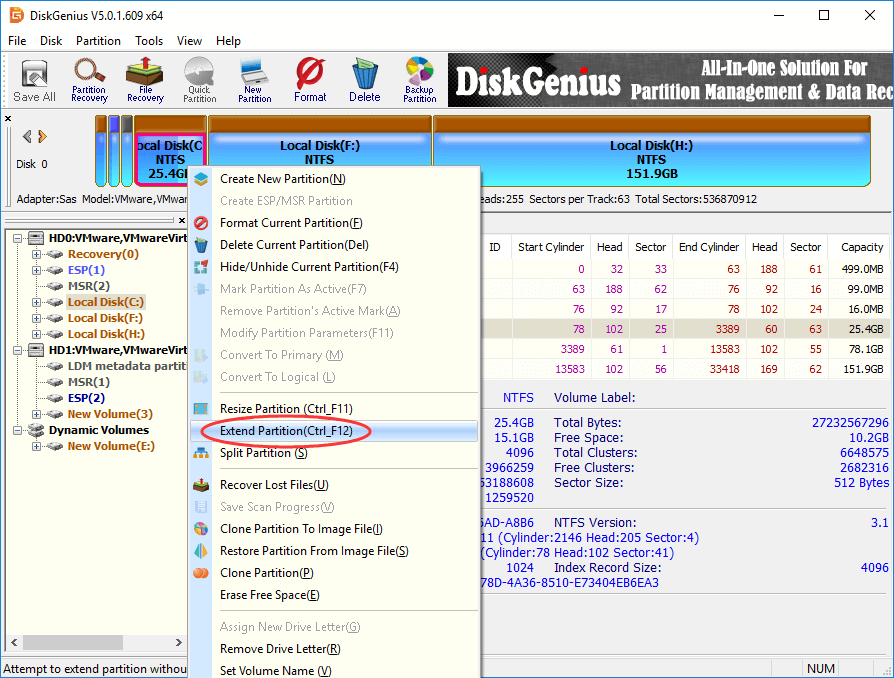
Step 1. Launch DiskGenius Free Edition, right-click the drive you want to extend and choose "Extend Partition".
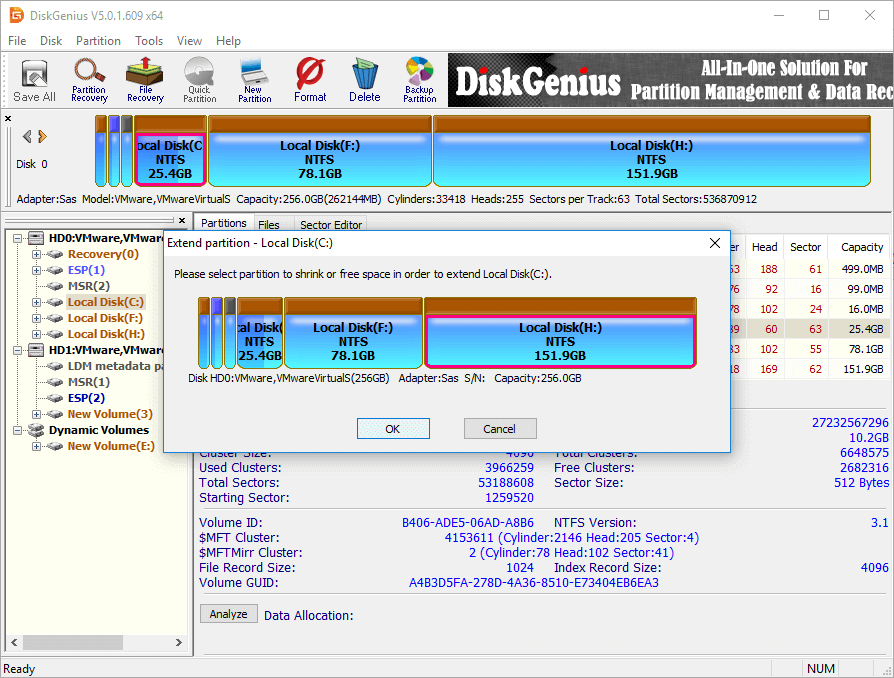
Step 2. Choose a partition that has sufficient free space and click "OK" button.
Step 3. Manage the disk space to be moved to C drive and click "Start" button.
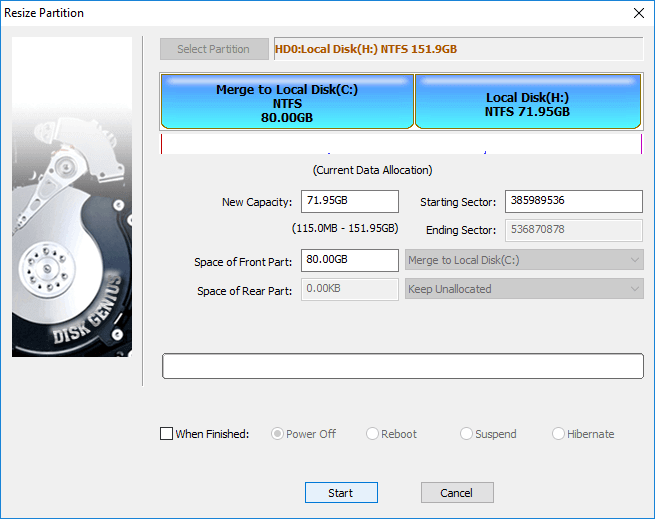
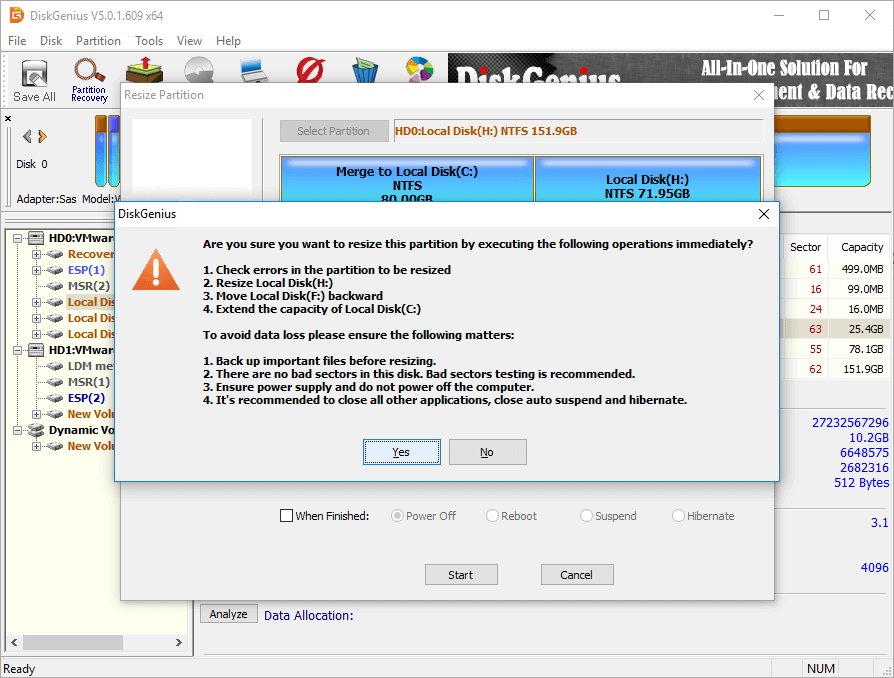
Step 4. View steps to be performed by the software and click "Yes" to continue.
Step 5. The partition resizing will be done by DiskGenius WinPE edition, as the process relates to system drive. Click "OK" button, and the software will start to prepare the WindowsPE environment.
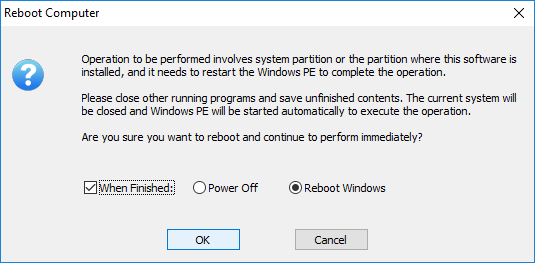
Wait for several seconds and the Windows PE environment will get ready.
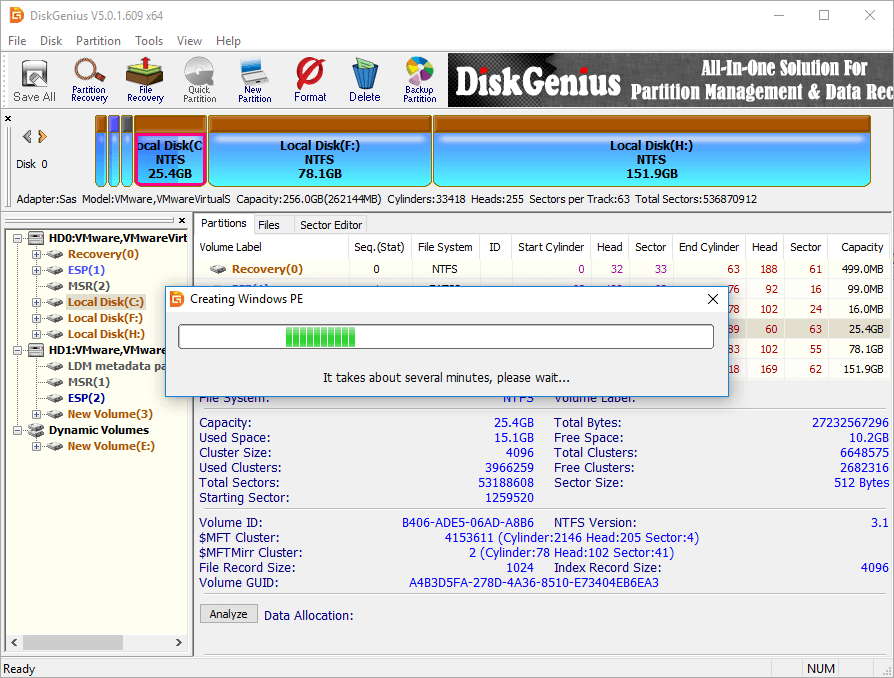
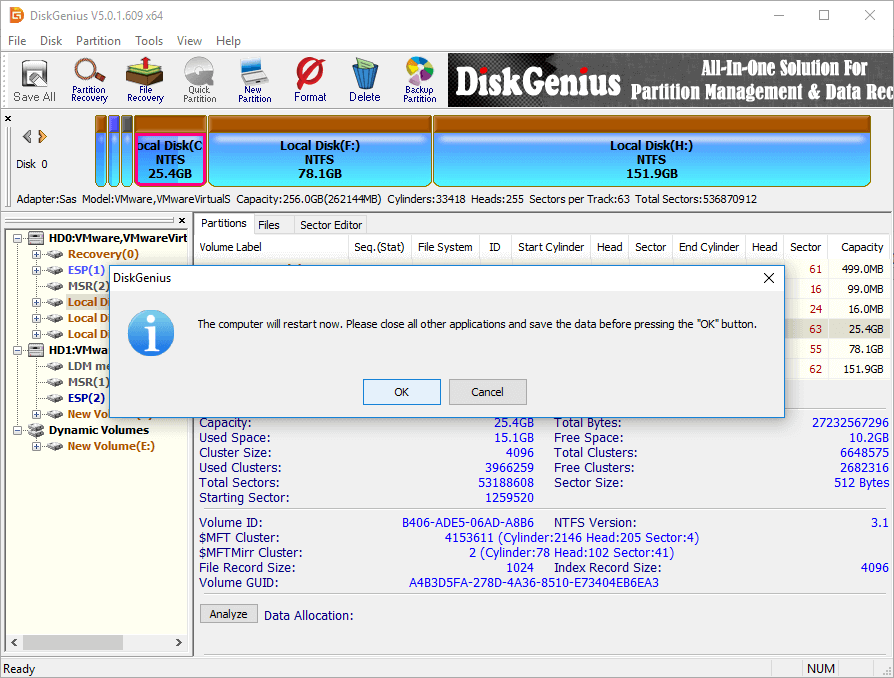
Click "Yes" button, and the computer will restart and boot to DiskGenius WindowsPE edition.
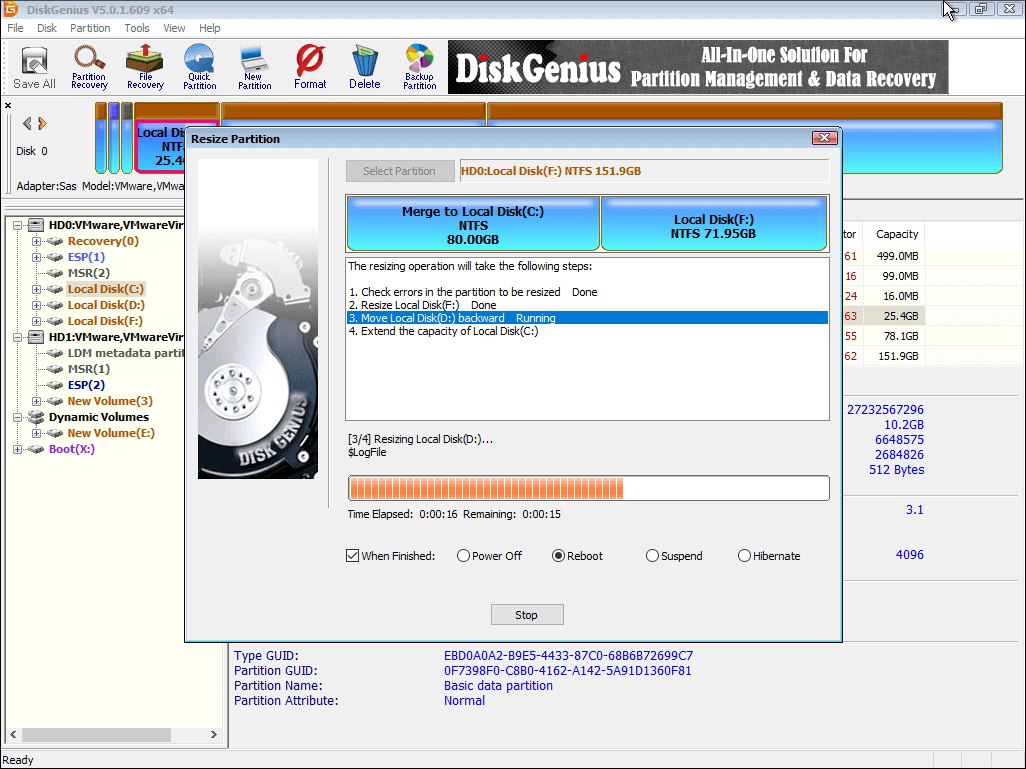
Step 6. Now DiskGenius WinPE Edition is moving free disk space to C drive. Wait for the process to complete.
Computer overheating can cause many issues such as system shutdown, blude screen errors, etc. A lot of reasons can lead to computer overheating, for example, the cooler is damaged or not powerful enough, computer is running in full load, the location where computer is placed is badly ventilated, etc.
To fix this, you can simply shut down computer and leave it powered off for a while. After that, turn on computer and check if it works properly.
Many gamers and computer geeks are fond of running computer with an overclocking on GPU or CPU in order to get better performance. Tools like MSI Afterburner, AMD Overdrive, CPU-Z or GPU-Z can help users to crank up system. Although overclocking CPU can squeeze extra performance out of PC without spending any money, it has chance to damage hardware like processor, motherboard, or RAM. Therefore, it is suggested to turn off all overclocking software when your computer is undergoing BSOD issue.
BIOS means basic input/output system, and it provides runtime services for operating systems and programs and performs hardware initialization during the booting process. BIOS controls many computer settings such as caching, overclocking, etc. Improper settings in BIOS may end up system crash, frequent hang up, etc. You can fix this issue by restore settings to factory.
Step 1. Restart computer. Repeatedly press the key shown on screen to access BIOS.
Step 2. Navigate options and locate the "Advanced" option.
Step 3. Turn on the "Reset Configuration Data" option.
Step 4. Save changes and exit.
Step 1. Go to Start > Settings > Update & Security > Recovery > Advanced startup > Restart now.

Step 2. Click Troubleshoot > Advanced options > Startup Settings > Restart.
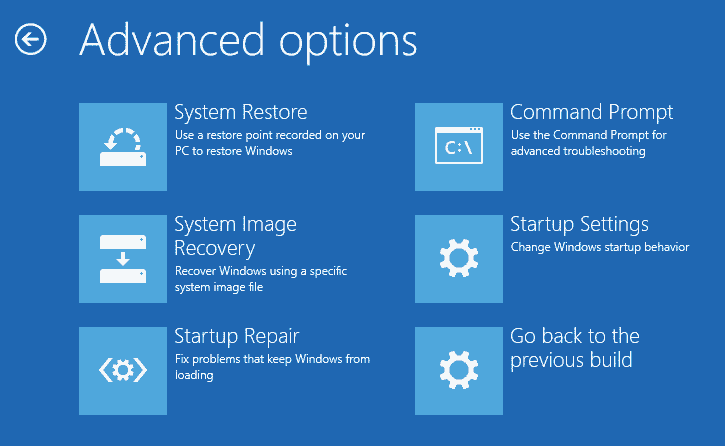
Step 3. Choose safe mode option by using number keys or functions keys F1 – F9. Then computer will boot into Safe Mode.

Step 1. Go to Start > Settings > Update & Security > Recovery > Advanced startup > Restart now.
Step 2. Click Troubleshoot > Advanced options > Startup Repair.

Step 3. Choose an account to continue. Enter the password for this account and click "Continue" button.
Step 4. The repair tool starts to diagnose your computer.
If the startup repair cannot repair your PC, you can press "Advanced options" to try other options to repair computer or click "Shut down" to turn off computer.
If you have created a backup for Windows OS, then go ahead to perform a system restore. If there are not any restore points, you will have to consider reinstalling Windows operating system. Please ensure you've backed up important files that are located on system disk in advance.
Since the computer is no longer bootable, you may need a bootable USB drive to help you access files on the computer. So how to create a bootable USB drive?
DiskGenius Free Edition provides you with the feature of creating a bootable USB drive. The process of making bootable USB drive does not damage existing files of the USB drive, as it does not format the drive.
After your computer boots from the USB drive, you can easily access tools like DiskGenius, Windows Command Prompt, Task Manager, Registry Editor, Notepad, etc. Then you can easily backup files, recover deleted or lost files/partitions, rebuild MBR, etc.
For most users, the most important task should be done is to rescue data when computer run into a BSOD problem. DiskGenius can recover lost files from computer hard drive, external storage devices, virtual disk, Windows Storage Spaces, RAID array, etc. Moreover, the free edition supports to create a bootable USB drive with which you can boot the BSOD computer and then start data recovery.
Step 1. Create a bootable USB drive.
If your computer can boot to Windows normally, then skip to Step 2 and perform data recovery.
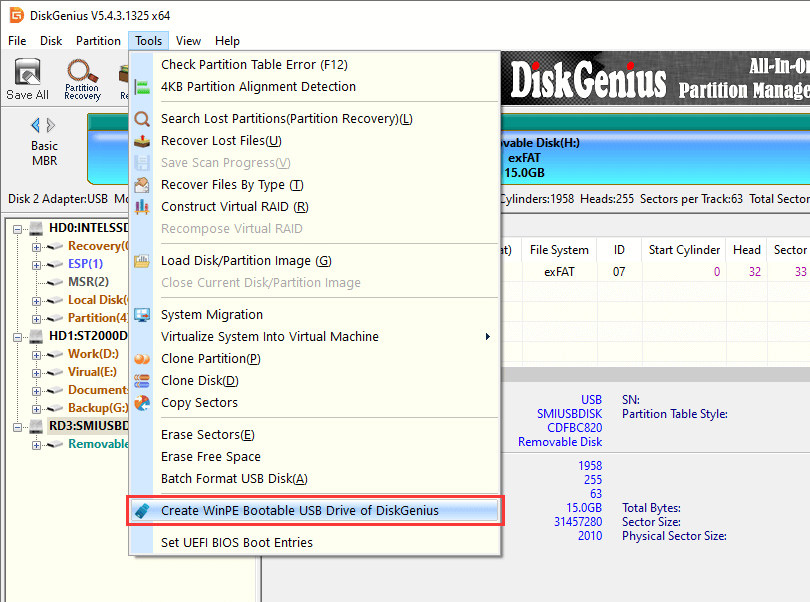
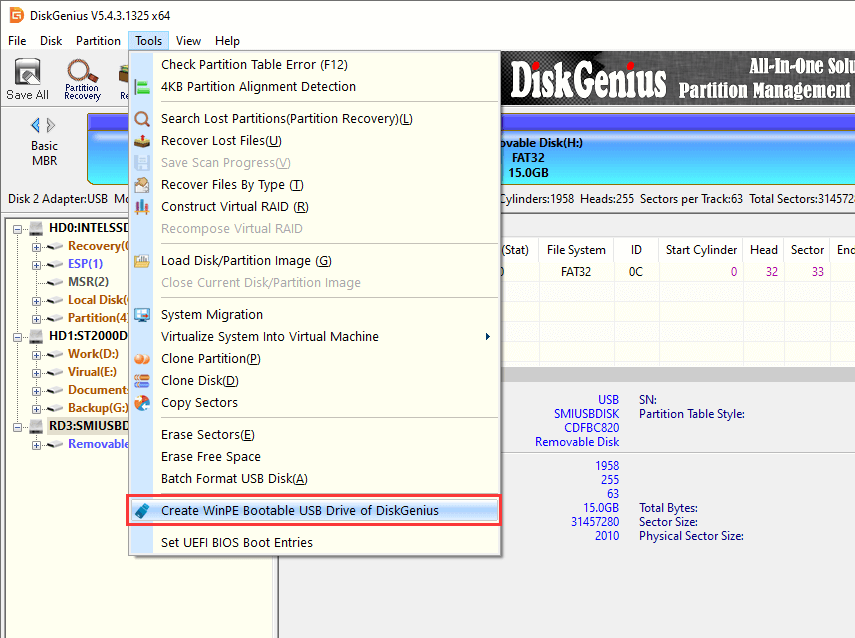
1. Connect a USB flash drive to computer and launch DiskGenius. Then click "Tools" – "Create WinPE Bootable USB Drive of DiskGenius", see the picture below:
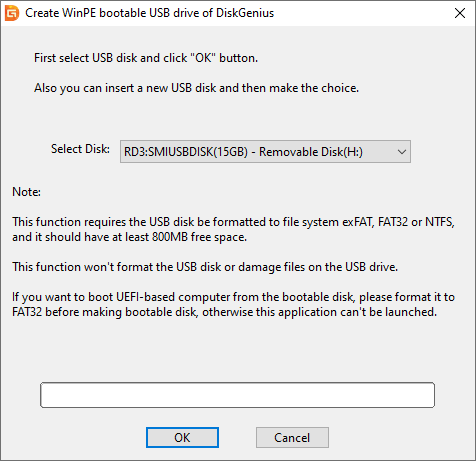
2. Select the USB drive from the dropdown list and click "OK" button.
3. Click "OK" button when the bootable USB drive is created successfully.

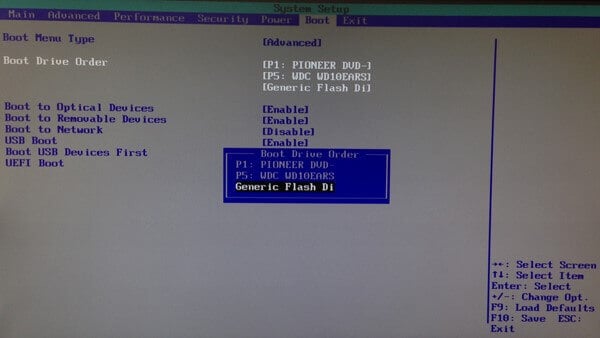
4. Connect the bootable USB drive to the BSOD computer and press power button. Then enter BIOS by repeatedly press a specified key. Make changes to boot sequence and make the USB drive as the boot device. Save changes and exit. After this, computer will reboot and boot from the USB drive. Once your computer boots from the USB drive successfully, DiskGenius will be launched automatically.
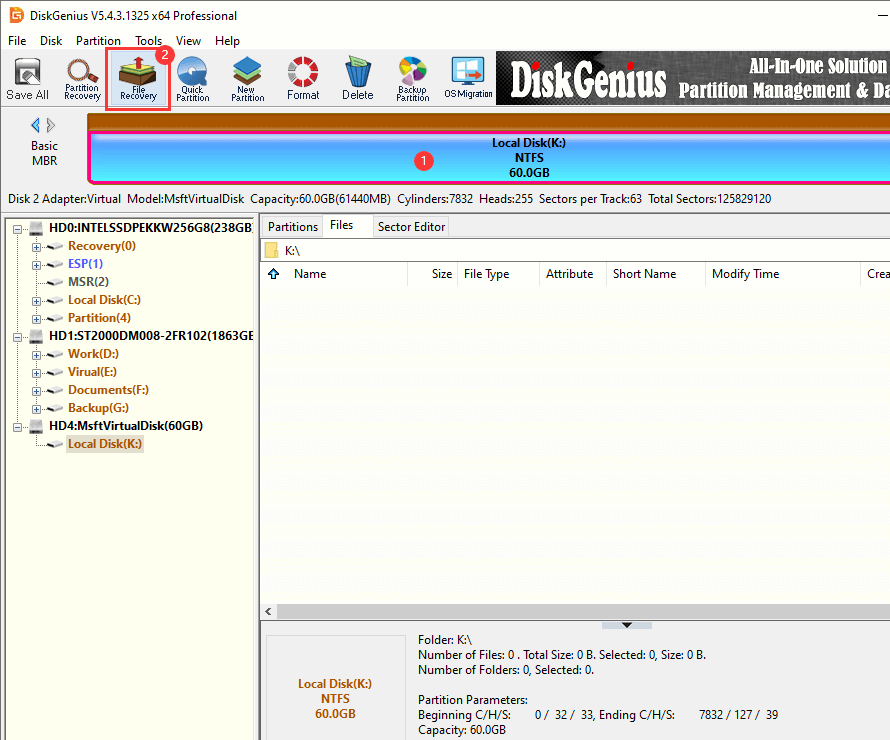
Step 2. In DiskGenius, select the drive where you want to restore data and click "File Recovery" button.
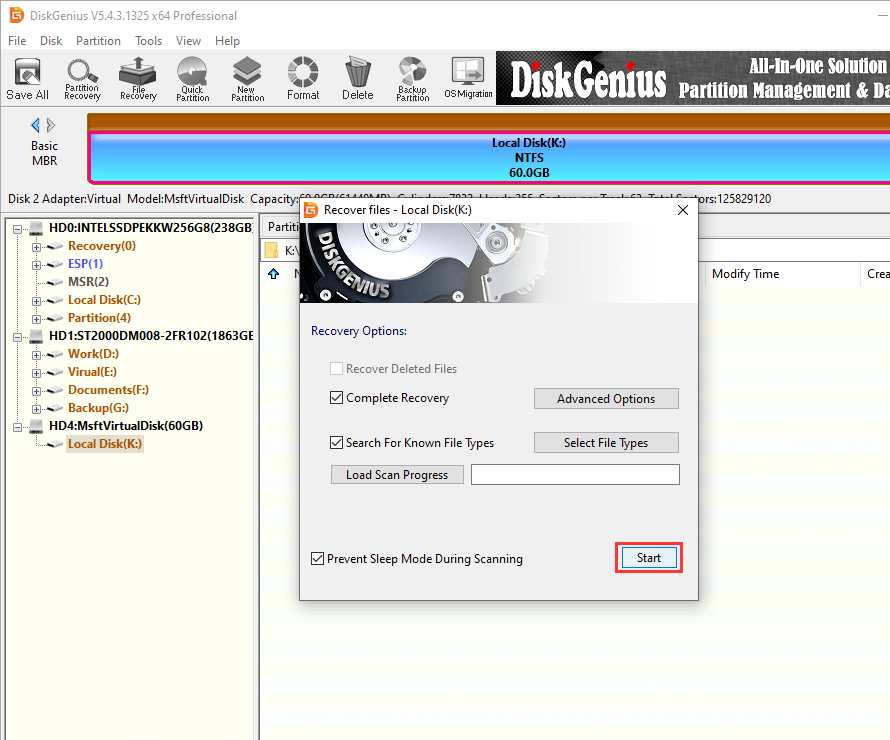
Step 3. Click "Start" button to let the software scan the drive.
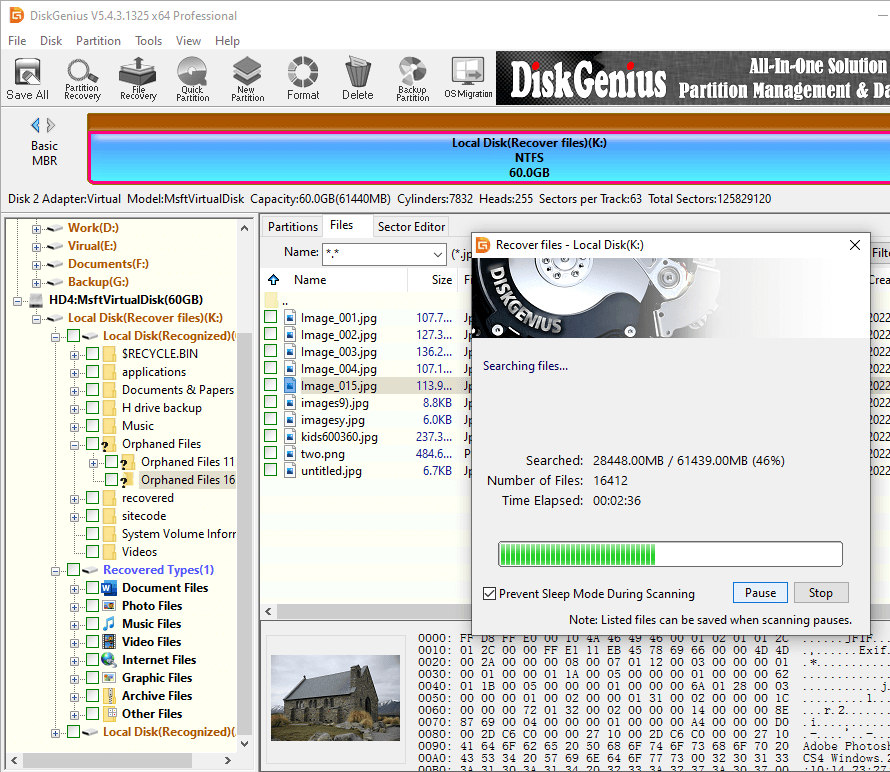
Step 4. Wait for the scanning process to finish on its own.
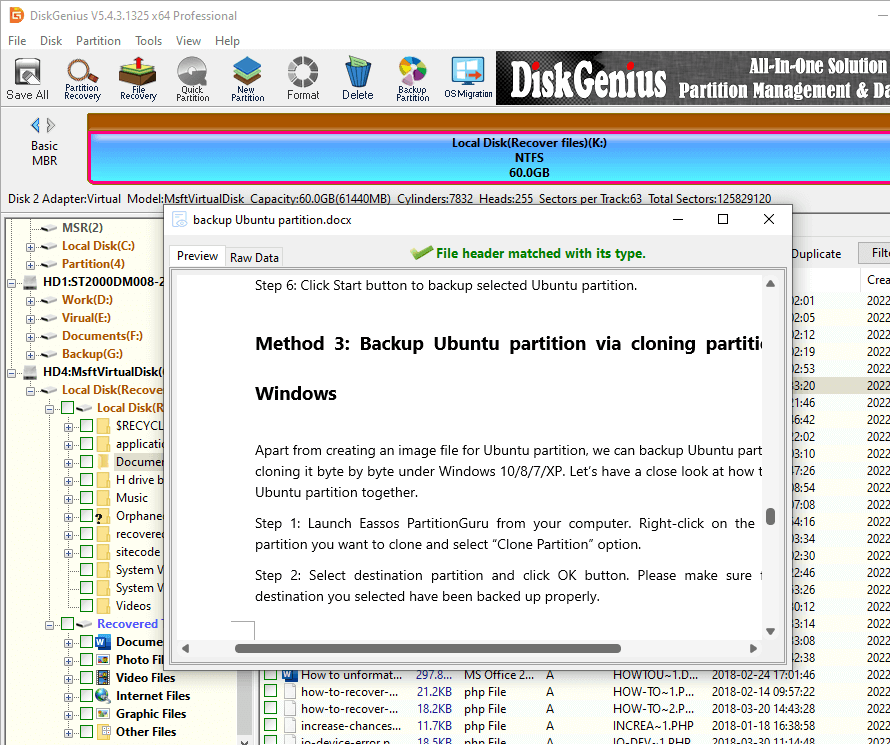
Step 5. Check and preview files found by the scanning process. Double-clicking a file to preview its content on a pop-up window, see the example in the picture below. File preview helps to verify whether lost files are still recoverable.
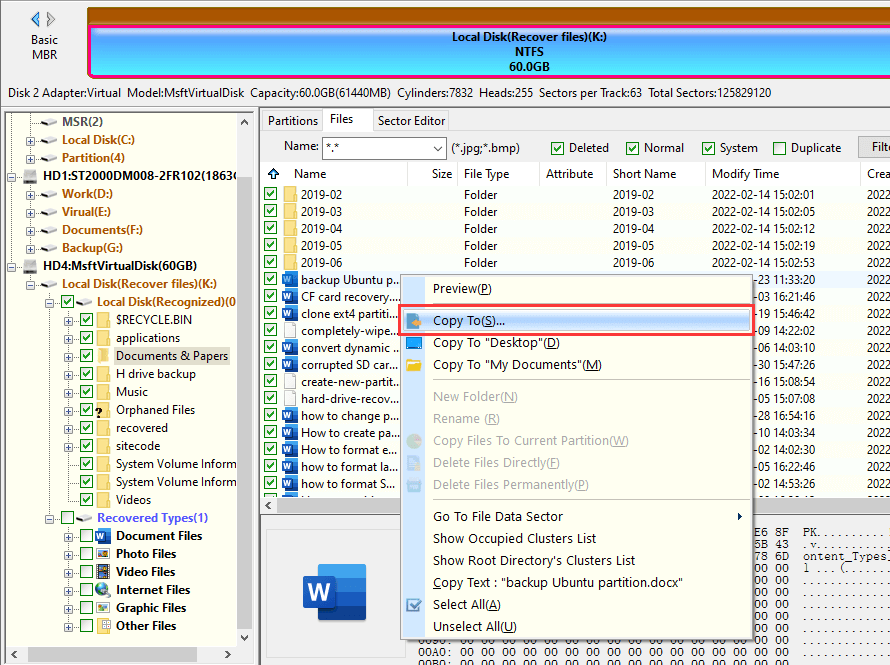
Step 6. Copy recovered files to a safe place.
Select files and folders listed in the software, right-click them and choose "Copy To" menu item. Then you can copy them to a secure location.
Some Windows booting issues are difficult to cope with, especially when the causes are uncertain. If you find fixes do not work as expected, the Windows 11/10 installed on your computer might be partially or even totally corrupted. On this occasion, you will have to consider Windows restore or reinstallation. Be sure that all files you want to keep have been transferred a safe location in advance.
In case that you want to prevent such BSOD errors from appearing again in the future and that even though BSOD occurs you have a backup to retrieve files and restore Windows OS, we strongly recommend creating backups for both Windows operating system and personal files.
DiskGenius Free Edition provides various backup solutions that can back up a single partition or an entire hard drive into an image file, clone hard drive to SSD, clone partition, migrate Windows OS to HDD/SSD/USB/virtual disk, backup partition table, clone hard drive with bad sectors, etc. Moreover, the application can load the partition / disk image file without executing restore process, so that you can view and retrieve certain files directly.

1. What to do when laptop says your device ran into a problem and needs restart?
First, you can try restarting computer and see if everything gets OK. If your laptop goes into Windows boot loop, you need to boot into Windows PE environment to rescue data. Then try fixes discussed in this article to fix the error.
2. Why is my blue screen stuck at 100%?
There is a good chance that hardware or device drivers on this computer are damaged. If Windows cannot fix it automatically, you can try repairing it with the help of DiskGenius. DiskGenius can create a bootable USB drive for you, enabling you to boot into Windows PE environment. After that you can back up important files, rebuild MBR, restore system, etc.
3. Should I wait BSOD to restart?
Although the BSOD (blue screen of death) issue looks like scary, it is a common occurrence for Windows users. It might be caused by either faulty software or failed hardware. First Windows will try analyzing and fixing it automatically, and the job is done behind the blue screen. So you can wait a while and see if the error can be fixed on its own. If your computer is not back in business after waiting for a long time, then you need to investigate and troubleshoot the error manually.
4. Is it okay to force shutdown blue screen?
Yes, you can force shutdown the computer by pressing and holding the Power button, provided that you've finished what the blue screen suggests. In most cases, the power off does not cause adverse impact on the computer.
5. What does DPC_WATCHDOG_VIOLATION mean?
The DPC_WATCHDOG_VIOLATION error code is one of the common problems you may encounter while using Windows 11/10/8.1/8/7. The DPC_WATCHDOG_VIOLATION error appears on a blue screen, which means the computer fails to boot into Windows.
6. How do you force restart a laptop?
When your laptop is suffering from freezing and the START menu does not work, you can try force restarting laptop via following steps. Do not perform a hard reboot frequently.
Step 1. Press and hold the power button for around 5 second.
Step 2. Then the laptop will shut down. Wait for all lights are turned off and then re-plug the power cord.
Step 3. Press the power button again to start laptop.
As discussed above, the BSOD issue can be caused by a variety of factors, such as corrupted system files, faulty drivers and a damaged hard drive. Therefore, several solutions should be tried to resolve the issue. The only important point to note is that solutions such as system restore, Windows reinstallation, repairing bad sectors and resetting Windows will definitely put data at risk. Therefore, always create backups beforehand. Please let us know which solution you used to resolve the 'Your PC ran into a problem and needs to restart' error. Don't forget to share this article on social media.
DiskGenius - The best free disk partition software to extend C drive, create bootable USB drives, check and repair bad sectors, rebuild MBR, image disks, and so on.

DiskGenius is a one-stop solution to recover lost data, manage partitions, and back up data in Windows.
Download