Position: How Tos - Partition Management - Solved: Windows Cannot Be Installed to This Disk
DiskGenius - A free tool to test HDD/SSD health, convert disk to MBR/GPT, repartition a hard drive, etc.
ô Free DownloadTable of Contents:
How do you fix Windows cannot be installed on this drive? The message Windows cannot be installed on this drive typically appears during the Windows installation process, indicating that there is an error preventing you from continuing the Windows installation. In addition to the error, there can be another message appearing along with it, providing additional information. And the accompanying error message varies depending on the underlying cause of the issue, and thus it is useful to read the error message to get clues to solutions. The error message can be caused by several reasons, such as, improper file system format, incorrect partition table type, insufficient disk or partition size, bad sectors, wrong BIOS/UEFI settings, etc.
You can follow troubleshooting mentioned below to identity and fix the error. It is important to back up any data you don't want to lose before making changes to the drive, because some solution involves deleting or formatting data and partitions. It's always a good idea to keep backups for important data.
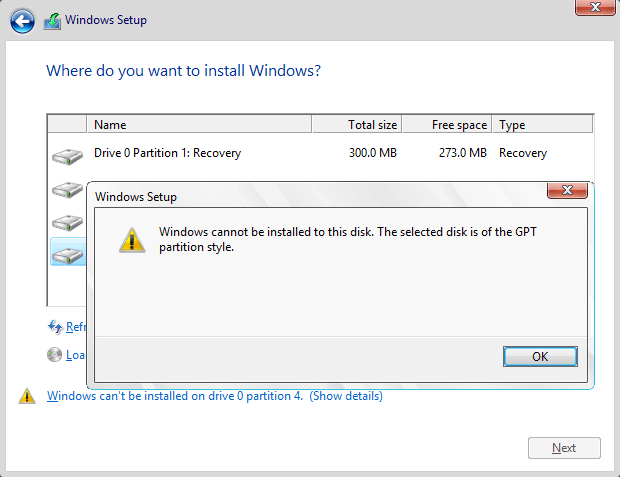
You may receive the error message " The selected disk is of the GPT partition style " when installing Windows OS to a GPT-style disk, see picture below. You will ask why Windows cannot be installed to this GPT disk. Generally, the main cause is motherboard. There are two types of boot modes: BIOS Boot Mode and UEFI Boot Mode. Most Windows versions have UEFI (Unified Extensible Firmware Interface) boot mode, while some versions since older days of Window XP have BIOS (Basic Input Output System) boot mode. Due to different boot modes, there are two types of partitioning schemes: MBR (Master Boot Record) and GPT (GUID Partition Table). If you want to boot system from a GPT disk, the motherboard should support UEFI; while on BIOS you should use MBR partition table. Thus, if you install Windows on BIOS system, the GPT partition table comes in your way. The installation will be blocked by the error.
Solution #1: Configure BIOS settings (boot mode)
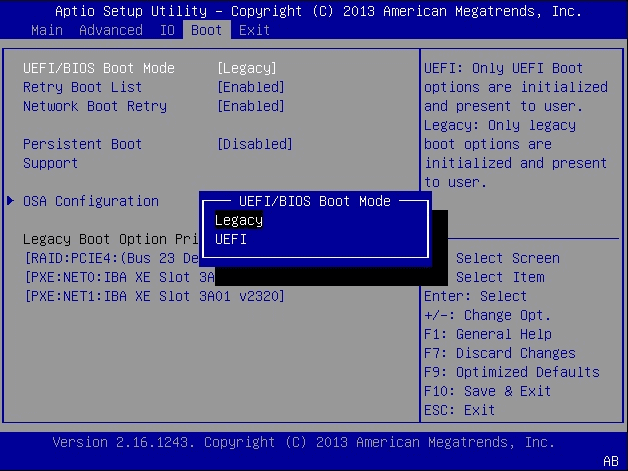
First of all, you should ensure the Boot Mode in your BIOS is set to Legacy BIOS instead of UEFI. At present, most motherboards support both legacy BIOS boot and UEFI boot. Thus, you need to make sure the proper boot mode is selected in BIOS setting. The picture shows the boot mode is modified to Legacy. Please note that the BIOS menu may look different on your computer, as it varies based on the models of the motherboard on your computer.
Solution #2: Convert the GPT disk to MBR without losing data
Since Windows cannot be installed on the GPT disk, you can fix the error by converting the GPT disk to MBR format. The converting does not deleting existing partitions and files if you use third-party free partition manager software to finish the task.
DiskGenius is free partition manager software for all Windows users and it is able to convert GPT disk to MBR without risking any data loss. If you prefer a user-friendly alternative to the Command Prompt, DiskGenius Free Edition is an excellent choice, as it is easier and safer to use. Additionally, this partition tool enables you to create a WinPE bootable USB disk, allowing you to manage your disks and partitions even if your system fails to boot. Furthermore, DiskGenius can assist you in backing up your data, imaging your system, recovering lost data or partitions, and backing up your partition table, migrating Windows 11/10 to HDDs or SSDs, etc.
Step 1. Download, install and launch DiskGenius from your computer. If your computer cannot boot to system, you can create a bootable USB disk to boot computer, and then carry out rest tasks.
Step 2. Select the GPT disk to be converted and click "Disk" menu to choose "Convert to MBR Partition Table", as below:
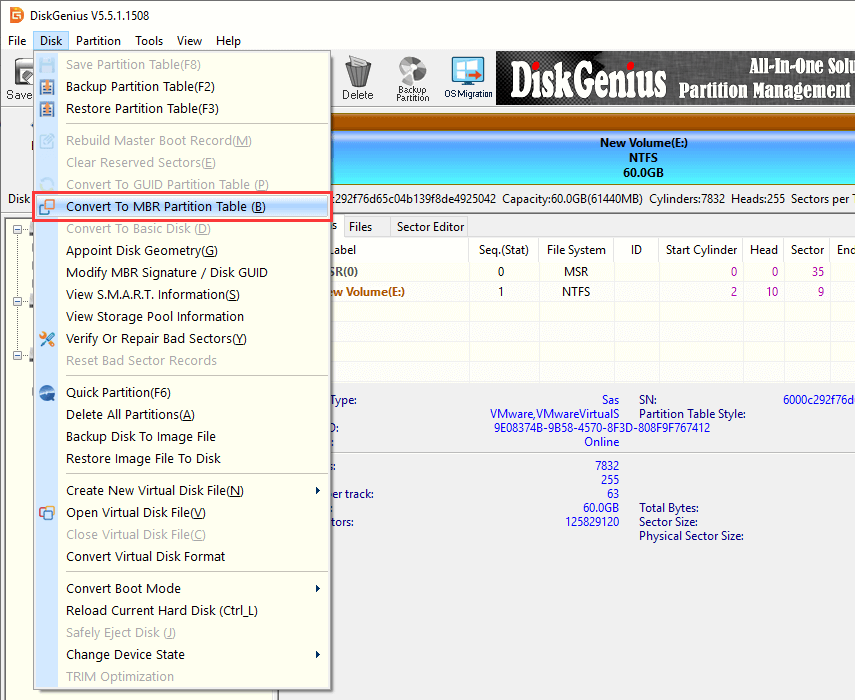
Step 3. Click Save All button from toolbar and click "Yes" from pop-up message box to save changes on partition table.
Tips: If capacity of the GPT disk is larger than 2TB, system can only make use of 2TB after it is converted to MBR.
Solution #3: Clean up the disk and convert to MBR using Command Prompt
It's important to note that the conversion from GPT to MBR using Command Prompt will result in data loss on the disk, as the process involves deleting all partitions and data on the disk. it's strongly recommended to back up all important data from the disk to a separate storage device to prevent data loss before trying following steps.
Step 1. Backup all of your data on the GPT disk you want to convert, as the process will erase all data.
If you can't afford to clean the disk or do not want to take efforts to back up data, you can convert GPT to MBR following steps in Solution 2 which does not disturb existing data.
Step 2. Run Command Prompt.
Boot computer from the Windows installation disk and click "Repair your computer" when you see following screen.
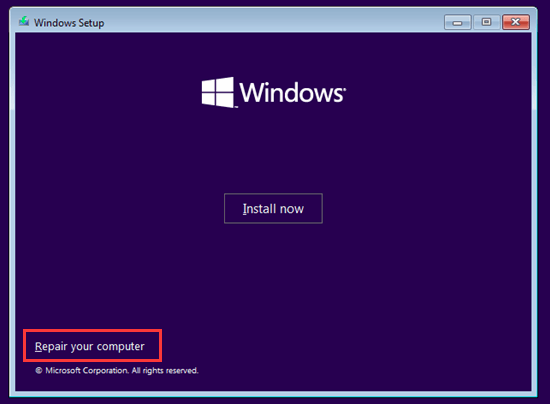
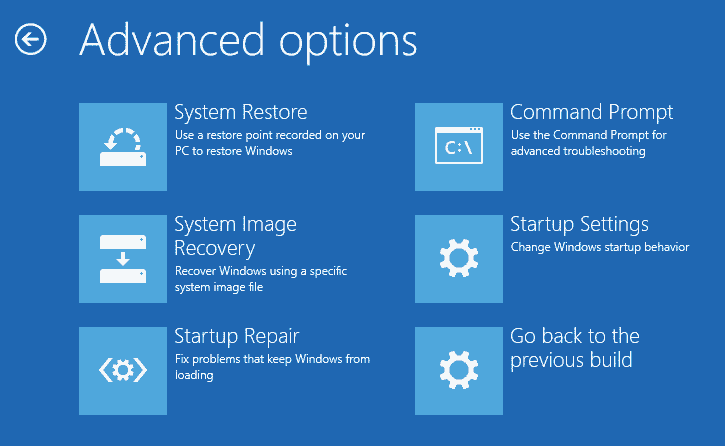
You will then be directed to the Advanced Recovery mode and see the Troubleshoot screen. The click Advanced options > Troubleshoot > Command Prompt.
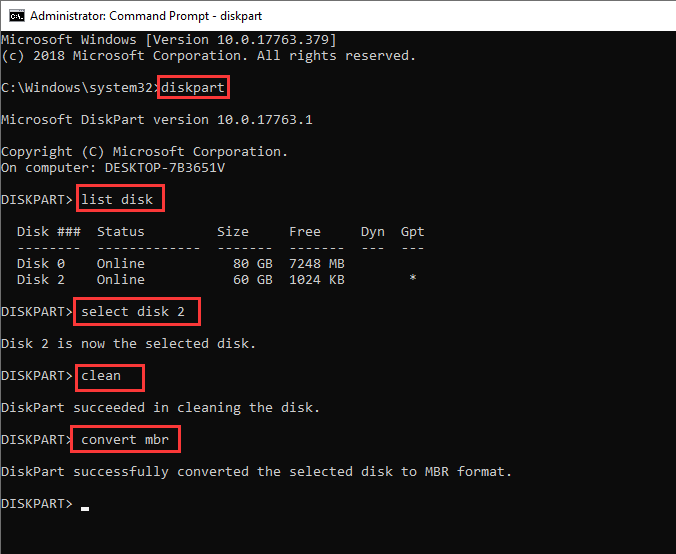
Step 3. Type diskpart in the command prompt and press Enter.
Step 4. Type in list disk and hit Enter key to view which one is of GPT style. The GPT disk is marked with asterisk in the GPT column. Remember the disk number you need to clean and convert.
Step 5. Type select disk # (# is the disk number and you should replace it with the actual number in your computer) to select disk.
Step 6. Type clean and press Enter.
Notice: this step will completely clean up selected disk, and all partitions and data will be deleted. Please make sure you have a backup before performing this command.
Step 7. Type convert mbr and press Enter, and the disk will be converted to MBR. Then you can execute exit command to exit or continue creating partition on this MBR disk.
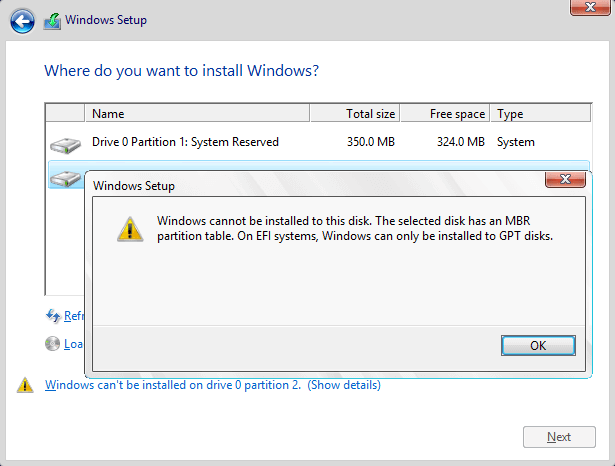
When you attempt to install Windows in UEFI mode on your computer, you cannot select the disk you want. You may click Show details to view the reason which says " The selected disk has an MBR partition table . On EFI systems, Windows can only be installed to GPT disks". That means you cannot install UEFI mode on a disk using MBR partition table and it can only install to GPT disks, as image below:
GPT (GUID Partition Table) was introduced as part of UEFI which is the acronym for Unified Extensible Firmware Interface. Compared to the traditional MBR partitioning scheme, GPT offers a more flexible approach to disk partitioning. Partitions or volumes are contiguous areas on a physical or logical disk, visible to both the system firmware and the installed Windows operating system. The system firmware controls access to partitions before the operating system boots, and once booted, the partitions are managed by the OS.
Many modern computers support the UEFI version of BIOS, which speeds up boot and shutdown speed as well as provides security features. If you want to boot computer in UEFI mode, the disk installs operating system should be of GPT style. Many computers are able to use UEFI and they also provide CSM (compatibility support module) so that legacy version of BIOS can be used in necessary. The GPT drive format allows users to set up drives larger than 4TB and does not impose a limit on the number of partitions.
Solution #1: Change BIOS Boot Settings
The first try to solve the problem should be going through BIOS and changing UEFI boot settings. You can manually switch boot mode to legacy BIOS compatibility instead of UEFI mode.
Step 1. Restart computer and enter BIOS by pressing the specified key prompted by your motherboard manufacturer.
The prompt appears on screen before computer boots into Windows.
Step 2. Go to Boot tab and locate boot order option. Then disable EFI Boot Source and change boot mode to Legacy.
Step 3. Save changes and exit.
Solution 2: Convert MBR disk to GPT using DiskGenius Free
DiskGenius Free Edition is able to convert an MBR disk to GPT without losing data and the process is quite easy to follow:
Step 1. Install and launch DiskGenius Free. You can download this free partition manger software from the download center.
Step 2. Locate and select the MBR disk to be converted to GPT and click "Disk" menu to choose "Convert To GUID Partition Table".
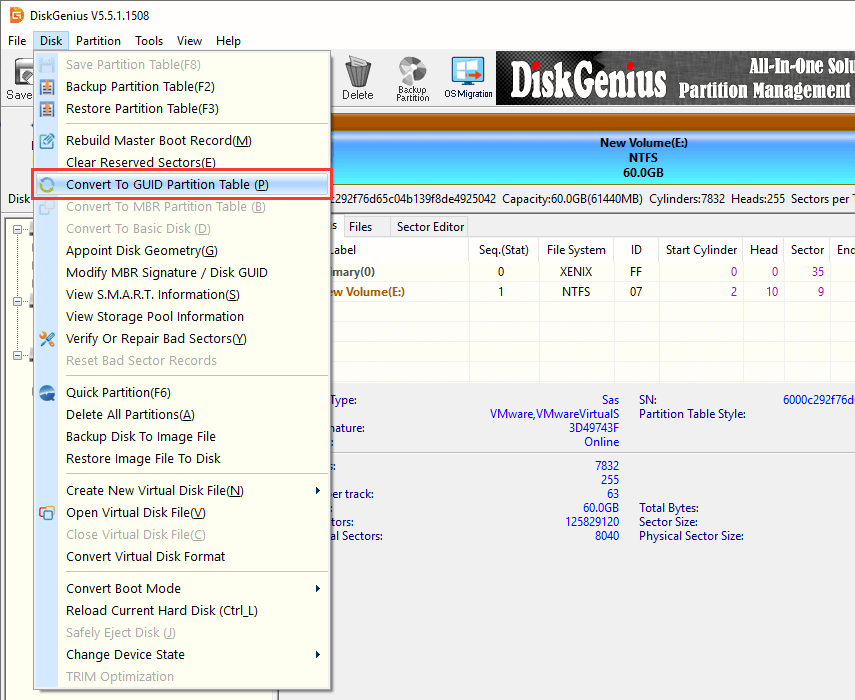
Step 3. Click "OK" button on the message box. Then click "Save All" button to make the converting work
When the disk is converted to GPT, you can retry installing Windows again and check if the error is fixed.
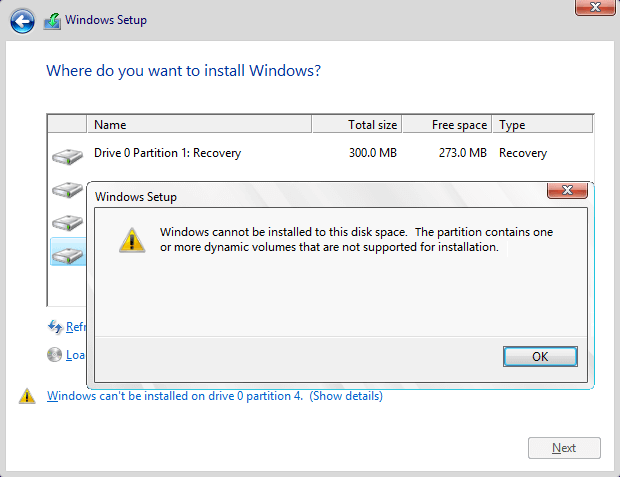
The "The partition contains one or more dynamic volumes that are not supported for installation" error is likely to appear when you attempt to install Windows on a dynamic disk. Users are allowed to make a fresh Windows installation on a dynamic volume only when the volume was converted from a basic disk and retained an entry in partition table. However, simple volumes (except system or boot volumes before conversion) that have been converted from basic disks do not have an entry in partition table, thus the installation will end up with the following error.
What is basic disk and dynamic disk? A basic disk is a storage type mostly used in Windows operating system, providing a solution to accommodate an array which changes storage requirement scenarios. A basic disk consists of partitions, such as primary and logical partitions, which can be formatted with a file system to store data. Generally, basic disks use MBR partition style since the disk is used by Microsoft MS-DOS operating system and all versions of Windows. Also, it supports GPT partitions on systems that support it. With basic disks you can create and delete primary, extended and logical partitions as well as format a partition or mark it as active.
On the other hand, a dynamic disk offers additional features not found in basic disks, for example, it is able to create volumes crossing multiple disks and create fault-tolerant volumes. Either MBR or GPT partition table styles can be used by a dynamic disk. Dynamic disks provide greater flexibility for managing volumes by utilizing a database to track information for volumes and other dynamic disks. Additionally, dynamic disk volumes can be created on noncontiguous scope or physical disks, while volumes on a basic disk should be located on a contiguous area on a single physical disk.
Solution #1: Convert the dynamic disk to basic disk in Disk Management
Step 1. Back up all volumes and data on the dynamic disk to be converted to basic, as this converting method removes all partitions and data on the disk.
If you don't want to spends too much effort on data backup and transferring, you can try Solution 3 which can do the converion without deleting data.
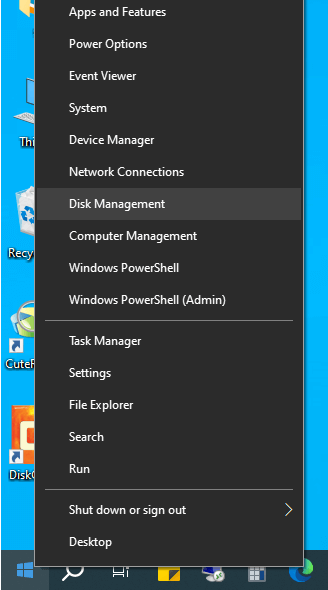
Step 2. Open Disk Management. Right-click the Start menu (the Windows icon) and click "Disk Management".
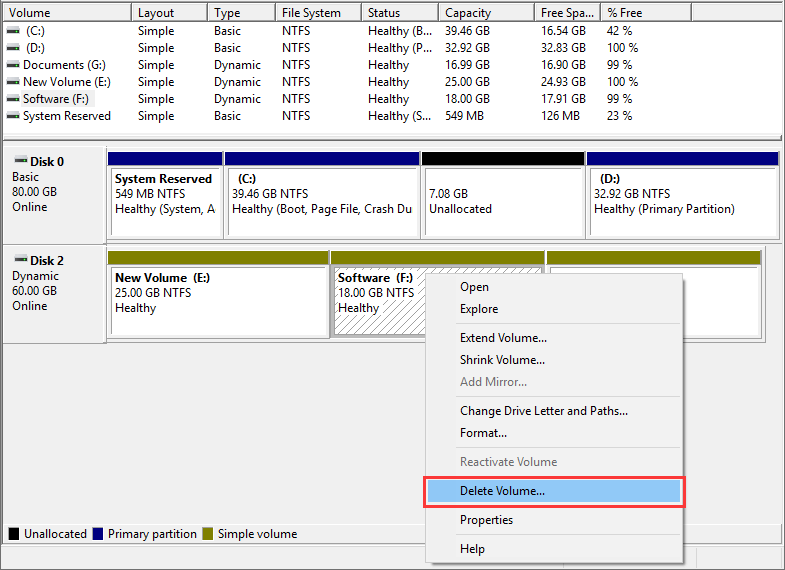
Step 3. Delete all volumes on the disk. Right-click each volume on the disk you want to change to basic disk and select Delete Volume.
The disk will be converted to basic automatically after all volumes are deleted from the disk. If the converting does not happen, then move to step 4.
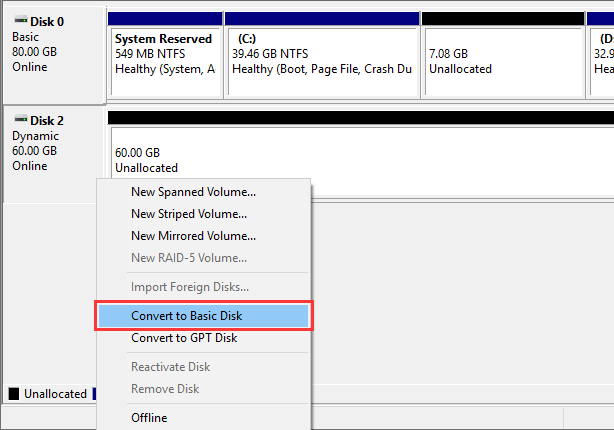
Step 4. Right-click the disk and select Convert to Basic Disk. Once the disk is converted to basic disk, you can create partitions on the disk.
Solution #2: Change a dynamic disk to basic disk using command line
Warning: If you want to keep your files on the disk, back up files or copy data to another disk before starting following steps.
Step 1. Open Command Prompt. If there in not operating system on your computer, you can use a Windows installation CD or bootable disk to boot computer and open CMD.
After the computer boots from the installation disc, choose "Repair your computer" and then access "Troubleshoot" to locate "Command Prompt".
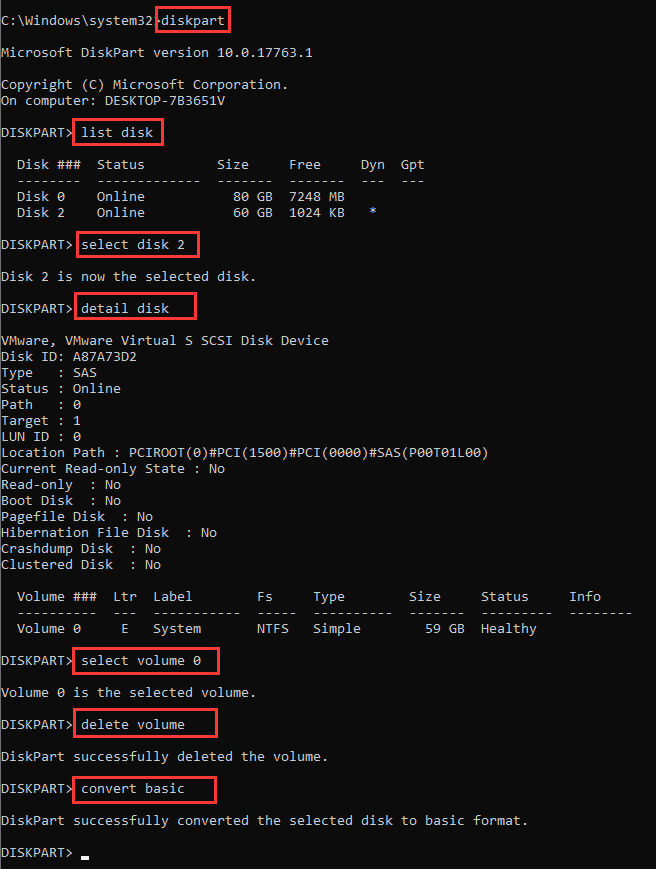
Step 2. Delete all volumes on the dynamic disk by typing following commands with pressing Enter after each command.
diskpart
list disk
select disk # (# is the number of the dynamic disk)
detail disk
select volume 0
delete volume
To delete other volumes, you can continue typing "select volume 1" -> "delete volume" one more time.
Step 3. After all volumes are deleted, type convert basic and the disk will be converted into a basic disk.
Solution #3: Convert a dynamic disk to basic disk without data loss
Both methods above require you delete all volumes and data before converting, thus you should make sure there are not important data or you've created a full backup beforehand. Here is an alternative solution which is able to complete the conversion without losing data. DiskGenius is a professional dynamic disk converter, it is able to convert the dynamic disk to basic without deleting volumes within several seconds. Let's see the entire converting process.
Step 1. Run DiskGenius and you can see the dynamic disk on the main interface.
Step 2. Locate and right-click on the dynamic disk and select Convert to Basic Disk option, as below:
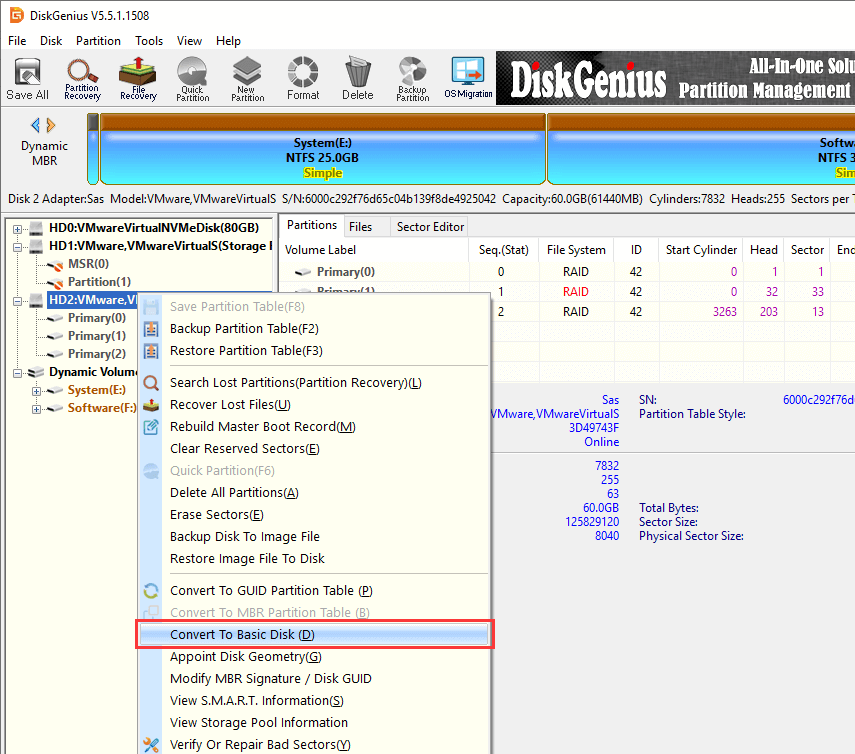
Step 3. Click OK button from the pop-up message box to make the changing work.
Due to compatibility problems on file system, most versions of Windows operating system can be installed to partitions formatted to NTFS, and only few versions can be installed to a FAT partition. If the volume is formatted to an improper file system, you'll receive error "Windows must be installed to a partition formatted as NTFS". Since the target partition has a file system issue, we can fix this error easily by changing its files system to NTFS.
Solution #1: Convert FAT file system to NTFS using Convert.exe
Converting the file system has the potential to result in data loss, and it is recommended to back up important data on the drive you are going to convert.
Step 1. Launch Command Prompt. Click Start button and enter cmd in searching box and press Enter.
Step 2. In the Command Prompt, type the following command convert G: /fs:ntfs and press Enter.
G is the drive letter of the partition that you want to change file system. You can open Windows Explorer to view the drive letter. Make sure the drive letter is correctly entered here. If it asks to enter the volume name, type in the name and press Enter.
Step 3. Convert.exe attempts to convert file system into NTFS and the process won't take too long. After the conversion is complete, you might be prompted to restart your computer.
Solution #2: Format the partition into NTFS
Step 1. Copy the folder where DiskGenius installs to your bootable disk and then use the disk to boot computer.
Besides, you can create a bootable disk with DiskGenius: Click "Tools" menu and choose "Create WinPE Bootable USB Drive of DiskGenius" option.
Step 2. Launch DiskGenius, select the system partition you want to format to NTFS, and click "Format" button.
Step 3. Set the file system as NTFS and click Format button.
As to options like Cluster Size, Volume Label, Surface Scan, etc., you can follow the default value set by the partition manager.
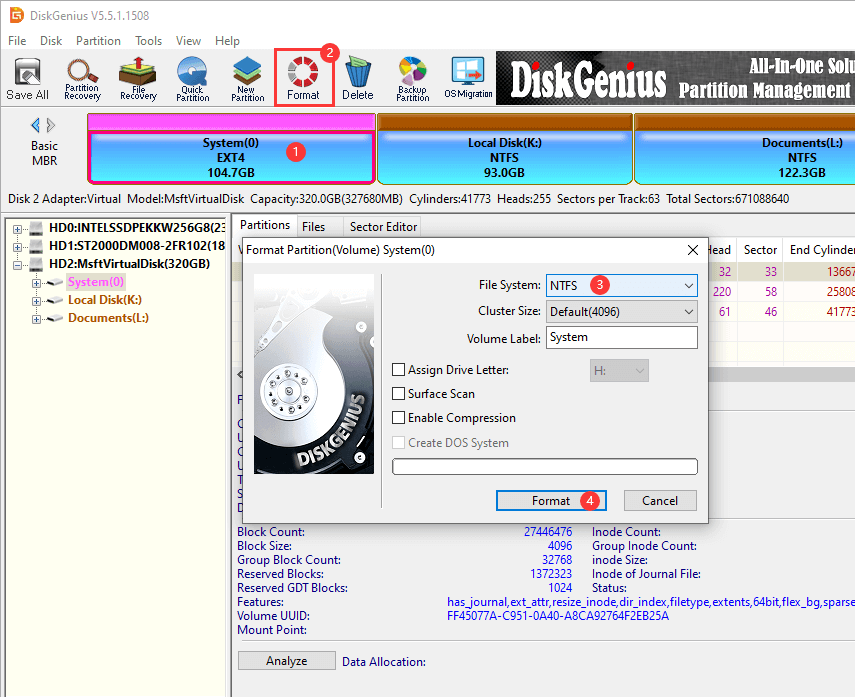
Step 4. Click Yes from the message box which prompts all files on this partition will be lost after formatting.
You may receive the warning message "This computer's hardware may not support booting to his disk. Ensure the disk's controller is enabled in the computer's BIOS menu" when you try to install Windows. If you click Next to continue and you will receive another error "Windows cannot find a system volume that meets requirements for installation".
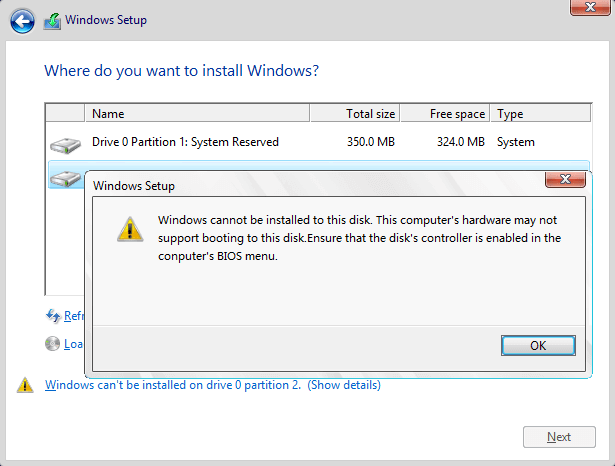
This error may indicate that BIOS settings of your computer are not properly configured, thus you can try setting BIOS to factory and go back to default settings. Plus, please ensure that your computer's firmware (BIOS/UEFI) is up to date. Manufacturers often release updates that can improve compatibility and fix bugs.
Also, this issue is caused by improperly configured hard disk mode; in that case, you need to change AHCI to Compatibility in BIOS. If there is not Compatibility option, you can select IDE. Additionally, if your system uses RAID, ensure that the RAID configuration is set up correctly in the BIOS/UEFI settings.
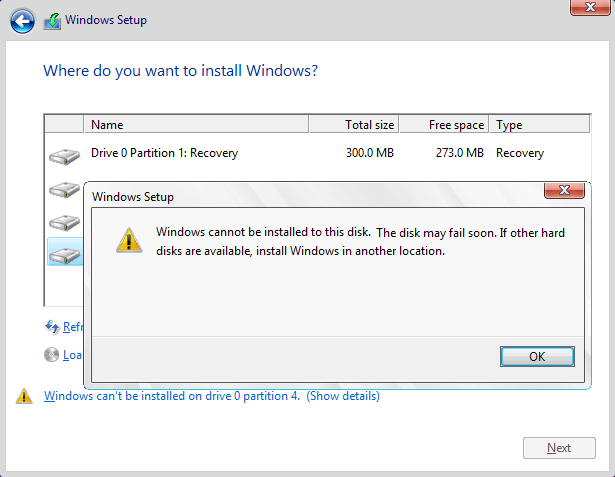
There might be something wrong with the hard drive if you get the error "Windows cannot be installed to this disk. The disk may fail soon. If other hard disks are available, install Windows in another location." You should be cautious if the hard drive is damaged, as data on that disk may get lost, which is similar to the system warning Windows detected a hard disk problem , you should have a check for hard drive health condition.
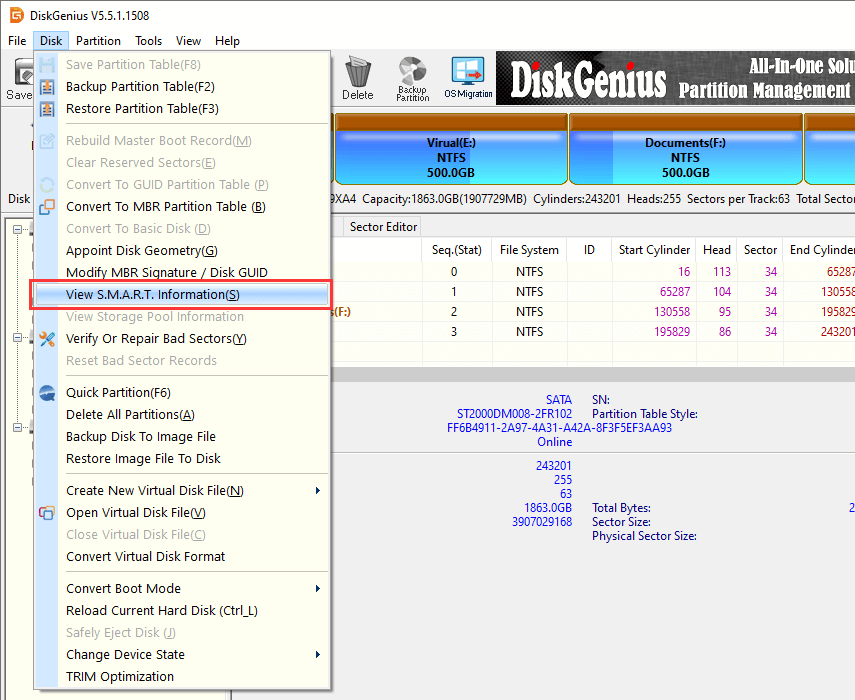
Step 1. Check hard drive or SSD health via accessing S.M.A.R.T. data.
Select the hard disk that may fail soon and click Disk menu to choose View S.M.A.R.T. Information. If the health status is NOT Good, then backup data and verify bad sectors following Step 2.
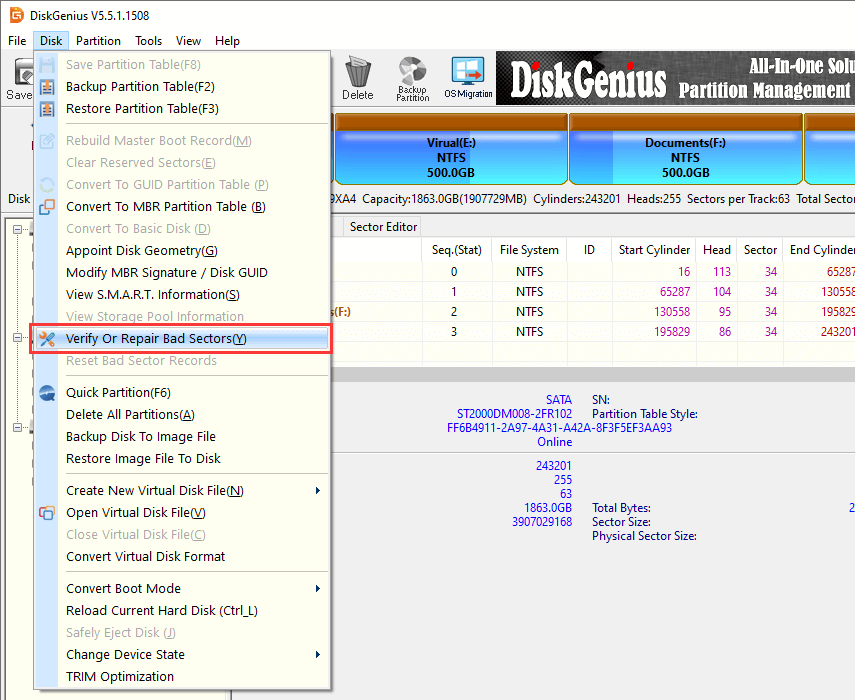
Step 2. Check bad sectors for the hard drive in questions.
Still in DiskGenius, select the disk you want to check bad sectors, click "Disk" and choose "Verify Or Repair Bad Sectors". Then click Start Verify button to start scanning sectors for selected area.
If the hard disk contains bad sectors, you can try repairing it with DiskGenius. However, it is crucial to backup all files before proceeding the repairing, as the process of repairing bad sectors can result in data loss. It is important to note that certain bad sectors caused by physical damages may be irreparable. In that situation, you can manually create a hidden partition on that area to isolate bad sectors. Moreover, it is recommended to install Windows operating system on a health hard drive or SSD that does not have bad sectors.
While installing Windows 7, you might run into an error saying "Windows is unable to install to the selected location. Error: 0x80300001". This error typically occurs when you are asked to exchange hard drives in order to install required drivers on the system and the system disk hasn't been put back. It can also be caused by other reasons, so you may have to try more than one solution to solve it.
Solution #1: Reconnect Windows installation disk
Step 1. Boot computer using a Windows installation CD or USB disk to access the setup wizard. Go to the step which requires selecting a partition and click "Load Driver". When you see the error message, ignore it.
Step 2. Reinsert the installation disk and click Refresh link and then Advanced Drive Options to create a new partition with any size. If Windows prompts it has to carry out some operations, click "OK". Then you can see a new system partition and a new primary partition.
Step 3. Select the new primary partition and click "Next" button. Then the setup should continue without any errors.
Solution #2: Change boot order
It's possible that this error occurs when the disk is not set as the boot disk provided that you are not using RAID. In that circumstance, you can get rid of the problem by changing boot order in BIOS.
Step 1. Enter BIOS Setup Utility. Turn on or restart your computer and watch message appearing on screen. A specific key such as Del or F2 will be promoted on the screen to enter BIOS. Press that key.
Step 2. Select the "Boot" tab. All BIOS utilities look different, but boot option is definitely included. Locate and select it.
Step 3. Set the hard drive where you want to install system as the boot device. Any attached storage devices like external hard drives, USB flash drives, floppy drives, etc. are listed here too, and you can change their order manually. Save changes and exit.
People who try to install Windows using internal SAS controllers for hard drives will encounter the message "Windows cannot be installed to disk # partition #". Usually this issue occurs due to SAS driver issues or corrupted $MFT. The Microsoft Windows partition manager is out of touch with drivers after changes were made on partitions. Here is an approach to troubleshoot the problem.
Step 1. When the Windows installation process asks where you want to install Windows, load the SAS driver from a USB key. If the disk is larger than 2TB and needs to be converted to GPT, you can follow steps in previous solutions to do the conversion.
Step 2. View and check all possible partitions available for system installing. If the disk does not show up, have a check whether the drive is correctly installed.
Step 3. Delete partitions until there is only unallocated Space on the disk. Click "New" and you can see recommended partition size. Continue "OK" and you can see 3 partitions: system partition, MSR partition and large partition.
For this step, you can also use DiskGenius to repartition the hard disk and choose GUID partition table, which is easier and intuitive.
Step 4. Select the big partition and click "Refresh". Then click "Next" to start the installation.
This guide addresses 8 scenarios that the "Windows cannot be installed to this disk" error appears during the Windows setup process. If the selected disk is of improper partition table style corresponding to BIOS settings, Windows installation will be blocked by errors. This article provides step by step solutions to each situation. If you have better solutions, please feel free to contact us or share with other readers. It is important to note that certain approaches mentioned in this article, such as disk formatting and partition deletion, may result in data loss. Therefore, it is essential to ensure that all files and partitions are backed up prior to executing these steps. The free partition manager DiskGenius provides proper and effective functions to help fix this error occurring in different cases, and it is a qualified partition and disk management tool as well as data recovery program for both beginners and professional users.
DiskGenius - A free partition manager to resize partition, migrate Windows to SSD/HDD, wipe HDD data, etc.
ô Free Download