
Updated on Nov. 11, 2022
Position: Resource - Partition Management - Windows Was Unable to Repair the Drive
DiskGenius - A free disk repair tool that can check and repair bad sectors, wipe hard disk & SD card data, clone hard disk with bad sectors, format RAW drive to NTFS/FAT32, etc.
"Everytime I connect the external hard drive to my laptop, Windows recommends me to scan and repair the device. The error message is 'Error checking. Repair this drive. We found errors on this drive. To prevent data loss, repair this drive now.' I want to get errors repaired, because files on the drive are of great importance for me. However, the reparing prcess always fails to work untimately, and repports there was a problem repairing this drive and Windows was unable to repair the drive. How can I overcome this safely?"
It is possible that Windows informs you that there is a problem with the internal hard drive, external hard disk, USB flash drive or SD card, and asks you to run scanning and repairing for the drive:
"There's a problem with this drive. Scan the drive now and fix it."
"Error Checking (USB Drive (F:))
Repair this drive
We found errors on this drive. To prevent data loss, repair this drive now.
Repair drive
You won't be able to use the drive while Windows finds and repairs any errors. This might take while, and you might need to restart your computer."
"Do you want to scan and fix removable disk (F:)?
There might be a problem with some files on this device or disc. This can happen if you remove the device or disc before all files have been written to it.
Scan and fix (recommended): This will prevent future problem when copying files to this device or disc.
Continue without scanning"
Most of us will choose to scan and repair the drive, for we care about the drive as well as files stored on the drive. There are two possible situations after running the repairing process: no errors are found, or Windows cannot repair the drive:
"Error Checking (USB Drive (F:))
You don't need to scan this drive
We haven't found any errors on this drive. You can still scan the drive for errors if you want.
Scan drive
You can keep using the drive during the scan. If errors are found, you can decide if you want to fix them."
"Error Checking (USB Drive (F:))
Your drive was successfully scanned
Windows successfully scanned the drive. No errors were found."
"Error Checking (USB Drive (F:))
There was a problem repairing this drive.
Windows was unable to repairing the drive. Close this dialog box and then try to repair the drive again."
Why does Windows ask to scan and fix the drive? The error can happen due to several factors, for example:
What to do when Windows was unable to repair the drive? Don't be panic. The message does not mean the drive is beyond repairing. Although Windows scanning and repairing cannot deal with the problem, you can try other solutions to fix it.
Important: It is strongly recommended that data backup or data recovery should be performed as soon as possible when Windows prompts there are problems with the drive. Do not try repairing the error before all files are safely recovered or backed up, because important files stored inside the drive may get lost or damaged during the scanning and repairing process.
Disclaimer: Solutions listed here may damage files stored on the drive, please create backups for important files. If the drive that cannot be repaired by Windows is no longer accessible, perform data recovery first.
Fix #1: Restart computer to enter Safe Mode
This method is going to figure out if the "Windows was unable to repair the drive" is caused by conflicts of installed programs, drivers, services, etc. If your computer can boot into Windows, you can follow steps below to boot into Safe Mode:
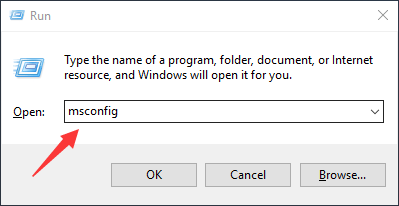
Step 1. Press Windows logo key and R together to open Run dialog box.
Step 2. Type msconfig in the searching box and click OK button. This will open System Configuration.
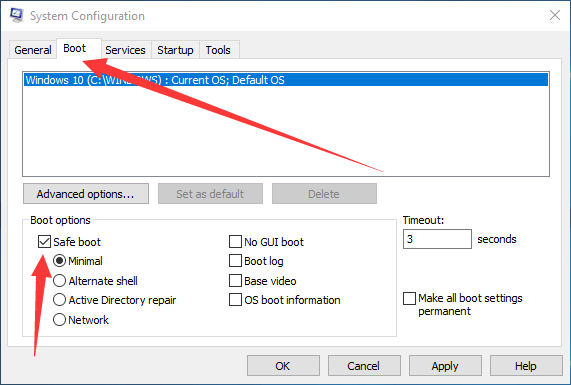
Step 3. Click "Boot" tab and select the "Safe boot" option. Then click "Apply" and "OK".
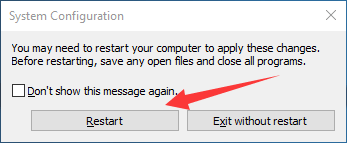
Step 4. Click "Restart" button to restart computer. Before clicking the button, please save any open and unsaved files.
Fix #2: Run System File Checker tool (SFC.exe)
SFC is one of the free utilities built in Windows, and it can inspect system files such as Windows DLL files to see if they are corrupted. Then it will replace corrupted system files with good ones to get rid of system problems.
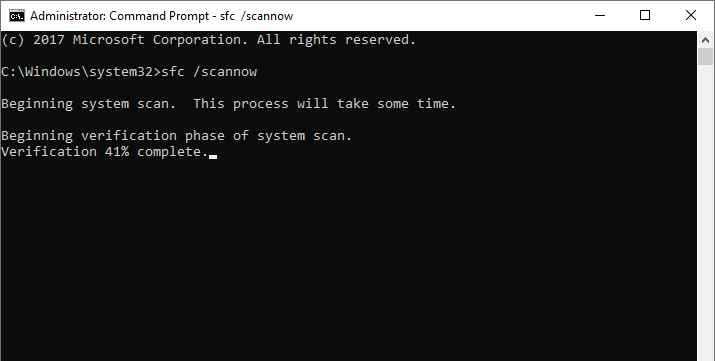
Step 1. Type cmd in searching box to find out Command Prompt. Right-click "Command Prompt" and choose "Run as administrator".
Step 2. Type sfc /scannow and hit Enter key.
The command you input here will check the integrity of important system files, and the process usually takes a while to finish. It's worth the wait, as it can fix many system errors.
If steps above do not work, you may need to run chkdsk, see Fix #3.
Fix #3: Run CHKDSK command
When Windows scanning and repairing process fails to repair the drive, you can try chkdsk commands to fix errors for the drive. There are two ways of running chkdsk utility, one is using Command Prompt, and the other is performed in File Explorer.
Way 1: Run chkdsk in Command Prompt
Step 1. Launch Command Prompt as administrator.
Step 2. Type chkdsk /f C: and hit Enter key.
Step 3. Type Y and hit Enter key when you see the message "Chkdsk cannot run because the volume is use by another process. Would you like to schedule this volume to be checked the next time the system restart?"
Step 4. Restart computer, and the chkdsk will start before Windows is loaded.
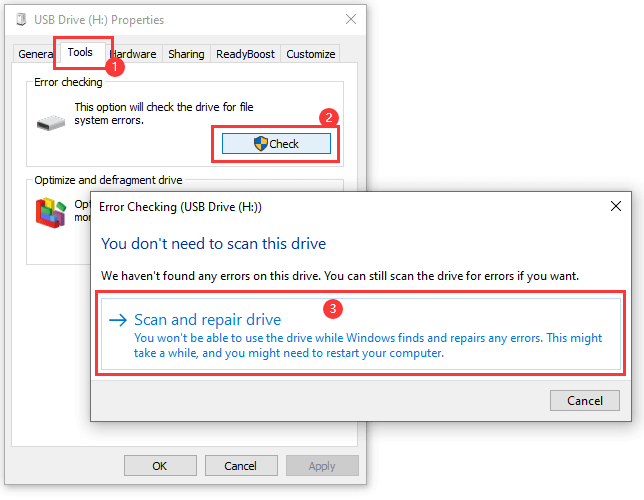
Way 2: Run disk checking in Windows File Explorer
Step 1. Double-click This PC to open File Explorer.
Step 2. Right-click the drive that cannot be repaired by Windows and choose "Properties" option.
Step 3. Click Tools > Check > Scan and repair drive.
Fix #4: Check and repair bad sectors for the drive using DiskGenius Free Edition
One of the possible causes that Windows asks to scan and fix the drive is that there are bad sectors on the drive. So, it is necessary to check and verify health condition of the disk in order to fix the problem. Since Windows built-in utilities cannot repair the error automatically, you may need to try a third-party tool to check the disk. Now, we'll show you how to check and repair bad sectors with a free partition manager tool – DiskGenius Free Edition.
Step 1. Install and launch DiskGenius Free Edition, and you can see the damaged drive in the software.
Note: Do not install and run the software on the disk to be checked.
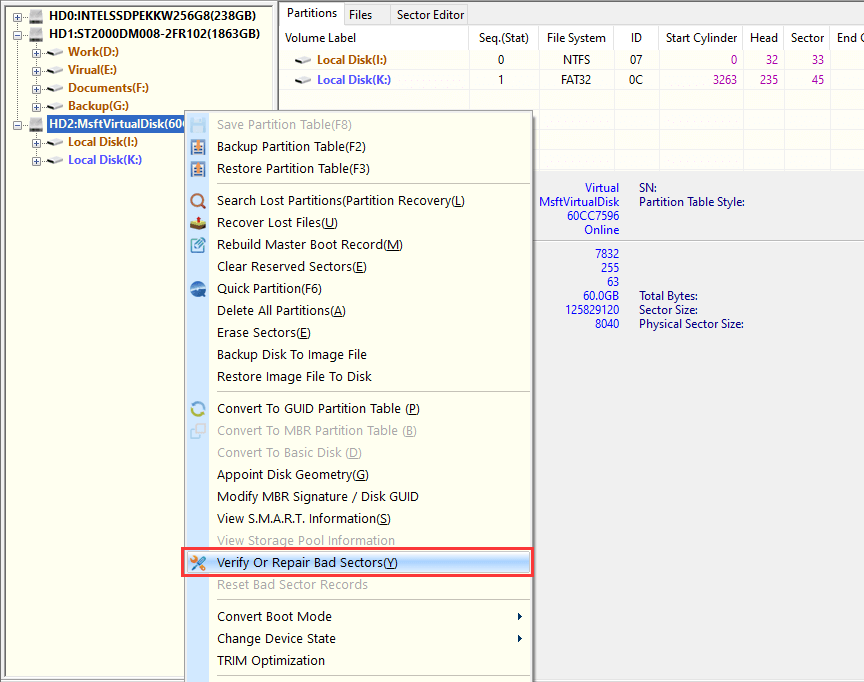
Step 2. Right-click the drive you want to fix and choose "Verify Or Repair Bad Sectors" from the context menu.
Step 3. Click "Start Verify" button to start the verifying process.
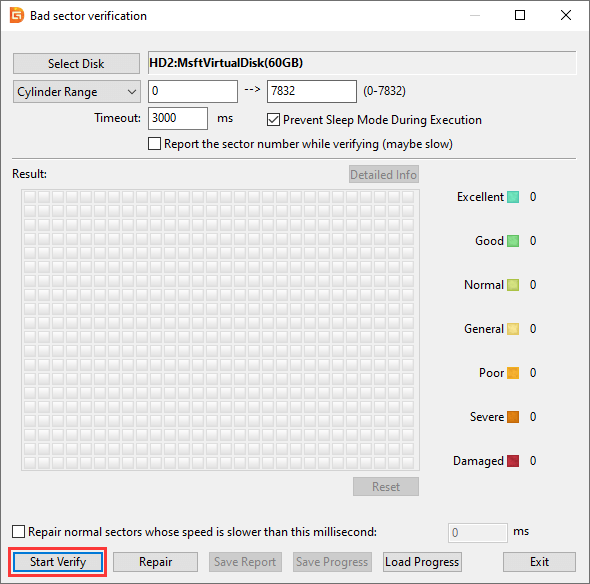
Step 4. Wait for the scanning to finish.
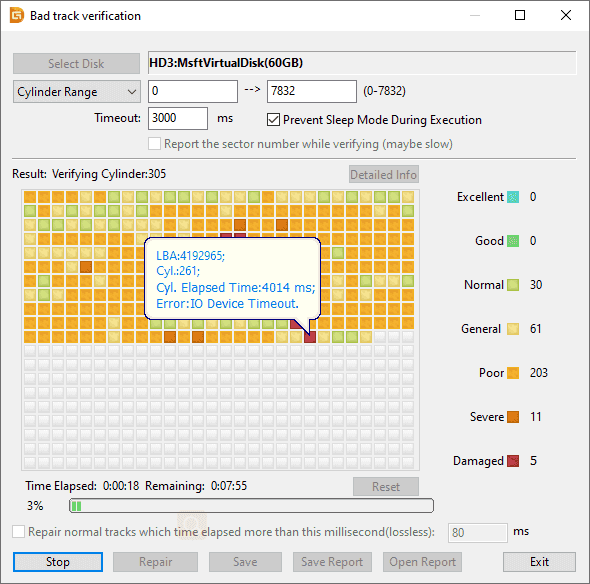
Do not access the drive being scanning before the software finishes checking bad sectors, because extra accessing the drive may lead to inaccurate results.
The color-coded alert system is used in the software: red (Damaged) indicates bad sectors, orange (Severe) means the block is likely to get damaged sometime in the future, soft orange (Poor) stands for the block is not broken but has slower read speed than other blocks.
Step 5. Click "OK" when bad sector checking is done.
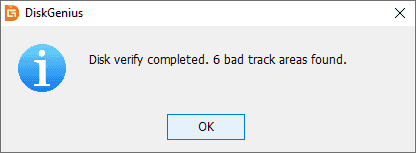
Step 6. Click "Repair" button if you want to try repairing bad sectors.
Read notices given by the software and continue with care. Be sure to create backups before repairing bad sectors.
Fix #5: Check the drive status
Step 1. Type "control panel" in the searching box which is next to the Start menu. The click "Control Panel" from the searching result.
Step 2. Go to Security and Maintenance > Maintenance > Drive status. Then you can see issues here and a link that you can click to repair the drive.
Fix #6: Defragment the drive
If the drive you want to fix is an SSD, this method is not recommended. Because the defragment process might reduce the lifespan of your SSD.
Step 1: Type defragment in the searching box and click "Defragment and Optimize Drives".
Step 2: Select the drive you want to repair and click "Optimize" button. Then let Windows to finish the optimization process.
Step 3: Restart computer and check if the scanning and repairing error still appears.
Fix #7: Full format the drive
The full format verifies all blocks in the drive and overwrites each sector with zeros. Thus, the full format wipes data permanently and fixes bad sectors at the same time. Also, we can use it to repair drive errors.
Step 1. In Windows File Explorer, right click the damaged drive you want to repair and choose "Format".
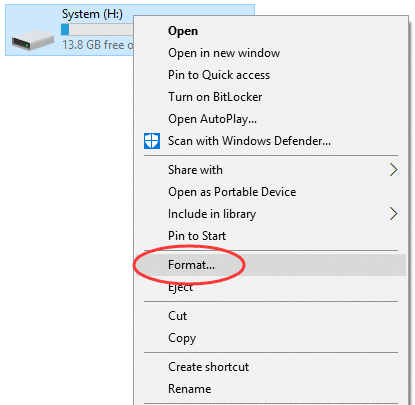
Step 2. Unselect the "Quick Format" option and click "Start".

Step 3. Click "OK" to start the formatting.
Unforeseen problems can appear at any time while using internal hard drive or external storage devices, for example, the drive may get corrupted or damaged, files get lost, etc. What's worse, the drive cannot be scanned or repaired by Windows built-in utilities. Whatever the causes, the first move should be rescuing important files from the drive that you attempt to repair.
When it comes to data recovery software, it is recommended to use DiskGenius Professional Edition. DiskGenius is well known RAW partition recovery software, and it can quickly load lost files with original names and paths from corrupted drive. The entire recovery procedure can be completed with just a few clicks.
Free download and install DiskGenius on your computer and attach the corrupted drive to this computer as well. Then follow steps presented below to recover data from the corrupted drive:
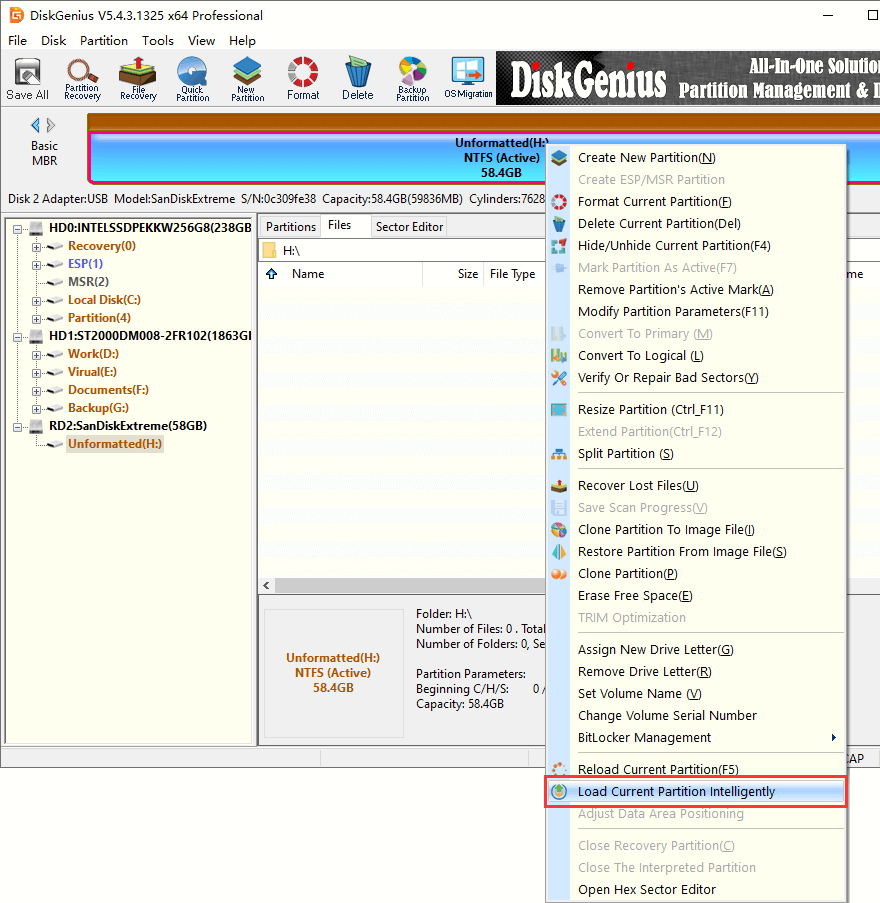
Step 1. Launch the recovery software, right-click the corrupted drive and choose "Load Current Partition Intelligently", as the figure below:
This feature is supposed to list all files and folders inside the corrupted drive with a couple of seconds. In general, some files that had been deleted before the drive got corrupted can also be listed. After this, you can skip to Step 5 and Step 6 to preview lost files and recover them.
If your files cannot be found by this feature, then move to Step 2 and go through rest steps.
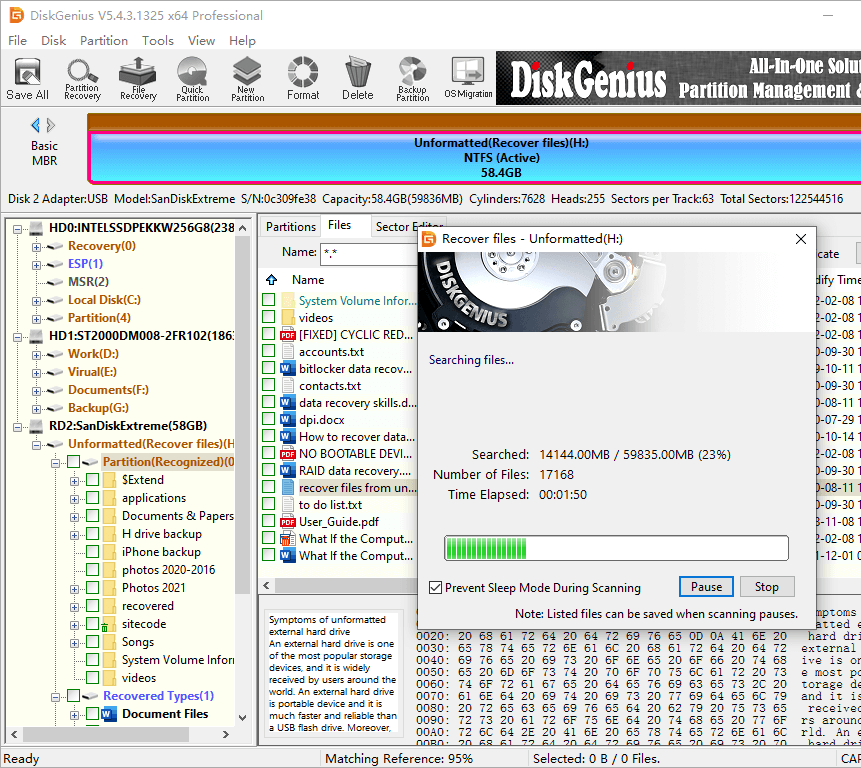
Step 2. Right-click the corrupted drive again and choose "Recover Lost Files" this time. This will open the Recover Files window.

Step 3. Click "Start" button to start the scanning process.

Step 4. Let the software finish scanning on its own.
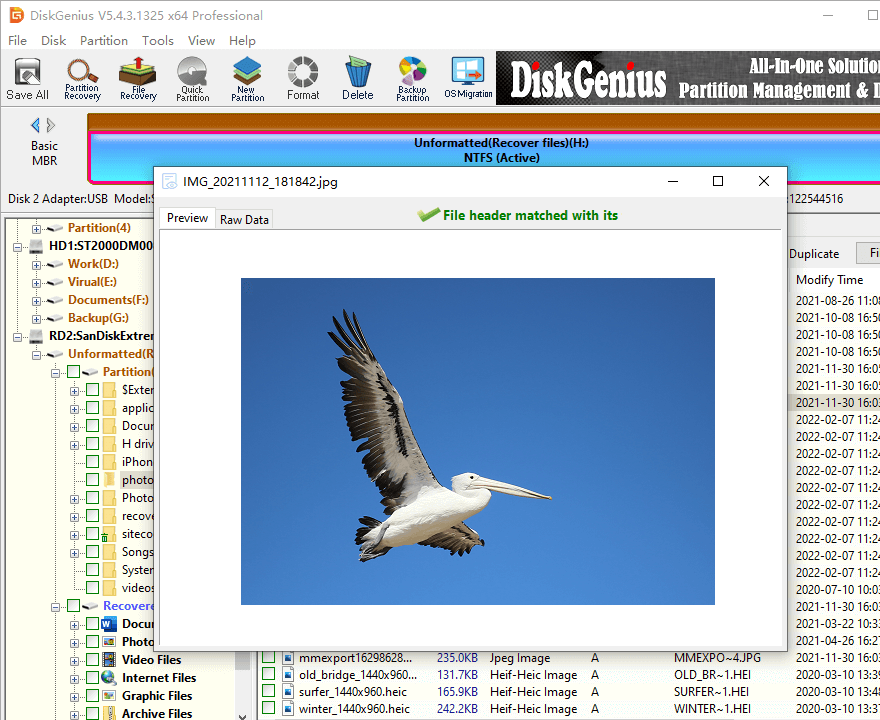
Step 5. View and preview lost files to check if they are still recoverable.
Browse files listed in the software to locate what you want to restore; double click a file to preview content, which can help you make sure if the file is still recoverable.
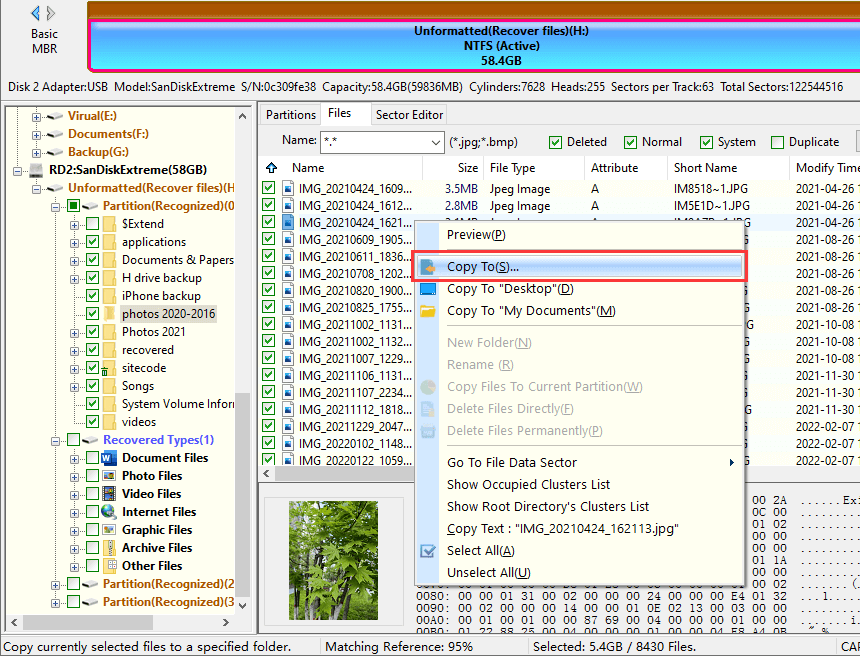
Step 6. Choose files and folders you want to restore, right-click them and choose "Copy To". Then you can appoint a location to output lost files.
1. How do you fix this error there was a problem repairing this drive?
To fix the error "there's a problem with this drive. Scan the drive now and fix it", you need to boot computer into Windows Safe Mode. Then carry out following solutions to fix Windows repair disk error:
2. How do I bypass Windows repair drive?
The message to scan and repair your drive is like to appear when Windows deems that there is something wrong with the hard drive, for example, bad sectors, corrupted system files, etc. You can try fix the issue in Safe Mode using tools like System File Checker and Deployment Image Servicing and Management.
3. Can Windows repair hard drive?
Yes, several utilities built-in Windows can repair corrupted hard drive, for example, disk checking, formatting, diskpart, etc. Repairing hard drive is different from recovering data from hard drive, and the repairing process may cause further damage to hard drive data. Thus, data recovery should be done to avoid data loss.
4. Why does my PC keep saying scanning and repairing drive?
Issues like scanning and repairing drive stuck in Windows 11, Windows 10 and other versions of Windows indicate there might be bad sectors or file system errors on the drive. Such error can be caused by unexpected system shutdown, bad sectors, virus, corrupted files, etc.
5. Why does my PC keep saying restart to repair drive errors?
When your computer asks to restart and repair drive, you should pay attention that if the hard drive is corrupted or damaged. This might be caused by corrupted file system, malware, bad sectors, failed Windows updates, damaged hard disk, bloated Windows registry, and more.
6. How do you fix macOS can't repair the disk?
If the First Aid fails when you use Disk Utility to repair disk on Mac, you are likely to get an error message saying that Disk Utility stopped repairing Macintosh HD. To solve the error, you can try following methods:
Method 1: Use First Aid to repair the drive once again.
Method 2: Try FSCK command.
Method 3: Enter macOS recovery mode to repaid disk.
Method 4: Recover files and then format the drive.
7. How do I fix a corrupted flash drive?
If you are using Windows 11/10/8/7, you can try following steps to fix corrupted UBS drive. Please note that these steps cannot retrieve files from the corrupted flash drive, so, try these steps with care.
Step 1. In Windows File Explorer, right click the corrupted flash drive and choose "Properties".
Step 2. Click "Tools" tab and then click "Check" button.
Step 3. Click "Scan Drive" and let the checking and scanning process to complete.
8. Can a corrupted hard disk be repaired?
Yes, a corrupted hard drive can be repaired in many situations, and there are a couple of ways you can try to repair a corrupted hard disk or external hard disk, for example:
Solution 1: Run chkdsk command to repair errors in the drive.
Solution 2: Use DiskGenius to check and repair bad sectors.
Solution 3: Format the hard drive to NTFS or FAT32.
9. How much does it cost it fix a corrupted hard drive?
When it comes to how much repairing a hard drive cost, you should figure out the physical condition of the hard drive first. For logical damages, you can try formatting to get it repaired. Before formatting, hard drive data recovery might be performed. As to physical damages, you may need to replace the hard drive with a new one. The cost is the price of a new hard disk.
There is a number of solutions when Windows was unable to repair the drive, and lost files can be recovered from corrupted hard disks or removable disks using data recovery software in Windows 11, Windows 10, Windows 8, Windows 7, and Windows Servers. Finally, if you have any questions or need help about repairing corrupted drive and data recovery, contact our technical team via email please.
Related pages:
DiskGenius - Professional data recovery software that can retrieve data from corrupted/RAW drive, undelete files, unformat hard drive, uncprrupte SD card, restore lost partitions, and more.
DiskGenius is a one-stop solution to recover lost data, manage partitions, and back up data in Windows.
Download Facebook
 YouTube
 X
X