This feature is designed to create a sector-by-sector copy of disk, partition or a defined number of sectors. It copies specified sectors no matter they are used or not on selected disk, even though the sector does not contain any data or gets damaged. Thus, you can get a copy or image that is identical to original disk or partition. Both source and destination can be a partition, disk or file.
Step 1. In DiskGenius, click Tools and choose Copy Sectors.
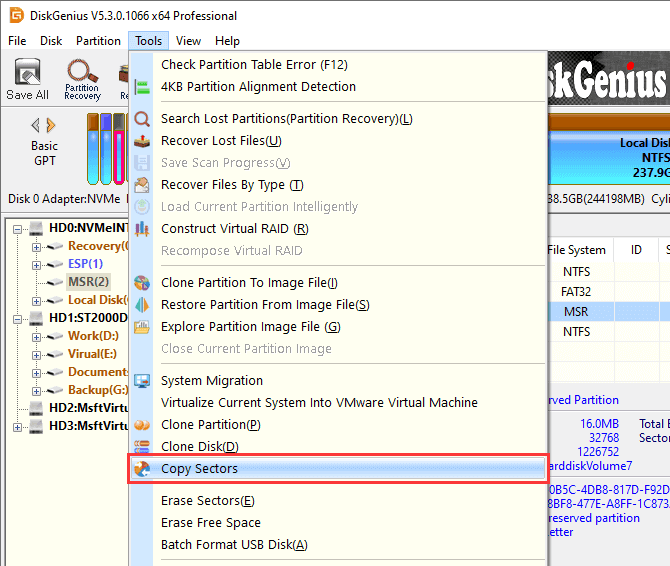
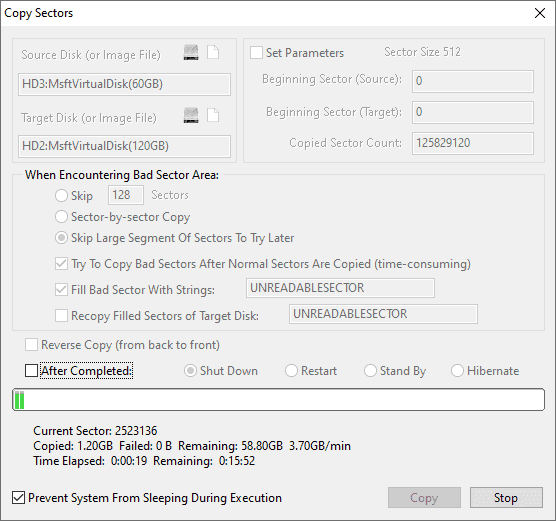
The copy sectors window shows up:

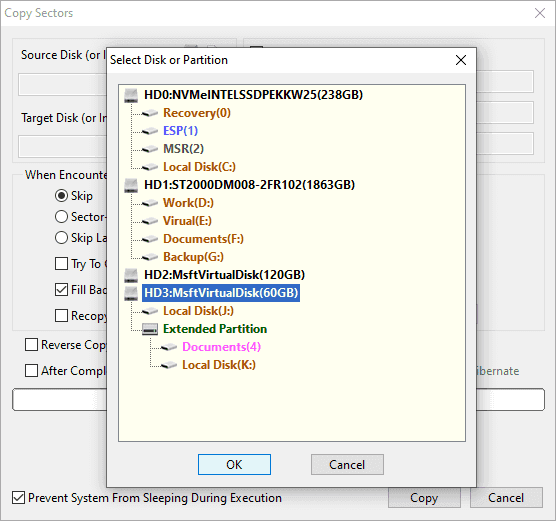
Step 2. Select source and destination disk (or image file).
You can click the disk icon to select a disk (partition) or click the file icon to select a file.
Step 3. Configure settings for the sector copy process.
A couple of options are provided to help you control the copy process when bad sectors are encountered on the source drive, and you can configure this based on actual condition of the drive to be copied.
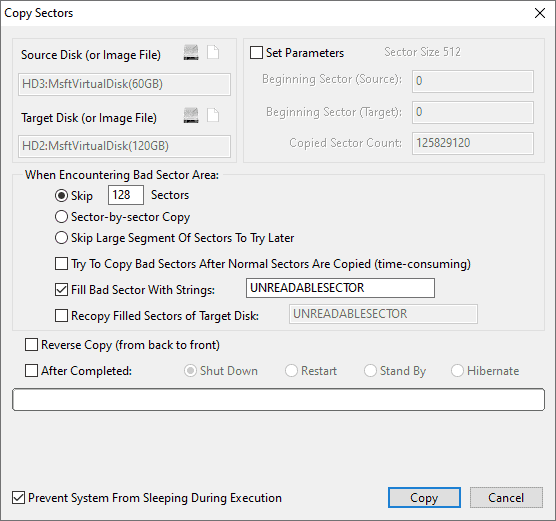
1. When encountering bad sector area
Skip a defined number of sectors (128 by default): When the process fails to read a certain buffer, it changes to read 128 sectors at a time. If that fails again, it turns to read sectors one by one. When a bad sector is encountered, it skips the specified number of continuous sectors and writes zeros (or fills with defined strings) to these sectors' counterpart on target disk. Then it continues to read 128 sectors at a time until finish reading the entire buffer.
Sector-by-sector copy: When the process fails to read a certain buffer, it changes to read 128 sectors at a time. If that fails again, it turns to read sectors one by one. When a bad sector is encountered, it does not skip it. Instead, it writes zeros (or fills with defined strings) to the bad sector's counterpart on target disk and continues to read remaining sector of the 128 sectors one after another. After that, it reverts to reading 128 sectors each time until finishing reading the entire buffer.
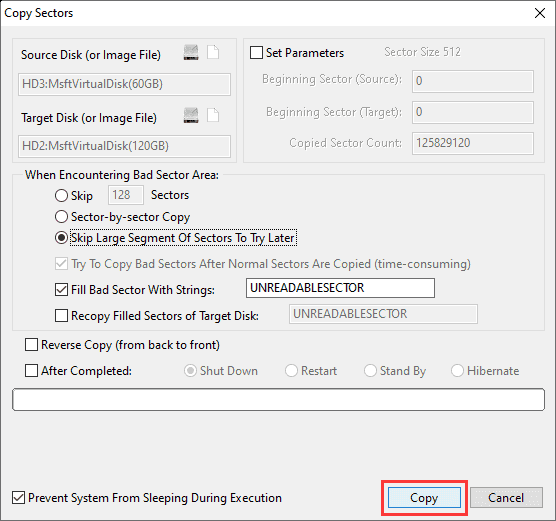
Skip large segment of sectors to try later: When the process fails to read a buffer, it writes zeros (or fills with defined strings) the entire buffer and skips a large segment of sectors (around 10%-15% of the entire range to be copied). Those skipped sectors will be copied again after all segments are copied (skipped).
Try to copy bad sectors after normal sectors are copied (time-consuming): If this option is selected, the program will recopy every previously skipped segment of bad sector after normal sectors are copied. When recopying skipped sector segments, the program attempts to copy 128 or 8 sectors at a time according to the size of sector segments. If the attempt fails, it will read sectors one by one. It automatically switches to read the rear end of the segment when reading the beginning part fails, and it will try next segment until all sectors of this segment have been successfully copied or confirmed to be failed. This option will be disabled (greyed out) when you choose "Sector-by-sector Copy"; and this option must be selected when you choose "Skip Large Segment Of Sectors To Try Later".
Fill bad sectors with strings: This option is used to specify strings to fill bad sectors. When bad sectors are encountered, the corresponding sectors on destination disk will be filled with specified strings. If you do not select this option, the corresponding sectors on destination disk will remain unchanged (do not copy failed sectors) when bad sectors are encountered on the source disk. It is recommended to check this option when copying sectors for the first time, so that you can recopy those filled sectors.
Recopy filled sectors of target disk: Before starting copying process, the program reads and analyzes sector data on target disk, adding sectors filled with specified strings to the sector list to be copied and filtering out unfilled sectors. When analysis gets completed, it copies sectors in the list only. With this option selected, those skipping options will be disabled and the option "Try To Copy Bad Sectors After Normal Sectors Are Copied (time-consuming)" will be automatically selected.
2. Reverse copy (from back to front)
The program copies sectors of a disk in reverse direction, backward from the end of the source disk. When bad sectors are encountered, it skips defined number of sectors from back to front.
3. After completed
With this option, you can preset what to do after the copy process completes, including, shut down, restart, stand by and hibernate.
Step 4. Click Copy button to start copying sectors and wait for the process to complete.
The sector copy process will damage and overwrite files on target disk, please make sure there is not important data on target disk. Click Yes to continue.

When copying sectors between different disks, dual threads are used to speed up the process; while if sectors are copied on the same disk, it turns to simple thread so as to reduce frequency of head seek and make full use of read and write performance.
The progress is clearly displayed on the lower part of the dialog box, including overall progress bar, current sector being copied, the amount of data has been copied, remaining data, speed, time elapsed, remaining time, etc.
Other features
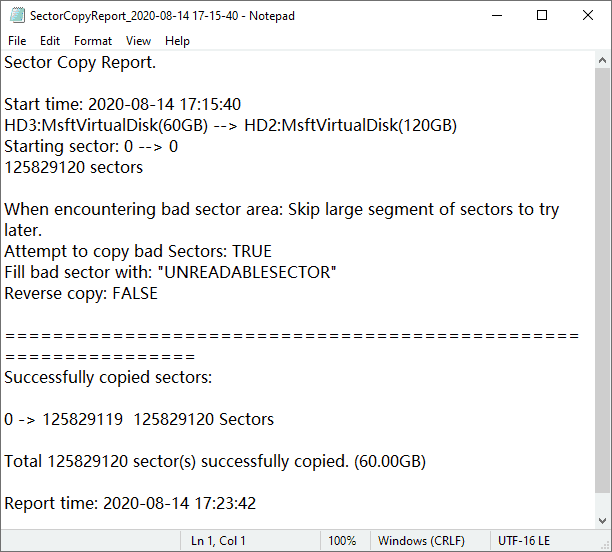
1. Copy report: During the copying process, a copy report (a text file and the file name contains the starting time) is automatically saved to the folder where the software is installed, and the report gets updated every two minutes. The report covers information like source and target disk, copy parameters, sector list to be copied, the list of successfully copied sectors, the amount of data that was successfully and unsuccessfully copied, starting and ending time, etc. The report will be opened automatically after sector copy process completes.
2. If you want to power on the source disk again which is offline or has been stuck for a long time, you can click Stop button. Then you can reconnect the disk after the copying process stops. Once the disk is recognized by the software, you can click Continue button to resume the copy process.

In addition, the software will automatically stop the copy process when detecting the source disk is offline and prompt to power on the source disk.

3. After the process gets completed (not interrupted), the dialog box won't close and the option "Recopy Filled Sectors of Target Disk" will be selected if there are bad sectors that are still failed to copy and strings that have been specified to fill bad sectors. At this point, you can click Continue button to try to copy those bad sectors again.
4. A file recording copy progress is automatically stored to the software directory after copy process gets completed or interrupted. With this file, previous settings will be automatically loaded when you open Copy Sector window next time. If the Copy button turns into Continue button, which means you can resume the last unfinished progress.
If the last copy got interrupted, after loading progress, you can click Continue button to continue copying sectors.
If the last copy is completed but there are sectors failed to copy, the option "Try To Copy Bad Sectors After Normal Sectors Are Copied (time consuming)" will be automatically selected after loading progress. Then the process will try to copy those failed sectors again.
After loading progress, the software will ask whether to follow new settings if options on the dialog box get changed.


