Position: How Tos - Partition Management - Create and Manage Parallels Virtual Disk File (*.hdd) in Windows 10
DiskGenius - A free tool to create and operate VMDK, VDI, VHD, HDD virtual disk file in Windows 10/8/7.
ô Free DownloadTable of Contents
When it comes to running Windows on a Mac device, the most commonly used options are dual-boot and virtualization. Boot Camp is included in Mac free, and it enables users to install Windows and choose which OS to boot from on startup. If you feel bothered to run Windows via rebooting each time, then choose virtualization. Parallels Desktop is one of the popular software that allows users to run Windows and other operating systems on Mac. It is very easy to use even for ordinary users.
Parallels Desktop is Mac-only, namely, it does not have version that can run on Windows or Linux machines. As of press time, Parallels Desktop for Mac with Apple M1 chip (Apple Silicon), called Technical Preview Program, is available, and users who are interested in the new version can get one from Parallels website. Currently, there are some limitations on the Parallels Desktop 16 for M1 Mac Technical Preview, e.g. installing or starting an Intel x86-based OS is not supported, suspending and resuming a VM is not available, ARM32 programs do not work, etc.
Virtual disks created by Parallels Desktop is in the .hdd format, and such virtual disk is also supported by DiskGenius. This means you can create a virtual disk for Parallels as well as access such virtual disks using DiskGenius on a Windows 10 computer. The .hdd virtual disk file create by DiskGenius can also be loaded and used by Parallels on Mac. DiskGenius is able to load and access virtual disks like VMDK, VHD, VHDX, VDI and HDD without launching virtual machine, such as read/write files, manage partitions, recover lost data, clone virtual disk, convert virtual disk format (e.g. convert VMDK to VHD), backup partition, etc.
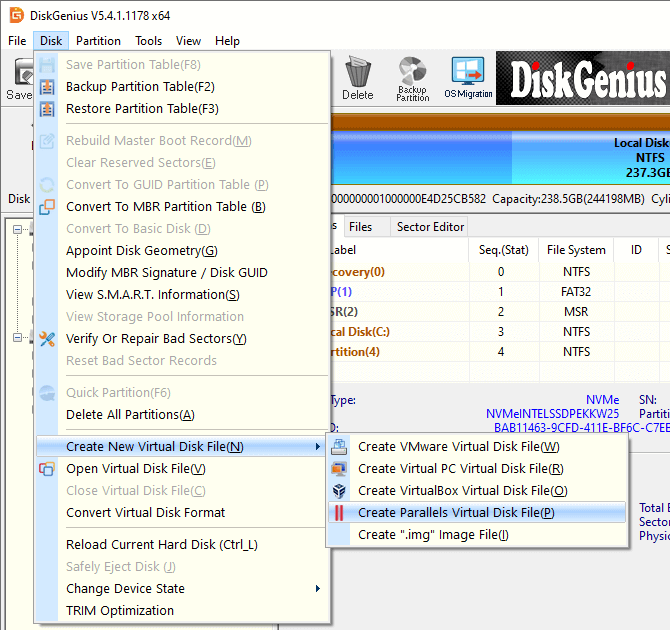
Step 1. Free download and install DiskGenius Free edition on your Windows 10 computer. Then run DiskGenius and click Disk > Create New Virtual Disk File > Create Parallels Virtual Disk File, as the figure below.
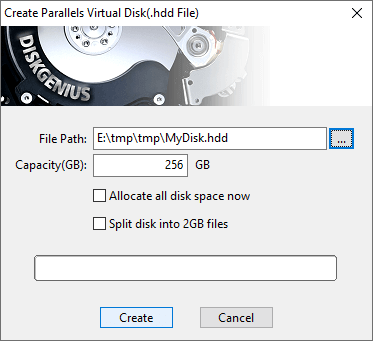
Step 2. On the "Create Parallels Virtual Disk (.hdd File)" dialog box, you can set a location, name and capacity to the virtual disk to be created and click Create button. Besides, you can also set whether to allocate all disk space now and split the disk into 2GB disks. All these settings are consistent with settings in Parallels.
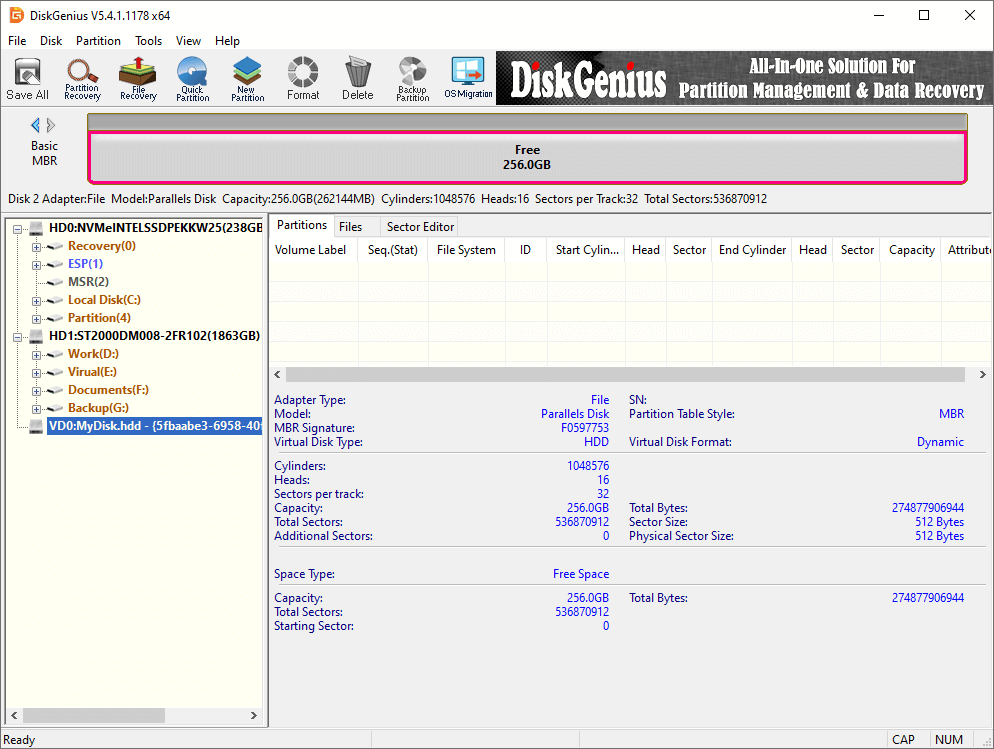
Once the virtual disk is created, it will be loaded in DiskGenius automatically. The newly created virtual disk is not partitioned and it includes only unallocated disk space. At this point you can partition the disk into one or more partitions, and then write data to it. In short, the virtual disk can be accessed as an average hard drive.
The virtual disk file created by DiskGenius can be added to Parallels as the second disk, and let's take a look at how to do that.
Step 1. Copy the virtual disk just created by DiskGenius to your Mac machine.
Note: when creating the .hdd virtual disk file, DiskGenius generates three files to the specified location, see the picture below. And you need to copy all of them to your Mac where Parallels Desktop is installed, otherwise the virtual disk cannot be loaded properly.

Step 2. Start Parallels Desktop and do not run your virtual machine. Then open the VM's Configuration > click Hardware tab > click the "+" sign > select Hard Disk from the list.
Step 3. Choose Type: Existing image file from the displayed menu, and then select Location to browse your Mac and find out the virtual disk to be added.
Step 4. When the virtual disk file is found, select it and click Open and then OK. After this, the virtual disk file created by DiskGenius will be added to Parallels automatically.
With the help of DiskGenius, you can access the .hdd virtual disk file as well as recover lost data from it in Windows 10. Once the virtual disk file is opened in DiskGenius, you will be able to operate it like a common hard drive, which means most functions provided by DiskGenius works on it. In the following section, we'll give 3 examples to show how to manage the .hdd virtual disk file and recover data using DiskGenius in Windows 10.
Step 1. Start DiskGenius and open the virtual disk file: Click Disk menu > select Open Virtual Disk File > browse your computer to select the virtual disk file > click Open.
Step 2. Select the virtual disk you want to partition and click Quick Partition button from toolbar. Then on the appeared windows, choose partition table type, partition number, size, etc.
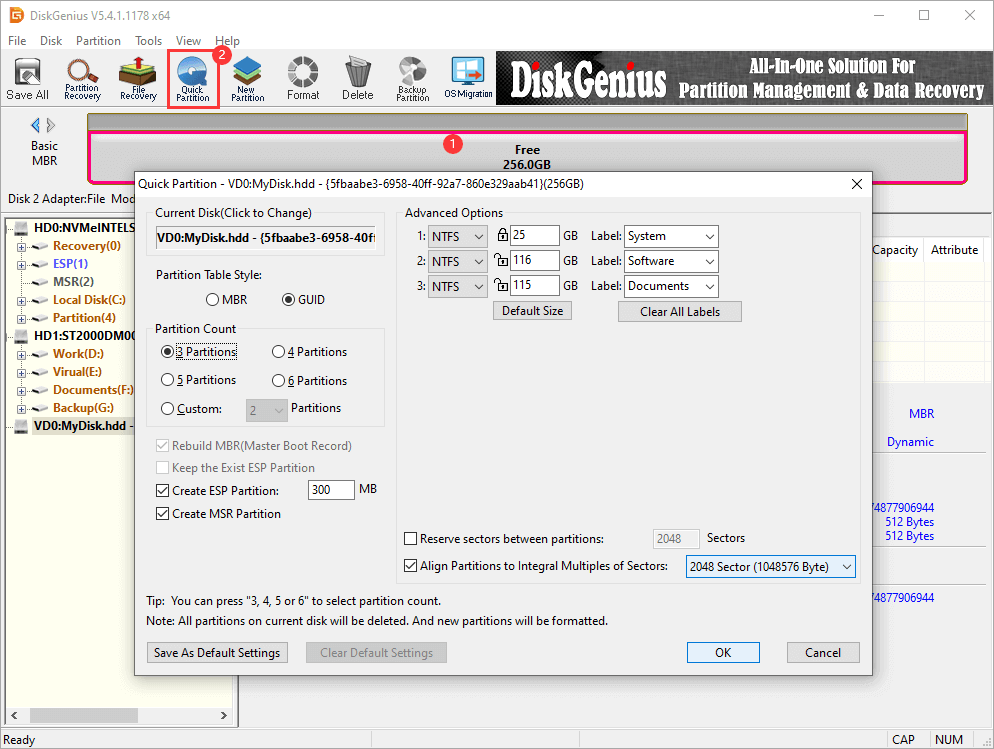
Step 3. Click OK button and DiskGenius starts to create partitions on the disk.
DiskGenius supports to read and write data to virtual disks provided that the partition is formatted to NTFS, FAT32, exFAT, FAT12, FAT16, EXT4, EXT3 or EXT2 file system. Writing data to partitions of virtual disk file is available for DiskGenius Professional Edition. Here is how to write data to virtual disk:
Step 1. Select the partition you want to write data on the loaded virtual disk and click Files tab.
Step 2. Browse your computer and select files/folders you want to write into the virtual disk, then drag them to DiskGenius.
"I am trying to read files of a .hdd file on Mac. However, when I tried choosing Parallels, it does not work. The operating system Windows 10 of the virtual machine now won't boot. Should I move the disk to somewhere else? The virtual machines includes lots of files that are important to me. I'm not sure how to retrieve files from it"
As aforementioned, DiskGenius can open virtual disk files (VMDK, VDI, VHD, VHDX and HDD) without running the virtual machine. Hence, you can perform data recovery from .hdd virtual disk using DiskGenius on a Windows computer.
Step 1. Open virtual disk file in DiskGenius.
1. Copy virtual disk files of Parallels to a computer PC.
2. Start DiskGenius and open the virtual disk file: Click Disk menu > select Open Virtual Disk File > browse your computer to select the virtual disk file > click Open.
Step 2. Search for lost data.
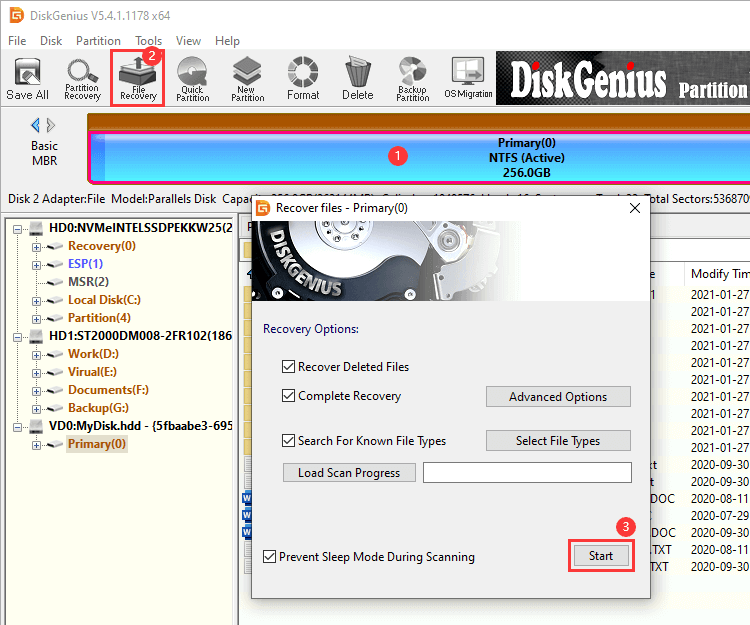
Select the partition where lost files are located > click File Recovery button > click Start button. Then DiskGenius starts to scan the selected partition and looks into if any recoverable files can be found.
Step 3. Preview files.
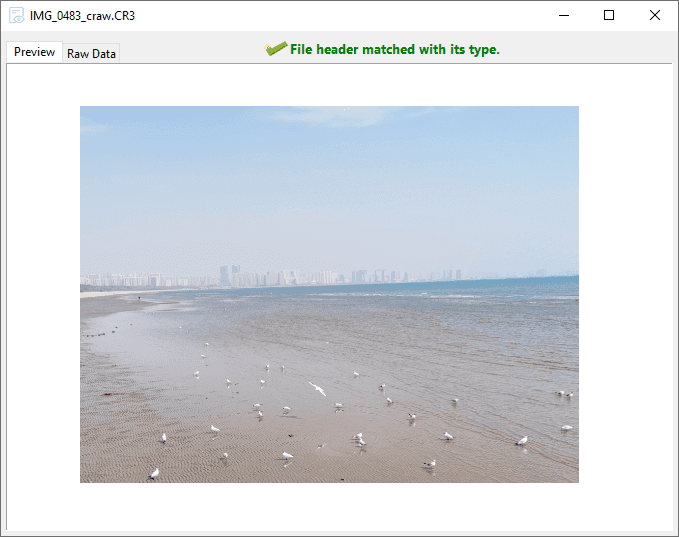
After scanning finishes, you can view listed files to examine if desired files have been found. Moreover, you can also double click a file each time to open the preview window and see file content in the original size. Previewing files helps to check if lost files are corrupted before final recovery.
Step 4. Copy files.
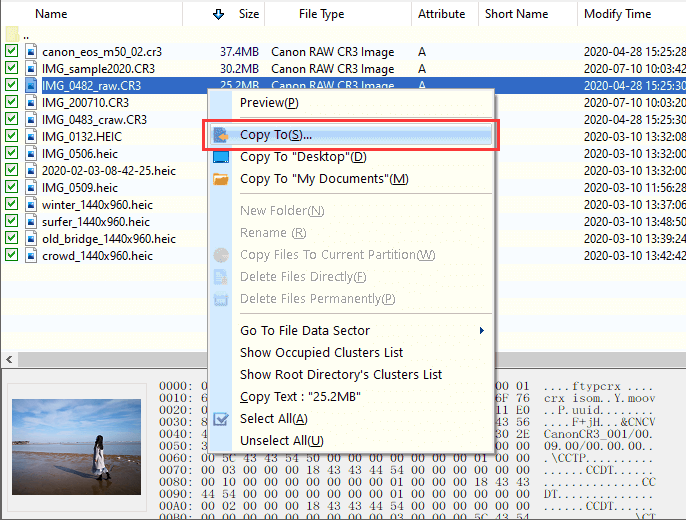
If you are satisfied with the scanning result after preview files, you can purchase a license code to get DiskGenius registered. After that, you can copy lost files to another drive and finish the recovery task.
1. How to run Windows on Mac?
There are two ways you can try to run Windows on Mac: dual boot and virtual machine. Mac's Boot Camp makes it possible to install both Windows and Mac OS, and you can dual-boot your Mac Easily. In addition, you can also run Windows in a virtual machine, such as Parallels Desktop, VMware Fusion and Virtual Box.
2. How to install Windows 10 on Parallels 16?
It is easy to install Windows 10 in Parallels Desktop 16 on your Mac. You can choose "New…" in the File menu and then click "Get Windows 10 from Microsoft" button; then you can choose a Windows 10 edition and buy a license key (or click Continue button if you already have one). Once you get the Windows 10 installation iso file, you can follow the installation assistance to finish installing Windows 10.
3. Do I need to buy Windows 10 with Parallels Desktop?
Yes. Parallels Desktop for Mac does not include Microsoft Windows, which means users need to manually install Windows 10 in Parallels Desktop and purchase license code for Windows10, otherwise some features will be disabled. You can place an order on Microsoft Online Store and get a license key.
4. Does Parallels make Mac slower?
No. Parallels Desktop will not make your Mac slower unless there is unsupported hardware on your Mac, lack of hardware resources or there is an incorrect resource allocation to the VM.
5. Is Parallels Free for Mac?
No. Parallels is not freeware and it is a subscription-only product. Users have to pay 79.99USD every year for the Home & Student Version, or 99.99USD for Prop Edition.
6. Does Parallels run on m1 Mac?
For the moment, Parallels has released a Technical Preview Program which can run on the new Mac device with the Apple M1 chip. According to the developer, the new version switched Parallels Desktop to universal binary and optimized the virtualization code. If you are interested in the Proview Program, you can free download it from its official site.
Virtual disks created by Parallels Desktop are in the .hdd format which is also supported by DiskGenius. With DiskGenius, you can easily create, access and recover data from ".hdd" ".vmdk" ".vdi" ".vhd" virtual disks in Windows 10/8/7. It's important to note that some function requires DiskGenius Professional Edition. For more information, feel free to contact support team please.
DiskGenius - Recover lost data from VMDK, VDI, VHD, HDD virtual disk without running VM in Windows 10.
ô Free Download